


How to Set Up and Configure Captive Portal on the TP-Link TL-WA1201
Captive Portal allows you to design a portal page for network access verification. Customers are directed to view an advertisement or accept set terms before being granted internet access. This makes captive portal setup a useful option for small businesses managing guest Wi-Fi access. Note that Captive Portal is only available when the TL-WA1201 is operating in Access Point mode or Multi-SSID mode.
Key Takeaways
- Captive Portal is available only when the TL-WA1201 is in Access Point or Multi-SSID mode.
- Two authentication types are supported: Simple Password (requires a password to connect) and No Authentication (allows open access without a password).
- An optional redirect URL can be set to send newly connected clients to a specific website after authentication.
- The authentication login page can be customized using the "Click to Edit" option in the portal settings.
- Authentication Timeout controls how long a client stays connected before needing to re-authenticate.
Steps to Set Up Captive Portal on TP-Link Access Point
Step 1. Connect your computer to the access point’s network.
Step 2. Visit http://tplinkap.net, and log in with the password you set for the access point.
If you have trouble logging in to the management page, see why you can't log in to the web management utility of a TP-Link device.
Step 3. Go to Wireless > Portal.
Step 4. Enable Portal.
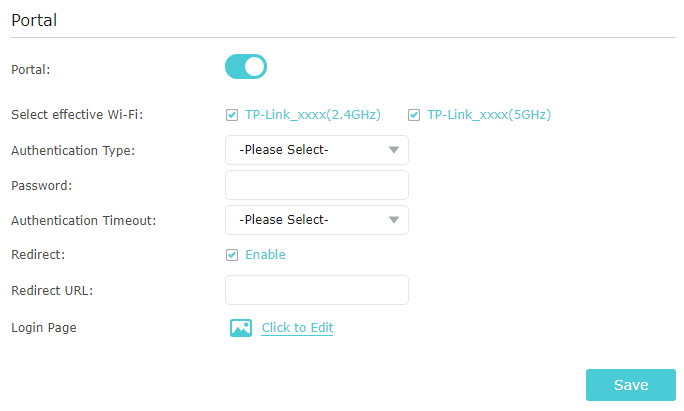
Step 5. Select the effective Wi-Fi network for portal authentication.
Step 6. Set the Authentication Type to Simple Password and set a password for clients, or select No Authentication to allow clients to access the network without a password
Step 7. Select a time for the Authentication Timeout. A client has to reconnect to the network when its authentication times out.
Step 8. (Optional) Enable Redirect and enter your desired website. Newly connected clients will be redirected to the specified website.
Step 9. (Optional) Click Click to Edit to customize the authentication login page.
Note: TL-WA1201 V3.0 does not support image uploads.
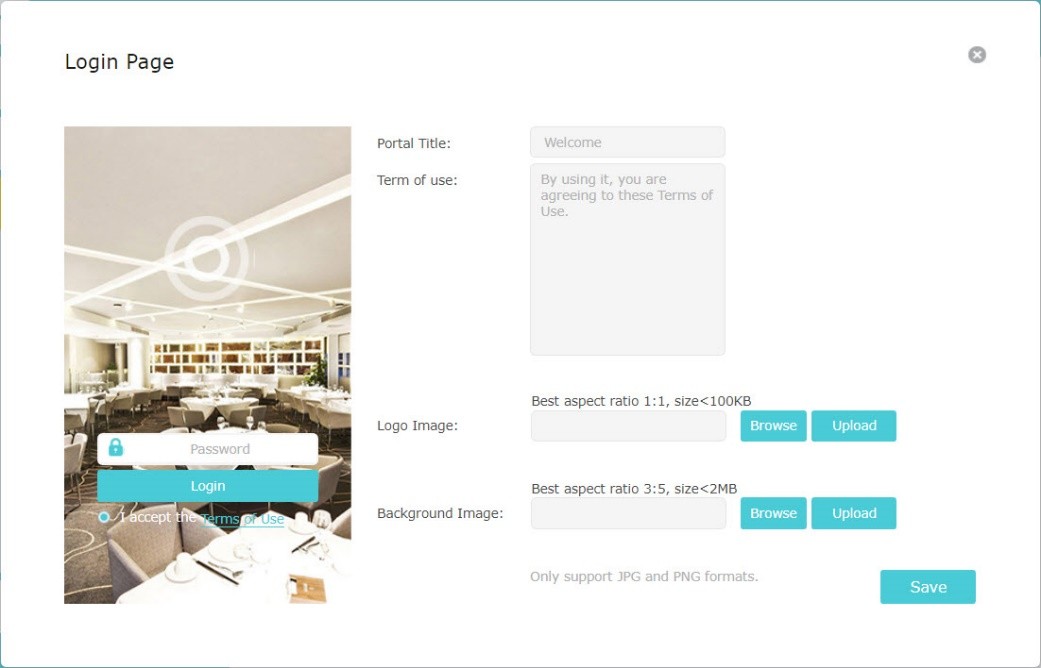
Step 10. Save your settings.
Looking For More
¿Es útil esta pregunta frecuente?
Sus comentarios nos ayudan a mejorar este sitio.

TP-Link Community
Still need help? Search for answers, ask questions, and get help from TP-Link experts and other users around the world.