


How to Configure One-Key Disarming via Alarm Input on VIGI NVR
Contents
Connect the External Alarm In Device
Configuration One-key Disarming via the NVR GUI
Introduction
One-Key Disarming on VIGI NVR allows users to quickly switch the NVR between Arm and Disarm modes using an external alarm input device connected to the Alarm Imput AI1 port. This feature helps users temporarily disable selected alarm responses when needed, such as during authorized access, while keeping the security system ready to return to normal monitoring.
By connecting an external alarm button, switch, or dry-contact device to the VIGI NVR Alarm Input AI1 interface, users can trigger the configured One-Key Disarming action. The NVR will then change its defense status and control the selected alarm linkage actions, such as buzzer, screen prompt, push notifications, alarm output, and sound and light alarm linkage.
This article explains how to connect an external alarm input device and configure One-Key Disarming via Alarm Input AI1 on VIGI NVR through the NVR GUI.
Requirements
- VIGI NVR that supports One-Key Disarming
|
Model |
Hardware Version |
Minimum Firmware Version |
|
VIGI NVR2008H-8MP(UN) |
2.0 |
1.7.0 Build 260603 Rel.15327n |
|
VIGI NVR2016H-16MP(UN) |
2.0 |
1.7.0 Build 260603 Rel.15327n |
|
VIGI NVR2016H-16P(UN) |
2.0 |
Upcoming firmware release |
|
VIGI NVR2016H (UN) |
2.0 |
Upcoming firmware release |
- External alarm in device
- Monitor, mouse, and HDMI cable for NVR GUI configuration
Configuration
Configuration of One-Key Disarming is supported through both the NVR GUI and Web Interface. This article uses the NVR GUI as an example.
Connect the External Alarm in Device
Step 1. Insert the included terminal block into the corresponding alarm interface on the VIGI NVR. The VIGI NVR2016H-16MP is used as an example in this article.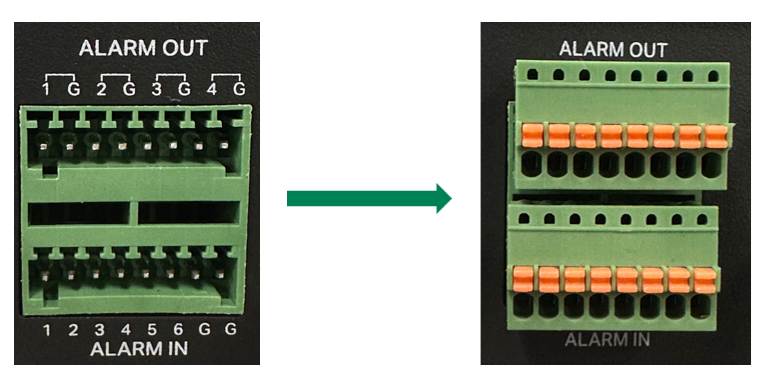
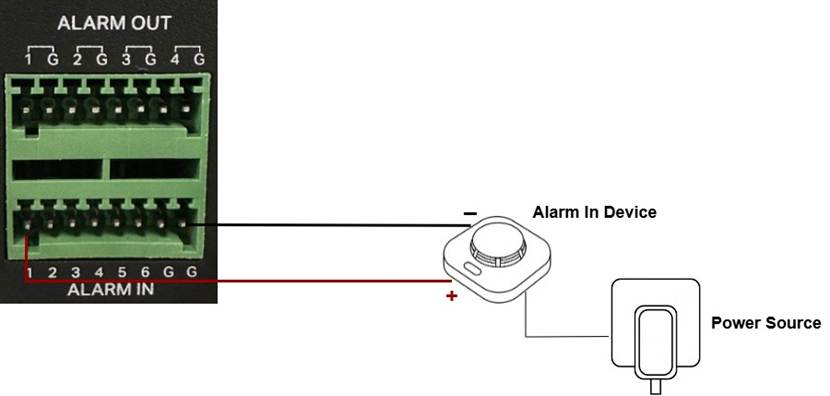
Step 2. Connect the external alarm button, switch, or alarm input device to the Alarm Input AI1 port of the NVR.
Connect the external alarm in device between port 1 and G of the NVR’s Alarm Input interface.
The wiring method depends on the type of external device:
|
Device Type |
Wiring Method |
|
Powered alarm input device, such as a sensor |
Connect the positive terminal (COM port, +) of the device to Alarm Input AI1 of the NVR, and connect the negative terminal (NO/NC port, -) to the G terminal of the Alarm Input interface. If the device requires external power, connect it to an external power source as shown below. |
|
Alarm button/switch or dry-contact device |
Connect the two terminals of the external alarm button/switch directly between Alarm Input AI1 and the G terminal of the Alarm Input interface. No external power source is required. |
Note:
1. For Alarm Input wiring, use the G terminal in the Alarm Input (ALARM IN) section. Do not connect the device to the G terminal of the Alarm Output (ALARM OUT) connector.
2. Normally Open (NO) means that under normal conditions, the circuit is open. When the alarm is triggered, the circuit closes and the NVR receives the alarm input signal.
3. Normally Closed (NC) means that under normal conditions, the circuit is closed. When the circuit is opened due to an alarm trigger or circuit fault, the NVR receives the alarm input signal.
Configuration One-key Disarming via the NVR GUI
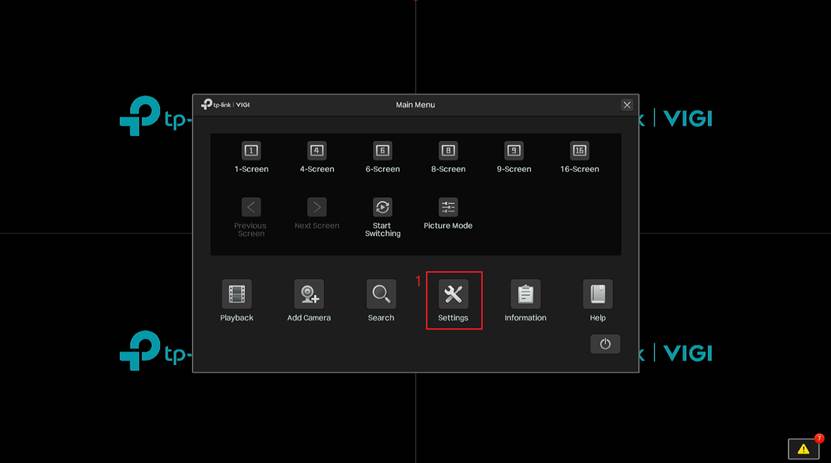
Step 1. Right click on the Live View screen and click Settings in the Main Menu.
Step 2. Navigate to Event > Alarm Device > Alarm Input and turn on Enable Status for AI1. Then click the configuration button in the Action column for AI1. In the Alarm Input Settings window, select One-Key Disarming, , click Confirm, and then click Apply to save the configuration.
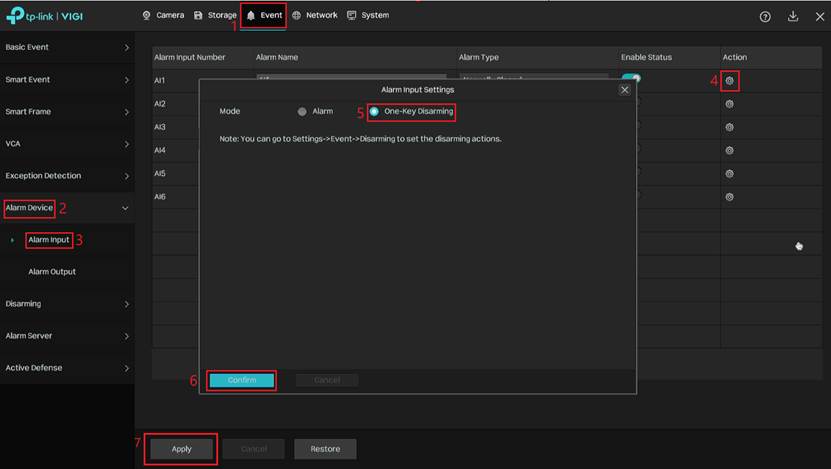
Note: If Mode is set to Alarm in the Alarm Input Settings window, the external alarm input device will work as an alarm input trigger. When it is triggered, the NVR will perform the configured linkage actions, such as Normal Action, Linkage Action, Alarm Output Linkage, or PTZ Linkage. For details, refer to How to connect alarm device to VIGI NVR | TP-Link.
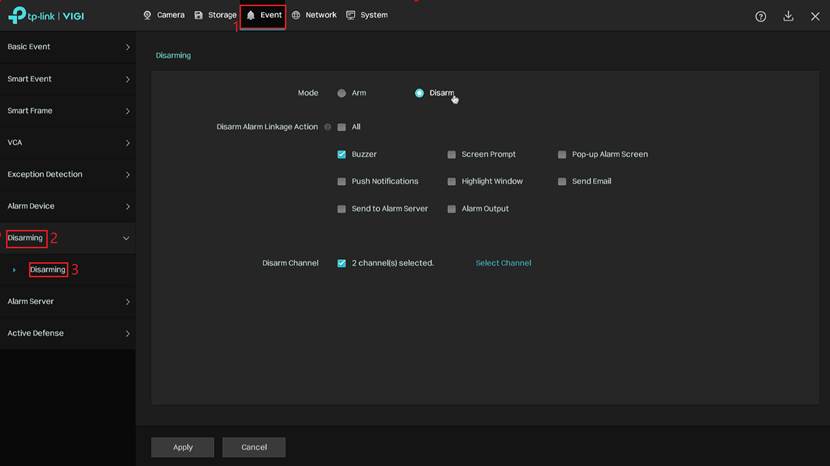
Step 3. Go to Event > Disarming > Disarming to set the disarming actions.
On the Disarming page, select the mode and configure the following options:
- Mode: Determines the current status of One-Key Disarming. When Disarm is selected, the configured disarming rules take effect. When Arm is selected, the disarming effect is disabled. Alarm actions on the NVR follow the original Normal Action settings, and the sound and light alarm linkage of IPC channels follows the original Linkage Action settings configured on the corresponding Basic Event or Smart Event page.
- Disarm Alarm Linkage Action: Select the NVR alarm linkage actions to be controlled, such as Buzzer, Screen Prompt, Pop-up Alarm Screen, Push Notifications, Highlight Window, Send Email, Send to Alarm Server, and Alarm Output. When Mode is set to Disarm, the selected NVR alarm actions will not take effect.
- Disarm Channel:Select the channels whose sound and light alarm linkage will be controlled. When Mode is set to Disarm, the selected channels enter the disarmed state, with sound and light alarms disabled.
Note:
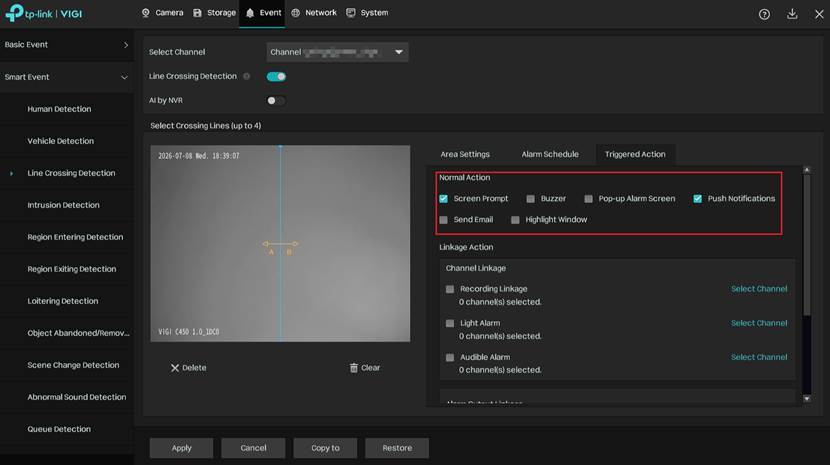
1. Disarm Alarm Linkage Action applies to alarm linkage actions on the NVR and does not modify the original Normal Action settings. When Mode is set to Disarm, the selected actions will not take effect. When Mode is set to Arm, the NVR alarm actions will follow the original event configuration.
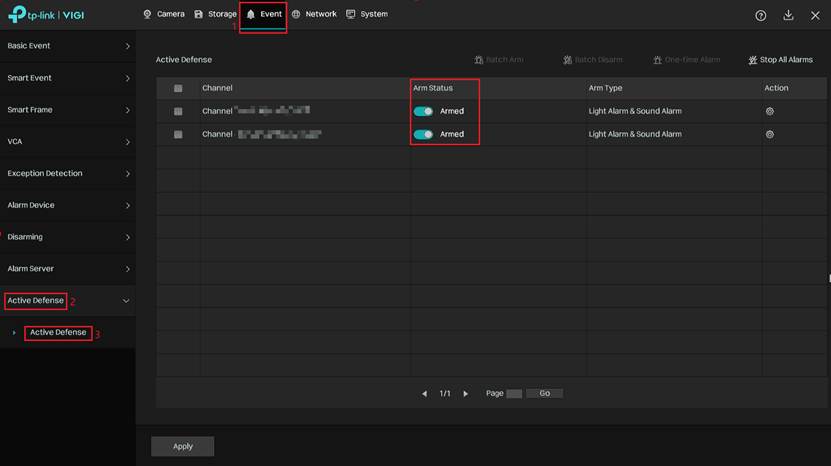
2. Disarm Channel changes the active defense status of the selected channels. The channel status can be checked on the Active Defense page.
When Mode is set to Disarm, the selected channels will be set to Disarmed.
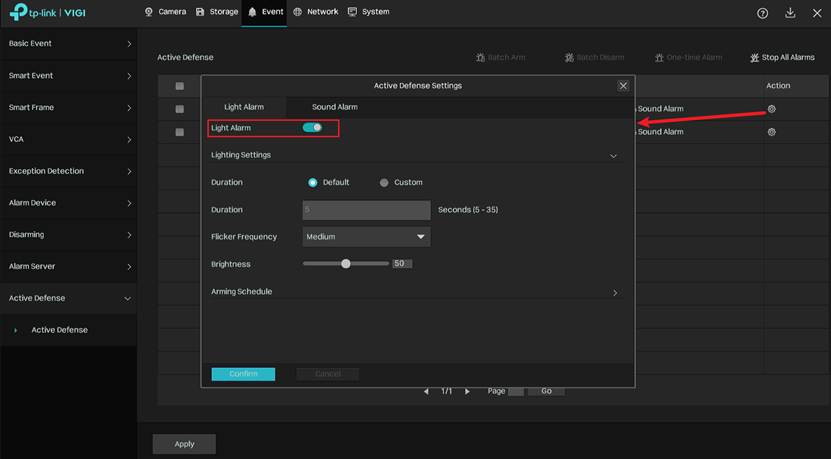
When Mode is set to Arm, the selected channels will be set to Armed. The actual sound and light alarm behavior depends on both the Linkage Action settings on the corresponding event page and the Light Alarm and Sound Alarm switches accessed by clicking the configuration button in the Action column on the Active Defense.
Step 4. Click Apply to save the settings. After the Disarming settings are applied, each trigger from the external alarm input device connected to Alarm Input AI1 will switch the Mode between Arm and Disarm.
Conclusion
You have successfully configured One-Key Disarming via Alarm Input AI1 on your VIGI NVR. After setup, the connected external alarm input device can be used to quickly switch the NVR between Arm and Disarm modes, helping you manage alarm responses more efficiently.
To learn more about each function and configuration, please visit Support Home to download or check the manual for your product.
Looking For More
Is this faq useful?
Your feedback helps improve this site.



TP-Link Community
Still need help? Search for answers, ask questions, and get help from TP-Link experts and other users around the world.