


TP-Link Router Not Connecting to Internet?
If your TP-Link router not working after setup is your current headache, this guide is for you. These troubleshooting steps are for users who have already completed the initial setup but still cannot get internet access through their router. Checking the router's Internet Protocol (IP) address is the key starting point — it tells you whether the problem is with the router itself or the modem. Video guides are also available below. If you work through all the steps and still need help, you can reach out through the TP-Link contact page.
Key Takeaways
- Check the router's Internet IP address first by logging in to the management page and going to Advanced > Status.
- If the IP address shows as 0.0.0.0, the issue is likely with the modem connection or physical setup.
- Configuration fixes such as cloning your computer's media access control (MAC) address, changing the router's local area network (LAN) IP address, or setting a domain name system (DNS) server manually may resolve the issue.
- Restarting the modem and router in the correct order can restore internet access if other steps do not work.
- If the IP address is valid and public but you still cannot connect, contact TP-Link technical support with your router and modem details.
Before You Begin
These steps assume your TP-Link router has already been set up. If you have not completed the initial installation, refer to the quick setup guide for your router model or watch the setup video for your connection type before continuing.
Make sure the following physical connections are in place:
- Your modem is connected to the WAN/Internet port on the TP-Link router.
- Your computer is connected to the router’s network.
Once you have confirmed the connections, log in to the router's web management page. For help with that, see how to log in to the web-based management page of your TP-Link router. After logging in, go to Advanced > Status and note the Internet IP address shown. This value will tell you which troubleshooting path to follow.
Troubleshooting Videos
Before walking through the step-by-step fixes below, check whether one of these videos resolves your issue. Each video covers general TP-Link troubleshooting based on your specific internet connection type.
- Using a cable modem and a TP-Link router:
- Using a DSL modem and a TP-Link router:
If the videos do not fully resolve the issue, continue with the steps below for your specific situation.
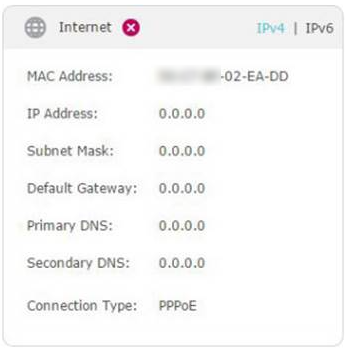
If the Internet IP Address Shows as 0.0.0.0
An IP address of 0.0.0.0 means the router has not received a valid address from the modem. Work through the following steps in order.
Step 1: Verify the Physical Connection Between the Router and Modem
Make sure your modem is plugged into the WAN/Internet port on the TP-Link router using an Ethernet cable. A loose or incorrect port connection is a common cause of a 0.0.0.0 IP address.
Step 2: Test the Modem Directly
Disconnect the router and connect your computer directly to the modem with an Ethernet cable. Check whether you have internet access. If the modem does not provide internet on its own, restart the modem. If the internet still does not work after restarting, contact your Internet Service Provider (ISP).
Step 3: Clone the MAC Address
Some ISPs lock internet access to a specific device's MAC address. Cloning your computer's MAC address onto the router can resolve this.
- Reconnect your computer to the TP-Link router using a wired Ethernet connection.
- Log in to the router's web interface and go to Advanced > Network > Internet.
- Locate the MAC Clone section.
- Select Use Current Computer MAC Address and click Save.
Note: Always use a wired connection when performing MAC cloning.
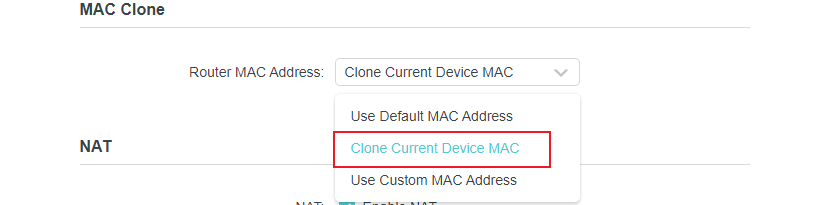
For more details on this process, see how to configure MAC Address Clone on a TP-Link Archer Router.
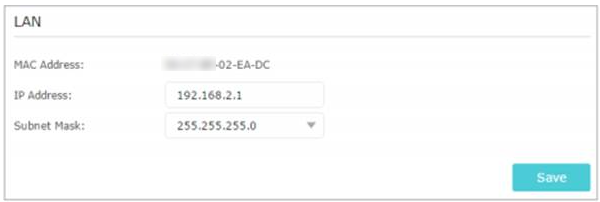
Step 4: Change the Router's LAN IP Address
Most TP-Link routers use 192.168.0.1 or 192.168.1.1 as the default LAN IP address. If your modem or DSL modem/router uses the same IP range, the two devices can conflict, preventing internet access. Changing the router's LAN IP address to something like 192.168.2.1 resolves this conflict.
- Log in to the router's web interface and go to Advanced > Network > LAN.
- Change the IP address (for example, to 192.168.2.1).
- Click Save.
Step 5: Restart the Modem and Router
- Power off both the modem and the router. Leave them off for one minute.
- Power on the router first, then wait about two minutes until it has a solid power indicator.
- Power on the modem and wait about two minutes until its lights are solid.
- Wait one to two more minutes, then check for internet access.
Step 6: Confirm Your Internet Connection Type
Check with your ISP to confirm your internet connection type (for example, Dynamic IP, PPPoE, or Static IP). If the router is configured for the wrong type, it will not connect properly.
For help with specific connection issues, see what to do if your wireless connection cannot work on a TP-Link Wi-Fi router.
If the Internet IP Address Is Valid
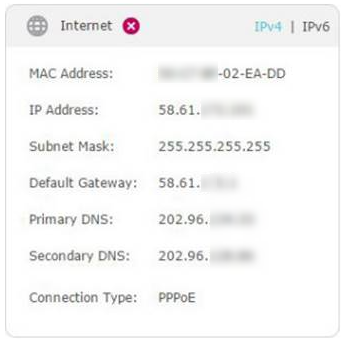
If the status page shows a valid, public IP address but you still cannot access the internet, work through the steps below.
Tip: Not sure if your IP address is public? Visit whatismypublicip.com to check.
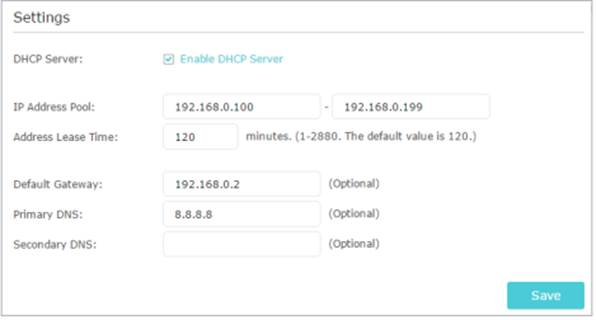
Step 1: Manually Configure the DNS Server
Your computer may not be recognizing any Domain Name System (DNS) server addresses automatically. Setting one manually can restore internet access.
- Log in to the router's web interface and go to Advanced > Network > DHCP Server.
- Enter 8.8.8.8 as the Primary DNS, and 8.8.4.4 as Secondary DNS.
- Click Save.
Tip: 8.8.8.8 is a public DNS server operated by Google and is safe to use.
For more information on changing DNS settings, see how to change DNS servers on a TP-Link wireless router and DSL modem router.
Step 2: Restart the Modem and Router
- Power off both the modem and the router. Leave them off for one minute.
- Power on the router first, then wait about two minutes until it has a solid power indicator.
- Power on the modem and wait about two minutes until its lights are solid.
- Wait one to two more minutes, then check for internet access.
Step 3: Reset the Router to Factory Default Settings
If the steps above do not resolve the issue, reset the router to its factory default settings and reconfigure it from scratch. For instructions, see how to reset a TP-Link router to factory defaults.
Advanced Troubleshooting: Contact TP-Link Support
If you have worked through all the steps above and still cannot get internet access, contact TP-Link technical support through the TP-Link contact page. Have the following information ready before reaching out:
- The Internet IP address currently shown on your router's status page.
- Your modem's model number and whether it is a cable modem or a DSL modem.
- A list of the steps you have already tried from this guide.
¿Es útil esta pregunta frecuente?
Sus comentarios nos ayudan a mejorar este sitio.
3.0_A_RGB_normal_1584493572647x.png)

1.0_normal_20210812031127k.png)