


How to Set Up a TP-Link Router as an Access Point
Access Point mode lets you use a TP-Link router as a wireless access point, turning a wired network connection into a Wi-Fi network. This is a good option if you have a wired Internet connection in a room and want to add wireless coverage without replacing your main router. This guide provides step-by-step instructions for configuring your TP-Link 11N wireless router as an access point. The process differs depending on whether your router has an Operation Mode menu, so read on to find the right method for your setup.
Key Takeaways
- You can use a TP-Link 11N wireless router as a TP-Link router access point without buying a separate device.
- Access Point mode extends Wi-Fi coverage by connecting your router to an existing wired network.
- The setup process is different depending on whether your router has an Operation Mode menu.
- Routers with the Operation Mode menu use a simpler built-in mode switch.
- Routers without the Operation Mode menu require manual configuration of the local area network (LAN) IP address, wireless settings, and Dynamic Host Configuration Protocol (DHCP) server settings.
Step-by-Step: How to Set Up a TP-Link Router as an Access Point
First, check whether your TP-Link router has an Operation Mode option in the left side menu. You can log in to the web management page to find out. If you are not sure how to do that, see How to Log In to Your TP-Link Router.
Method 1: Set Up a TP-Link Router as an Access Point Using Operation Mode
If there is an Operation Mode menu on the web interface of the TP-Link router to switch working modes, please follow the instructions below step by step.
1. Connect the power adapter to the router and turn on the router.
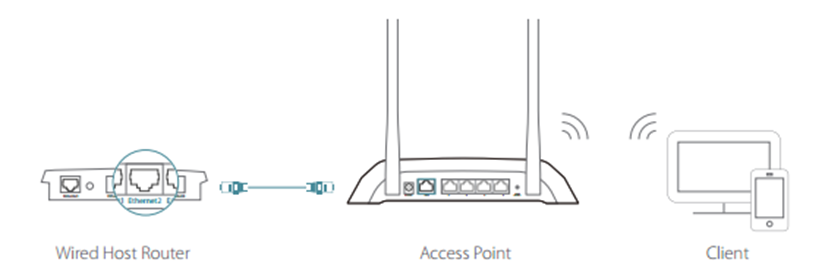
2. Connect the router to your wired host router’s Ethernet port via an Ethernet cable as shown below.
3. Connect a computer to the router via an Ethernet cable or wirelessly by using the SSID (network name) and password printed on the bottom label of the router.
4. Enter http://tplinkwifi.net in the address bar of a web browser to log in the router’s management page.
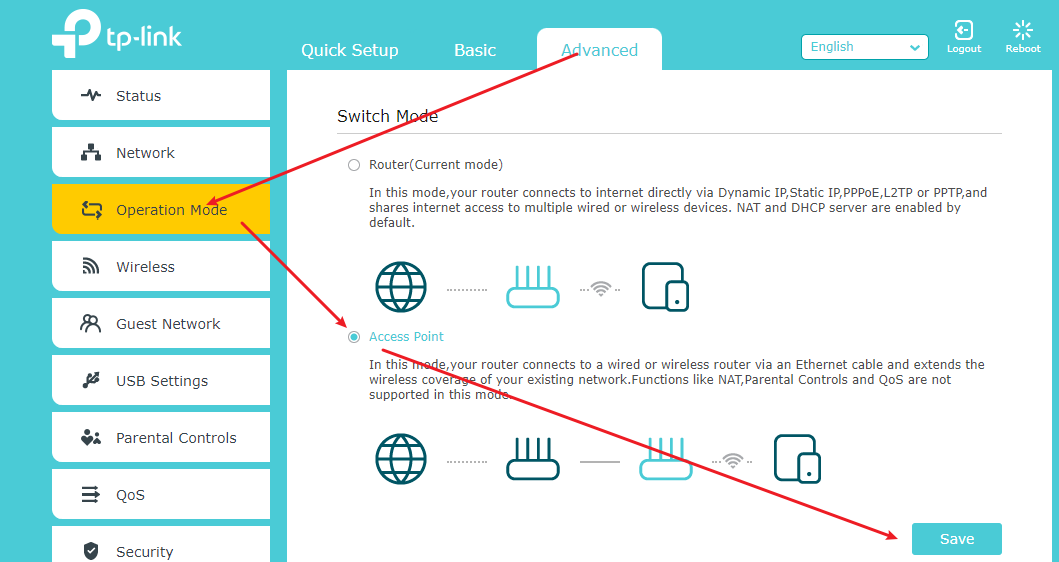
5. Go to Advanced > Operation Mode or Advanced > System > Operation Mode to switch to Access Point Mode.
Or click Change Mode in the top right corner, then select Access Point Mode. Follow the Quick Setup to complete the configuration.
6. Wait for the router to reboot, then log in and follow the Quick Setup to complete the setup.
7. Enjoy! Connect to the wireless network using the router's SSID (wireless name) and password.
Method 2: Manually Configure Your TP-Link Router as an Access Point
If there is no Operation Mode menu in the TP-Link router's web interface, here are some instructions for you.
1. Log into the router’s web management page.
2. Go to Advanced -> Network -> LAN on the side menu and change the LAN IP address of your TP-Link router to an IP address on the same segment as the main router. This IP address should be outside the main router’s DHCP range.
Example: If your DHCP is 192.168.2.100 -192.168.2.199, then you can set the IP to 192.168.2.11

Note: After changing the LAN IP address, a reboot is required, and you will need to log in to the TP-Link router with the new IP address.
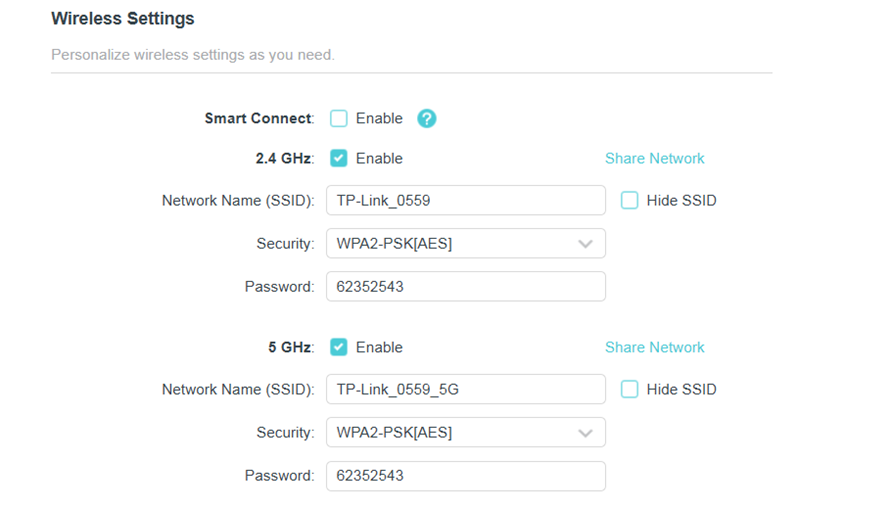
3. Go to Wireless -> Wireless Settings and configure the SSID (Network name). Select Save.
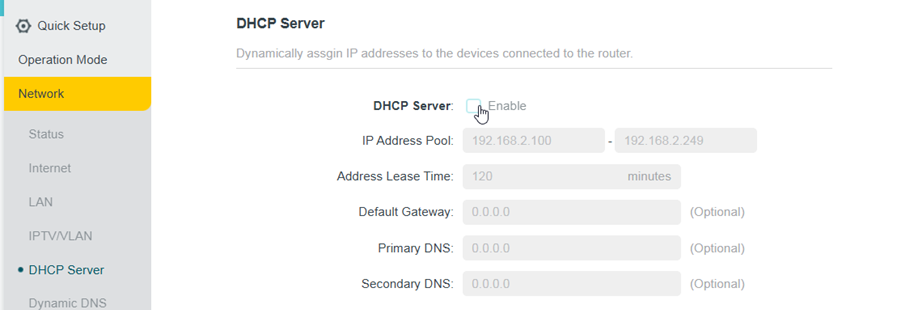
4. Go to Advanced -> Network -> DHCP Server and Disable the DHCP Server. Select Save.
5. Go to Advanced -> System -> Reboot and select Reboot to reboot the device.

6. Use an Ethernet cable to connect the main router to your TP-Link router through their LAN ports (any LAN ports may be used). All other LAN ports on your TP-Link router will now grant devices access to the Internet. Alternatively, any Wi-Fi device can now access the Internet through your TP-Link router using the SSID and Password set up in the steps above.

If you run into issues after completing setup, see What should I do if I fail to configure TP-Link Access Point?
For more details on each function and configuration, download the manual for your product from the TP-Link Download Center.
Daha Fazlasını Arıyorum
Bu SSS faydalı mı?
Your feedback helps improve this site.


TP-Link Community
Still need help? Search for answers, ask questions, and get help from TP-Link experts and other users around the world.