


目錄
便攜式路由器使用者指南(網頁版)
關於本指南
本指南介紹您的便攜式路由器的各項功能,並示範如何進行設定。
使用本指南時,請注意路由器的功能可能會因您擁有的型號與軟體版本、您所在的位置、語言以及網際網路服務提供者而略有不同。本指南中記錄的所有螢幕截圖、圖像、參數與說明僅供示範說明之用。
約定定名
在本指南中,使用了以下約定定名:
|
約定定名 |
說明 |
|---|---|
|
底線 |
帶有底線的字詞或短語為超連結。您可以點擊以重新導向至網站或特定章節。 |
|
粗體 |
需要強調的內容以及網頁上的文字均以粗體顯示,包含選單、項目、按鈕等。 |
|
> |
用於顯示開啟對應頁面路徑的選單結構。例如,設定 > 系統工具 > 韌體升級,表示「韌體升級」頁面部位於「設定」分頁下的「系統工具」選單中。 |
|
注意: |
忽略此類注意事項可能會導致設備故障或損壞。 |
|
提示: |
表示有助於您更好地使用設備的重要資訊。 |
更多資訊
- 最新的軟體、管理 App 及實用工具可至 下載中心 取得,網址為:https://www.tp-link.com/support。
- 快速安裝指南可以在您取得本指南的位置或路由器的包裝盒內找到。
- 規格資訊可以在產品頁面找到,網址為:https://www.tp-link.com。
- 我們提供了 TP-Link 社群供您討論我們的產品,網址為:https://community.tp-link.com。
- 我們的技術支援聯絡資訊可以在 聯絡技術支援 頁面找到,網址為:https://www.tp-link.com/support。
章節 1. 登入路由器
本章將引導您如何透過 Tether App 或路由器的網頁管理頁面登入路由器。
*網頁管理頁面上可用的功能可能因型號與軟體版本而異。
1.1 透過 Tether App 登入
注意:
1. 處於 Client (用戶端) 模式下的路由器無法透過 Tether 進行管理。請使用網頁管理頁面進行設定。
2. 由於 Tether App 更新,您實際的使用者介面與路徑可能與此處描述的有所不同。
3. Tether App 支援在 iOS 及 Android 裝置(例如智慧型手機和平板電腦)上運行。
1. 開啟 Apple App Store 或 Google Play 商店,搜尋 「TP-Link Tether」 或直接掃描 QR Code 下載並安裝 App。

2. 開啟 Tether App 並使用您的 TP-Link ID 登入。如果您還沒有 TP-Link ID,請先建立一個。
1.2 透過網頁管理頁面登入
透過網頁式公用程式,您可以輕鬆設定與管理路由器。此網頁式公用程式可以在任何配有網頁瀏覽器(如 Microsoft Internet Explorer、Mozilla Firefox 或 Apple Safari)的 Windows、Macintosh 或 UNIX 作業系統上使用。
1. 將電腦上的 TCP/IP 協定設定為 自動取得 IP 位址 模式。
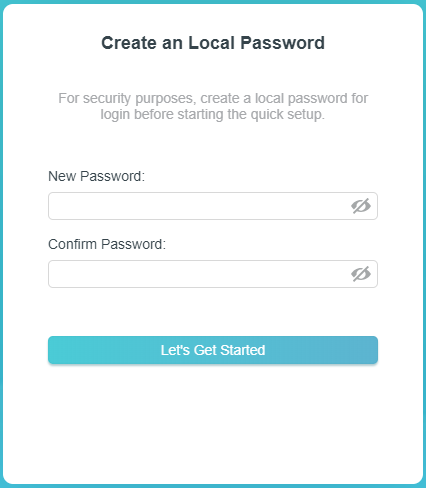
2. 造訪 http://tplinkwifi.net,並建立登入密碼以進行安全管理。然後點擊 開始使用 (Let’s Get Started) 即可登入。
注意:如果未出現登入視窗,請參閱常見問題 (FAQ)。

章節 2. 設定網際網路
本章將引導您如何透過 Tether App 或路由器的網頁管理頁面設定網際網路連線。
*網頁管理頁面上可用的功能可能因型號與軟體版本而異。
2.1 透過 Tether App 設定
1. 開啟 Tether App 並使用您的 TP-Link ID 登入。如果您還沒有 TP-Link ID,請先建立一個。
2. 點擊 + 按鈕,然後選擇 新增設備 > 新增路由器。按照步驟完成設定並連線至網際網路。
3. 將您的設備連線至路由器新設定的網路,開始享受網際網路!
2.2 透過網頁管理頁面設定
1. 造訪 http://tplinkwifi.net,並建立登入密碼以進行安全管理。然後點擊 開始使用 (Let’s Get Started) 即可登入。
注意:如果未出現登入視窗,請參閱常見問題 (FAQ)。
2. 快速設定嚮導將引導您完成路由器的設定流程。請按照逐步指引完成快速設定,或者前往 進階 > 快速設定,並按照指示將您的路由器連線至網際網路。
路由器模式 (Router Mode)
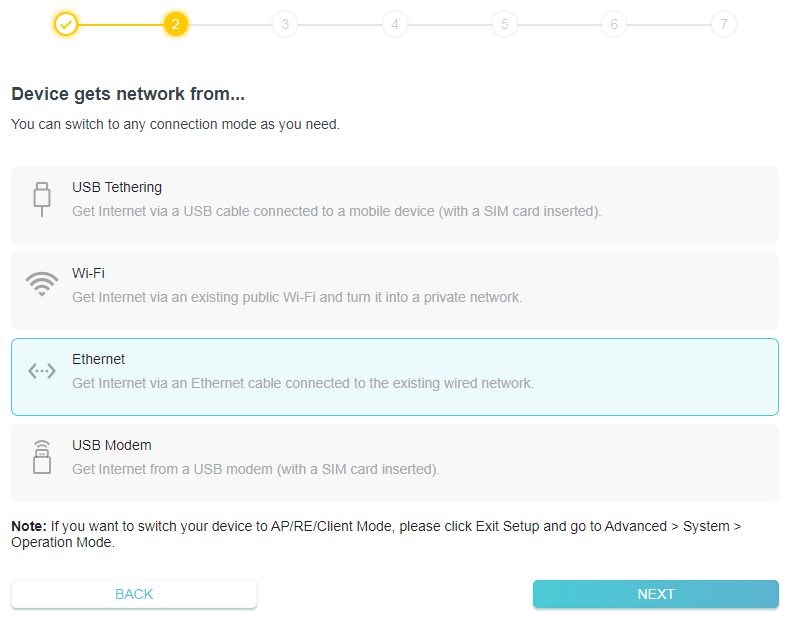
1. 啟動快速設定,選擇 以太網路 (Ethernet),然後點擊 下一步 (NEXT)。
2. 按照步驟指引設定網際網路連線,開始享受網際網路。
注意:如果您在快速設定期間更改了預設的無線網路名稱 (SSID) 和無線密碼,您的所有無線設備必須使用新的 SSID 和密碼才能連線至路由器。
USB 網路共享模式 (USB Tethering Mode)
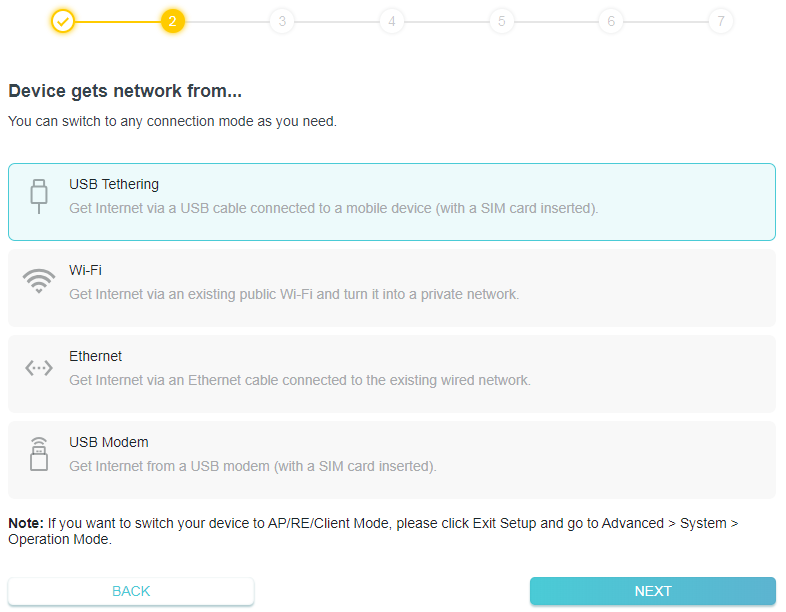
1. 啟動快速設定,選擇 USB 網路共享 (USB Tethering),然後點擊 下一步 (NEXT)。
2. 使用 USB 線將您的 iPhone/iPad 連線至路由器。

3. 按照步驟指引設定網際網路連線,開始享受網際網路。
注意:如果您在快速設定期間更改了預設的無線網路名稱 (SSID) 和無線密碼,您的所有無線設備必須使用新的 SSID 和密碼才能連線至路由器。
3G/4G/5G USB 數據機模式 (USB Modem Mode)
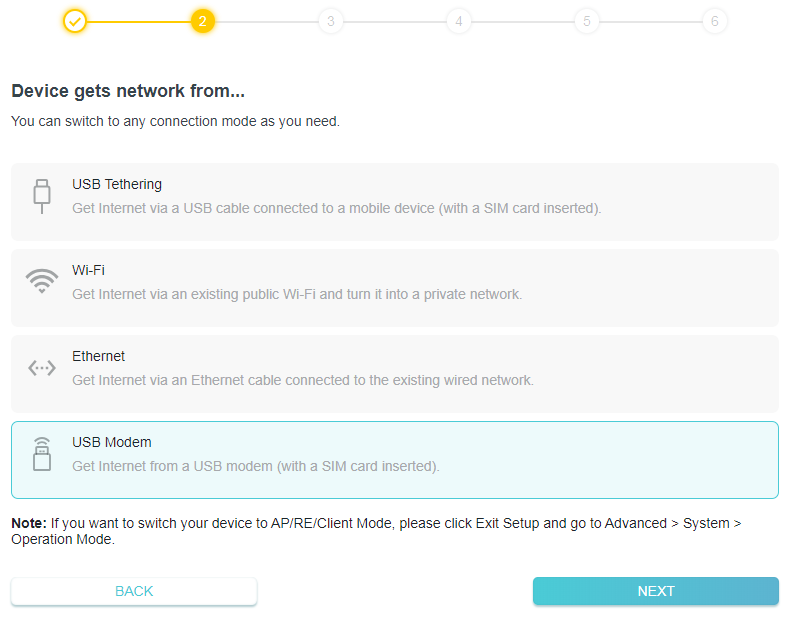
1. 啟動快速設定,選擇 USB 數據機 (USB Modem),然後點擊 下一步 (NEXT)。
2. 將您的 USB 數據機連接到路由器的 USB 3.0 連接埠。
3. 按照步驟指引設定網際網路連線,開始享受網際網路。
注意:如果您在快速設定期間更改了預設的無線網路名稱 (SSID) 和無線密碼,您的所有無線設備必須使用新的 SSID 和密碼才能連線至路由器。
熱點模式 (Hotspot Mode)
1. 啟動快速設定,選擇 Wi-Fi,然後點擊 下一步 (NEXT)。
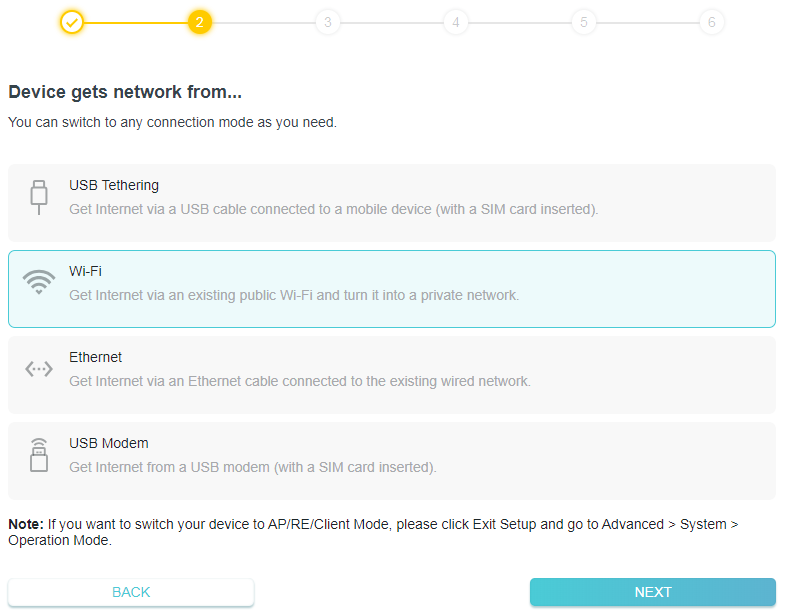
2. 按照步驟指引設定網際網路連線,開始享受網際網路。
注意:
如果公共熱點需要強制網頁入口驗證 (Captive Portal Authentication),請在快速設定期間完成驗證後才能存取網路。
如果您在快速設定期間更改了預設的無線網路名稱 (SSID) 和無線密碼,您的所有無線設備必須使用新的 SSID 和密碼才能連線至路由器。
無線基地台 / 訊號擴展器 / 用戶端模式 (Access Point/Range Extender/Client Mode)
1. 若要將您的設備切換為 AP/RE/Client 模式,請點擊 退出設定 (Exit Setup) 並前往 進階 > 系統 > 運作模式 (Advanced > System > Operation Mode)。
2. 選擇 AP/RE/Client Mode,然後點擊 儲存 (SAVE)。
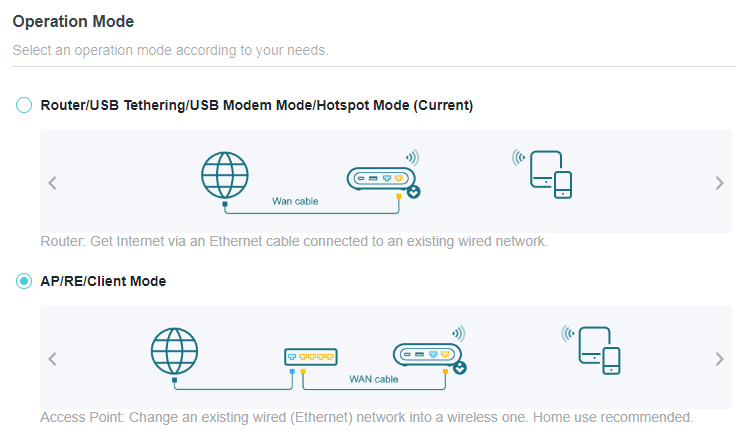
3. 選擇所需的模式,然後點擊 重新啟動 (REBOOT)。設定將在路由器重新啟動後生效。網際網路存取將會暫時停用。
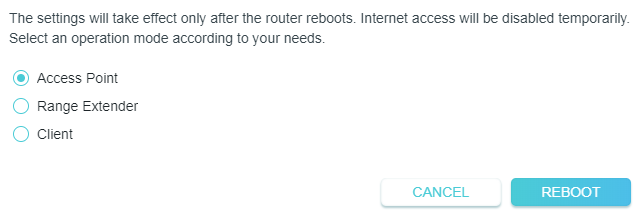
4. 等待重新啟動完成,並按照步驟指引完成設定,即可開始享受網際網路。
注意:如果您在快速設定期間更改了預設的無線網路名稱 (SSID) 和無線密碼,您的所有無線設備必須使用新的 SSID 和密碼才能連線至路由器。
章節 3. 路由器模式
本章介紹如何設定運作於路由器模式下的便攜式路由器各項功能。
*網頁管理頁面上可用的功能可能因型號與軟體版本而異。
3.1 透過 Tether App 設定
1. 造訪 http://tplinkwifi.net,並使用您的 TP-Link ID 或您為路由器設定的密碼登入。
2. 前往 網際網路 (Internet)。
• 若要檢視路由器的當前模式:
尋找 連線設定 (Connection Settings) 區域。路由器當前的運作模式會被突出顯示。
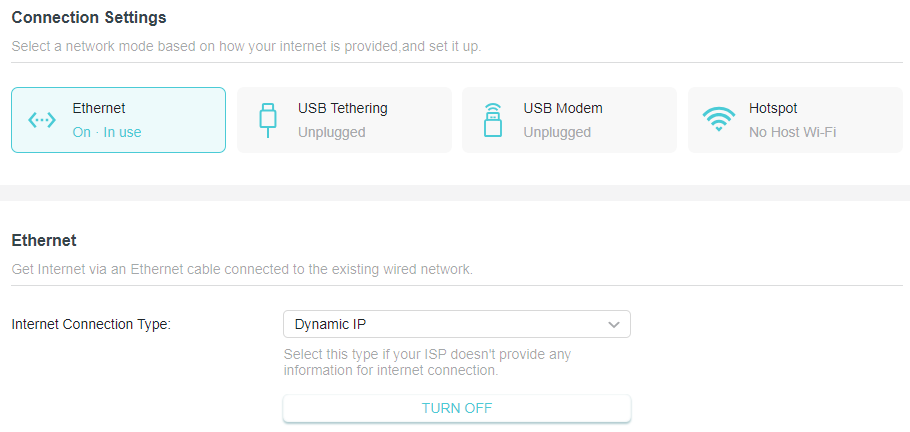
• 若要變更路由器的網路模式:
1. 造訪 http://tplinkwifi.net,並使用您的 TP-Link ID 或您為路由器設定的密碼登入。
2. 前往 網際網路 > 連線設定 (Internet > Connection Settings)。
3. 選擇您所需的網路模式,設定相關參數,然後點擊 儲存 (SAVE)。
• 若要變更路由器的運作模式(切換為 AP/RE/Client 模式):
1. 造訪 http://tplinkwifi.net,並使用您的 TP-Link ID 或您為路由器設定的密碼登入。
2. 前往 進階 > 系統 > 運作模式 (Advanced > System > Operation Mode)。
3. 選擇您所需的運作模式,然後點擊 儲存 (SAVE)。
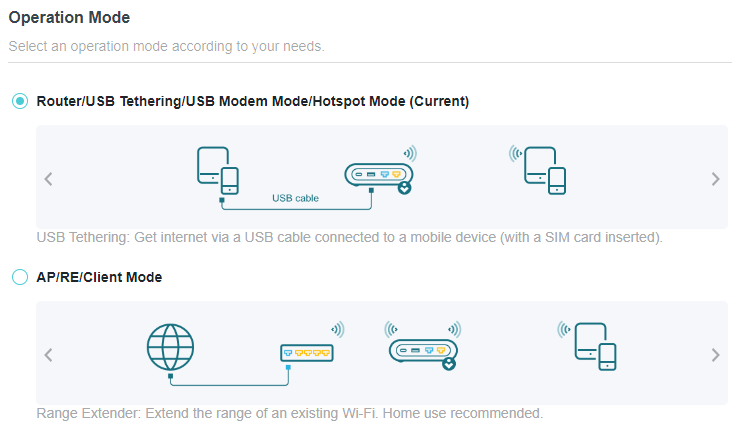
3.2 透過 Tether App 設定
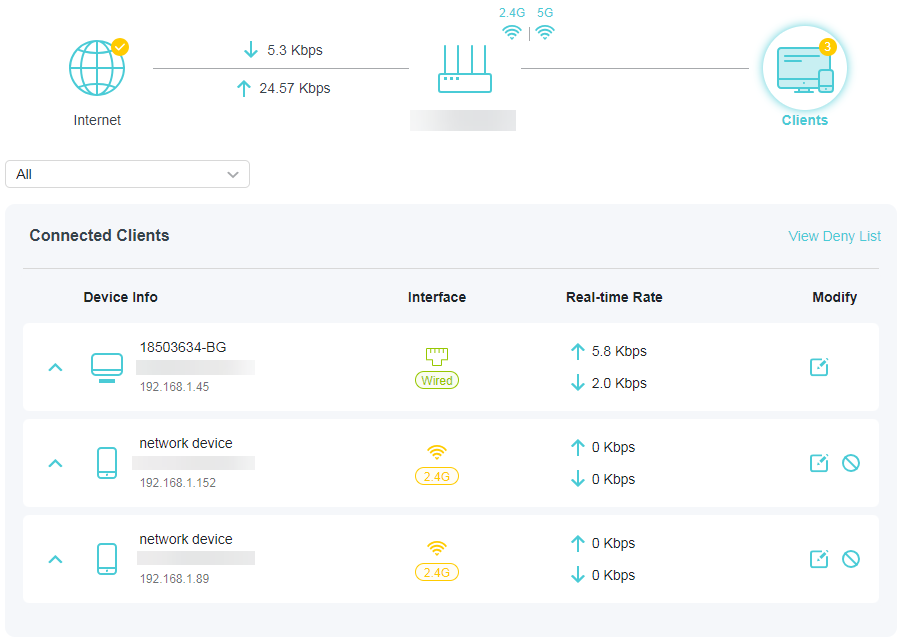
網路地圖以視覺化方式概述您網路中的設備連線狀態,並協助您管理網路的一般設定。
1. 造訪 http://tplinkwifi.net,並使用您的 TP-Link ID 或您為路由器設定的密碼登入。
2. 前往 網路地圖 (Network Map)。
3. 點擊每個網路設備圖示以檢查並管理一般網路設定。
• 點擊 網際網路 (Internet) 以檢查網際網路狀態。
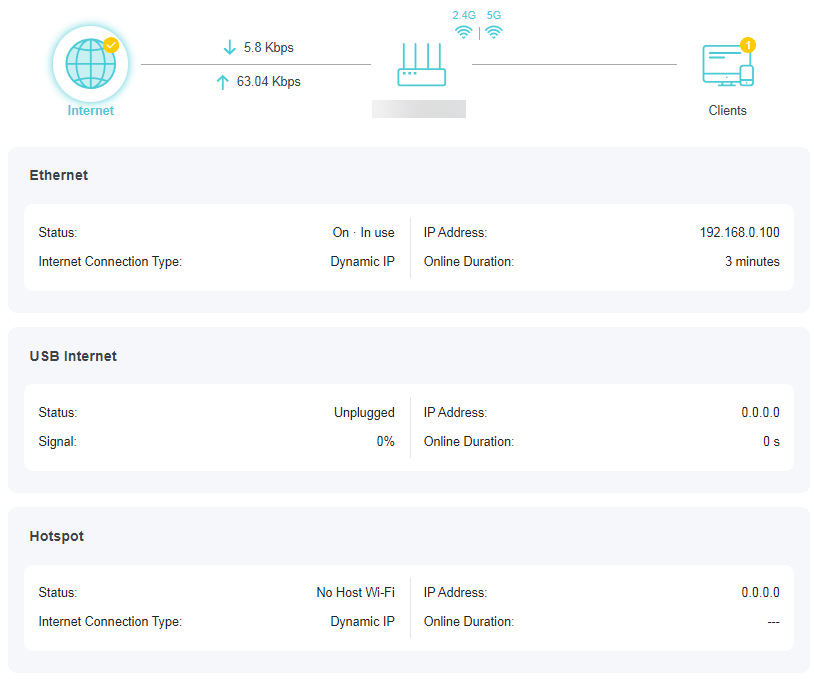
• 點擊路由器以檢查設備狀態與網路設定。您可以點擊「編輯 (Edit)」來變更相關設定。
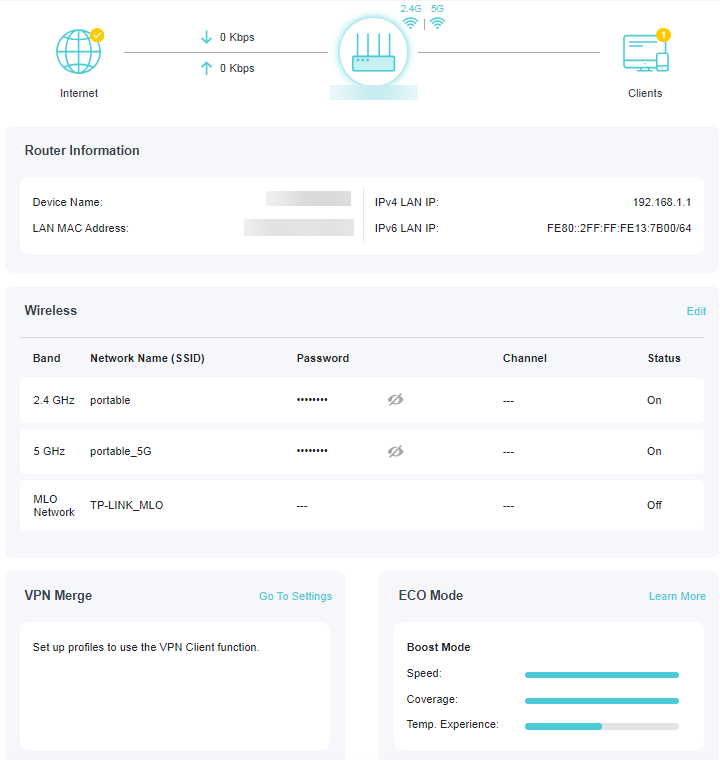
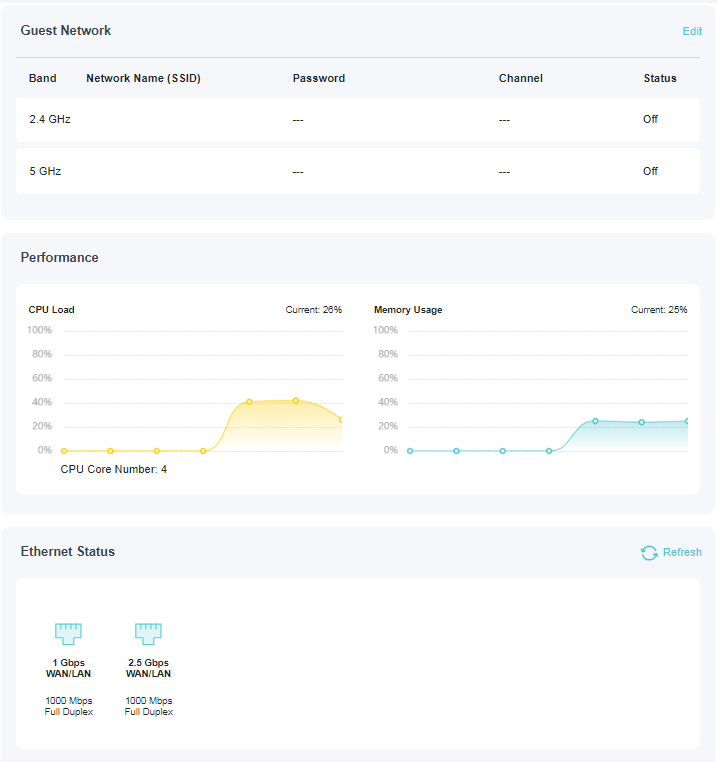
• 點擊 用戶端 (Clients) 以檢視您網路中的用戶端設備。您可以封鎖設備以阻止其存取您的網路。
3.3 網路
3.3.1 狀態
1. 造訪 http://tplinkwifi.net,並使用您的 TP-Link ID 或您為路由器設定的密碼登入。
2. 前往 進階 > 網路 > 狀態 (Advanced > Network > Status)。您可以檢視路由器當前的狀態資訊。
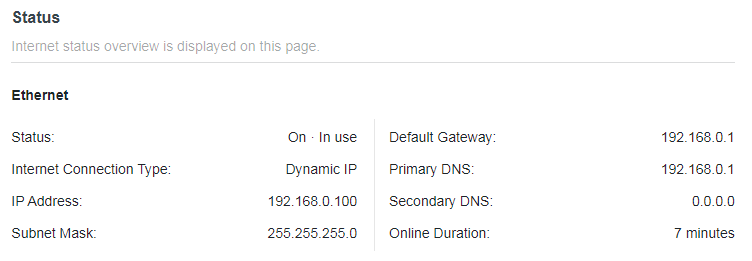
• 以太網路 (Ethernet) - 顯示當前的網際網路設定,您可以在 進階 > 網路 > 網際網路 頁面上進行設定。
• 狀態 (Status) - 表示路由器是否已連線至網際網路。
• 網際網路連線類型(僅限路由器模式)(Internet Connection Type) - 表示您的路由器連線至網際網路的方式。
• IP 位址 (IP Address) - 路由器的網際網路 IP (WAN IP) 位址。
• 子網路遮罩 (Subnet Mask) - 與網際網路 IP (WAN IP) 位址相關聯的子網路遮罩。
• 預設閘道 (Default Gateway) - 此處顯示目前使用的閘道。
• 主要與次要 DNS (Primary & Secondary DNS) - DNS(網域名稱系統)伺服器的 IP 位址。
• 連線時間 (Online Duration) - 顯示路由器已連線至網際網路的時間長度。
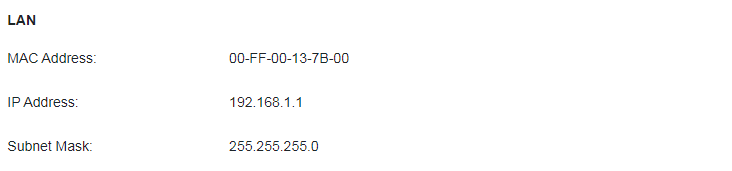
• 區域網路 (LAN) - 此欄位顯示 LAN 的當前設定,您可以在 網路 > 區域網路 頁面上進行設定。
• MAC 位址 (MAC Address) - 路由器的實體位址。
• IP 位址 (IP Address) - 路由器的 LAN IP 位址。
• 子網路遮罩 (Subnet Mask) - 與 LAN IP 位址相關聯的子網路遮罩。

• DHCP 伺服器 (DHCP Server) - 此欄位顯示 DHCP(動態主機設定協定)伺服器的當前設定,您可以在 網路 > DHCP 伺服器 頁面上進行設定。
• DHCP 伺服器 (DHCP Server) - 表示 DHCP 伺服器是否已啟用。預設為啟用,且路由器運作為 DHCP 伺服器。
• IP 位址池 (IP Address Pool) - 供 DHCP 伺服器指派 IP 位址的 IP 位址範圍。

• 動態 DNS (Dynamic DNS) - 此欄位顯示動態 DNS(網域名稱系統)的當前設定,您可以在 進階 > 網路 > 動態 DNS 頁面上進行設定。
• 服務提供者 (Service Provider) - 您所註冊的動態 DNS 服務提供者。
3.3.2 網際網路連接埠
1. 造訪 http://tplinkwifi.net,並使用您的 TP-Link ID 或您為路由器設定的密碼登入。
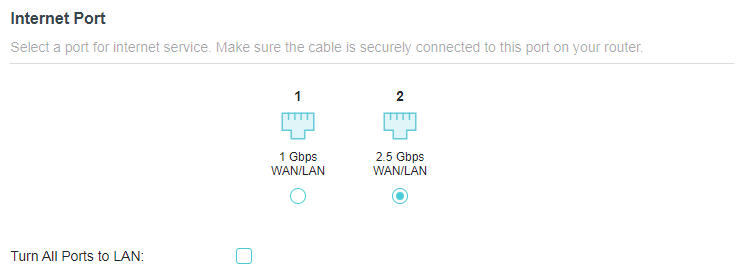
2. 前往 進階 > 網路 > 網際網路連接埠 (Advanced > Network > Internet Port)。
3. 選擇一個連接埠用於網際網路服務。請確保網路線已牢固連接至您路由器上的該連接埠。
注意:某些型號可能不支援此功能。圖像可能與實際產品有所不同。
• 將所有連接埠轉為 LAN (Turn All Ports to LAN) - 啟用此功能後,所有的以太網路連接埠都將作為 LAN 連接埠使用。
3.3.3 網際網路連接埠協商速率設定
注意:3G/4G USB 數據機模式和 USB 網路共享模式沒有此功能。
1. 造訪 http://tplinkwifi.net,並使用您的 TP-Link ID 或您為路由器設定的密碼登入。
2. 前往 進階 > 網路 > 網際網路連接埠 (Advanced > Network > Internet Port) 並尋找 網際網路連接埠協商速率設定 (Internet Port Negotiation Speed Setting) 區域。
3. 從下拉式選單中選擇雙工類型,然後點擊 儲存 (SAVE)。

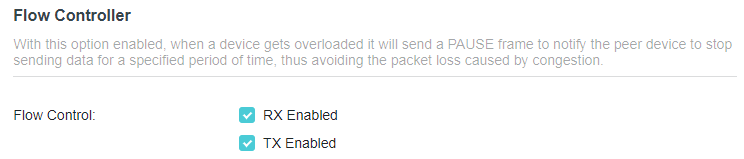
3.3.4 流量控制器
啟用後,當設備過載時,它會發送 PAUSE 封包通知對端設備在指定的時間內停止發送資料,從而避免因壅塞引起的封包遺失。
1. 造訪 http://tplinkwifi.net,並使用您的 TP-Link ID 或您為路由器設定的密碼登入。
2. 前往 進階 > 網路 > 網際網路連接埠 (Advanced > Network > Internet Port)。尋找 流量控制器 (Flow Controller) 區域。
3. 選擇所需的選項,然後點擊 儲存 (SAVE)。
3.3.5 路由器模式下的網際網路設定
1. 造訪 http://tplinkwifi.net,並使用您的 TP-Link ID 或您為路由器設定的密碼登入。
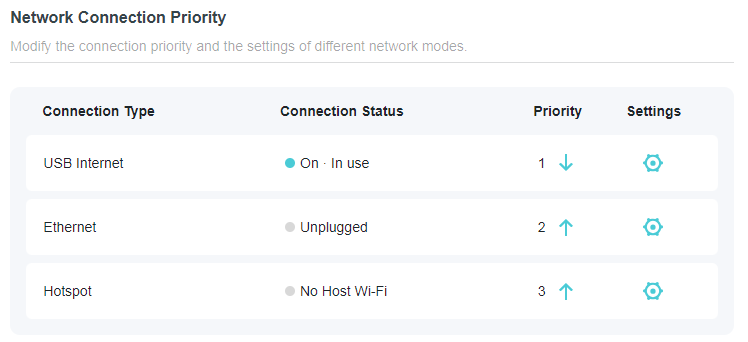
2. 前往 進階 > 網路 > 網際網路 (Advanced > Network > Internet)。
3. 尋找 網路連線優先順序 (Network Connection Priority) 區域。選擇您的網際網路連線類型並點擊設定圖示,然後輸入由您的 ISP(網際網路服務提供者)提供的設定。
動態 IP (Dynamic IP)
如果您選擇 動態 IP (Dynamic IP),您需要選擇是否複製 MAC 位址。動態 IP 使用者通常配有有線電視 (Cable) 或光纖網路。
• 點擊 更新 (RENEW) 以向您的 ISP 重新取得 IP 參數。
• 點擊 釋放 (RELEASE) 以釋放 IP 參數。
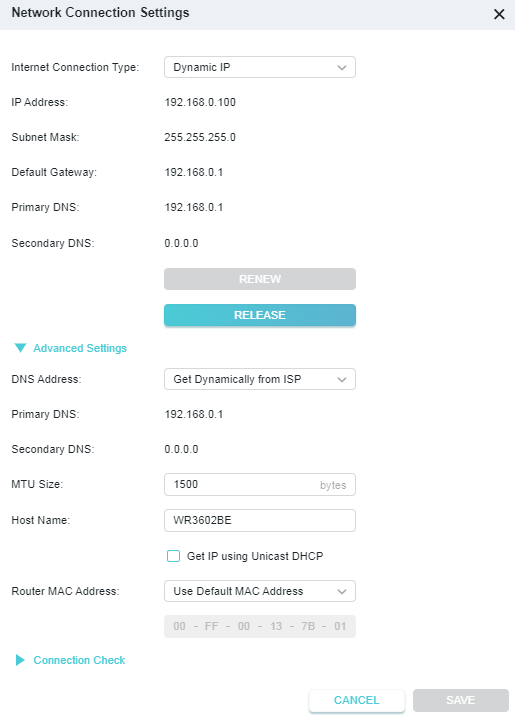
• DNS 位址 (DNS Address) - 預設設定為動態向您的 ISP 取得 IP 位址。如果您的 ISP 未自動指派 DNS 位址給路由器,請選擇「使用下列 DNS 位址」,並以點分十進位表示法輸入您 ISP 主要 DNS 伺服器的 IP 位址。若有次要 DNS 伺服器位址,也請一併輸入。
• MTU 大小 (MTU Size) - 大多數以太網路的正常 MTU(最大傳輸單位)值為 1500 位元組。除非您的 ISP 要求,否則不建議變更預設的 MTU 大小。
• 主機名稱 (Host Name) - 此選項指定路由器的名稱。
• 路由器 MAC 位址 (Router MAC Address):
• 使用預設 MAC 位址 (Use Default MAC Address) - 若 ISP 未將指派的 IP 位址與 MAC 位址綁定,請勿變更您路由器的預設 MAC 位址。
• 複製目前設備 MAC (Clone Current Device MAC) - 若 ISP 將指派的 IP 位址與 MAC 位址綁定,請選擇此項以複製目前連線至路由器的電腦 MAC 位址。
• 使用自訂 MAC 位址 (Use Custom MAC Address) - 若您的 ISP 要求您註冊 MAC 位址,請選擇此項並在此欄位中輸入正確的 MAC 位址,以防 ISP 將指派的 IP 位址綁定至特定 MAC 位址。
注意:
• 您只能對 LAN 上的電腦使用 MAC 位址複製功能。
• 如果您在 WAN 連線為 PPPoE 時變更了 WAN MAC 位址,該設定要在重新建立連線後才會生效。
• 連線檢查 (Connection Check):
路由器會定期使用 Ping 來檢查以太網路 / 熱點 / USB 網際網路連線類型的連線狀態,以確認網際網路是否可用。您可以編輯以下參數,然後點擊 儲存 (SAVE)。
• 追蹤間隔 (Track Interval) - 連續 ICMP 回應請求之間的時間間隔。建議保持預設值。
• 若 Ping 失敗/成功 X 次則變更為不可用/可用 (Change to unavailable/available if Ping failed/succeeded for X Times) - 當 Ping 失敗/成功的次數達到您設定的值時,連線狀態將變更為未連線/已連線。
• IPv4 追蹤 IP/網域名稱 (IPv4 Track IP/Domain Name) - 輸入您想要檢查路由器與其連線狀態的受測主機或其他網路設備的 IP 位址或網域名稱。您最多可以新增 4 個項目。
靜態 IP (Static IP)
如果您的 ISP 提供靜態或固定的 IP 位址、子網路遮罩、預設閘道和 DNS 設定,請選擇 靜態 IP (Static IP)。
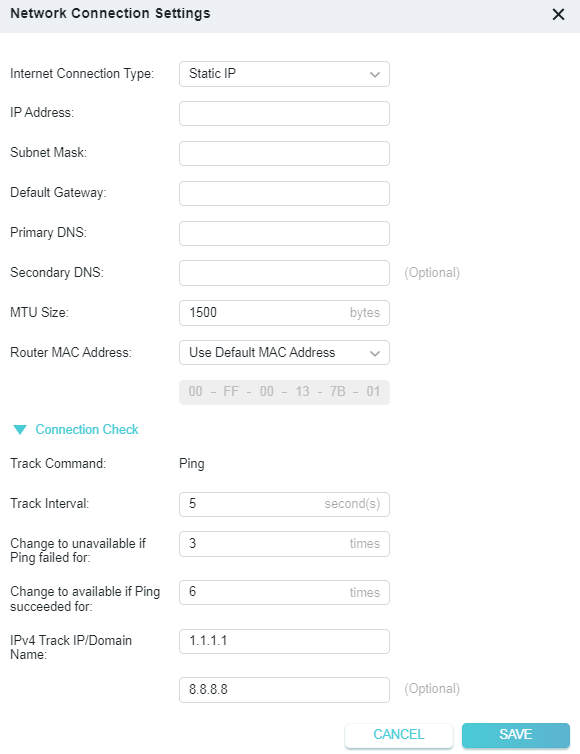
• IP 位址 (IP Address) - 輸入由您的 ISP 提供、以點分十進位表示法呈現的 IP 位址。
• 子網路遮罩 (Subnet Mask) - 輸入由您的 ISP 提供、以點分十進位表示法呈現的子網路遮罩。通常使用 255.255.255.0 作為子網路遮罩。
• 預設閘道 (Default Gateway) - 輸入由您的 ISP 提供、以點分十進位表示法呈現的閘道 IP 位址。
• 主要/次要 DNS (Primary/Secondary DNS) - (選填)輸入由您的 ISP 提供、以點分十進位表示法呈現的一個或兩個 DNS 位址。
• MTU 大小 (MTU Size) - 大多數以太網路的正常 MTU(最大傳輸單位)值為 1500 位元組。除非您的 ISP 要求,否則不建議變更預設的 MTU 大小。
• 路由器 MAC 位址 (Router MAC Address):
• 使用預設 MAC 位址 (Use Default MAC Address) - 若 ISP 未將指派的 IP 位址與 MAC 位址綁定,請勿變更您路由器的預設 MAC 位址。
• 複製目前設備 MAC (Clone Current Device MAC) - 若 ISP 將指派的 IP 位址與 MAC 位址綁定,請選擇此項以複製目前連線至路由器的電腦 MAC 位址。
• 使用自訂 MAC 位址 (Use Custom MAC Address) - 若您的 ISP 要求您註冊 MAC 位址,請選擇此項並在此欄位中輸入正確的 MAC 位址,以防 ISP 將指派的 IP 位址綁定至特定 MAC 位址。
注意:
• 您只能對 LAN 上的電腦使用 MAC 位址複製功能。
• 如果您在 WAN 連線為 PPPoE 時變更了 WAN MAC 位址,該設定要在重新建立連線後才會生效。
• 連線檢查 (Connection Check):
路由器會定期使用 Ping 來檢查以太網路 / 熱點 / USB 網際網路連線類型的連線狀態,以確認網際網路是否可用。您可以編輯以下參數,然後點擊 儲存 (SAVE)。
• 追蹤間隔 (Track Interval) - 連續 ICMP 回應請求之間的時間間隔。建議保持預設值。
• 若 Ping 失敗/成功 X 次則變更為不可用/可用 (Change to unavailable/available if Ping failed/succeeded for X Times) - 當 Ping 失敗/成功的次數達到您設定的值時,連線狀態將變更為未連線/已連線。
• IPv4 追蹤 IP/網域名稱 (IPv4 Track IP/Domain Name) - 輸入您想要檢查路由器與其連線狀態的受測主機或其他網路設備的 IP 位址或網域名稱。您最多可以新增 4 個項目。
PPPoE
如果您的 ISP 提供 PPPoE 連線,請選擇 PPPoE。
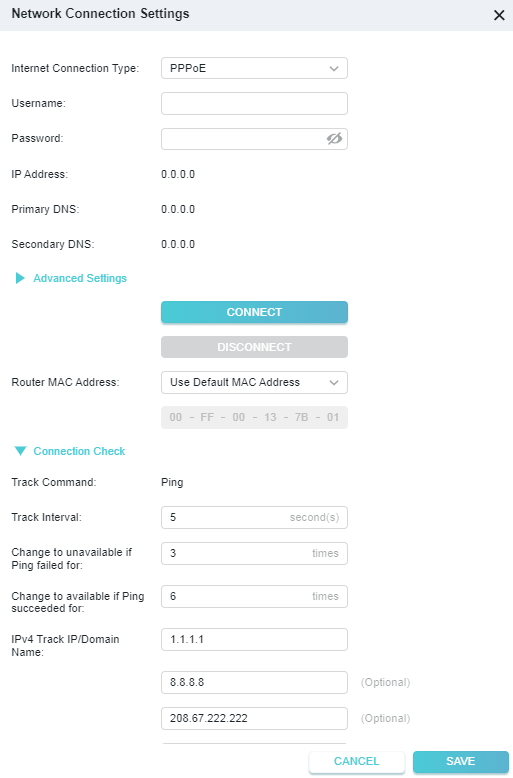
• 使用者名稱/密碼 (Username/Password) - 輸入由您的 ISP 提供的使用者名稱和密碼。這些欄位區分大小寫。
• 次要連線 (Secondary Connection) - 僅適用於 PPPoE 連線。如果您的 ISP 提供額外的連線類型,請選擇 動態 IP (Dynamic IP) 或 靜態 IP (Static IP) 以啟用次要連線。
• MTU 大小 (MTU Size) - 預設 MTU 大小為 1480 位元組。除非您的 ISP 要求,否則不建議變更預設的 MTU 大小。
• 服務名稱 (Service Name) - 除非您確定您的 ISP 有此必要要求,否則不應設定服務名稱。在大多數情況下,將這些欄位留空即可正常運作。
• 存取集中器名稱 (Access Concentrator Name) - 除非您確定您的 ISP 有此必要要求,否則不應設定存取集中器名稱。在大多數情況下,將這些欄位留空即可正常運作。
• 線上偵測間隔 (Detect Online Interval) - 路由器將在每個時間間隔偵測存取集中器是否線上。預設值為 10。您可以輸入 0 到 120 之間的值。數值為 0 表示不進行偵測。
• IP 位址 (IP Address) - 預設設定為動態向您的 ISP 取得 IP 位址。如果您的 ISP 未自動指派 IP 位址給路由器,請選擇「使用下列 IP 位址」,並輸入由您的 ISP 提供、以點分十進位表示法呈現的 IP 位址。
• DNS 位址 (DNS Address) - 預設設定為動態向您的 ISP 取得 IP 位址。如果您的 ISP 未自動指派 DNS 位址給路由器,請選擇「使用下列 DNS 位址」,並以點分十進位表示法輸入您 ISP 主要 DNS 伺服器的 IP 位址。若有次要 DNS 伺服器位址,也請一併輸入。
• 連線模式 (Connection Mode):
• 自動 (Auto) - 在此模式下,每當網際網路連線中斷時,都會自動重新連線。
• 依需求 (On Demand) - 在此模式下,網際網路連線將在指定的閒置時間(最大閒置時間)後自動終止,並在您再次嘗試存取網際網路時重新建立。
• 定時 (Time-based) - 在此模式下,網際網路連線將在您設定的連線時間內生效。
• 手動 (Manual) - 在此模式下,網際網路連線是透過點擊連線/斷開連線按鈕手動控制的。此模式也像依需求模式一樣支援最大閒置時間功能。請在「最大閒置時間」中輸入網際網路連線在終止前可保持閒置的最大時間(以分鐘為單位)。預設值為 15 分鐘。如果您希望網際網路連線始終保持連線狀態,請輸入 0。
• 路由器 MAC 位址 (Router MAC Address):
• 使用預設 MAC 位址 (Use Default MAC Address) - 若 ISP 未將指派的 IP 位址與 MAC 位址綁定,請勿變更您路由器的預設 MAC 位址。
• 複製目前設備 MAC (Clone Current Device MAC) - 若 ISP 將指派的 IP 位址與 MAC 位址綁定,請選擇此項以複製目前連線至路由器的電腦 MAC 位址。
• 使用自訂 MAC 位址 (Use Custom MAC Address) - 若您的 ISP 要求您註冊 MAC 位址,請選擇此項並在此欄位中輸入正確的 MAC 位址,以防 ISP 將指派的 IP 位址綁定至特定 MAC 位址。
注意:
• 只有在您已於 進階 > 系統 > 時間設定 (Advanced > System > Time Settings) 頁面上設定系統時間後,定時連線功能才會生效。
• 有時即使您指定了 最大閒置時間,連線也無法終止,因為某些應用程式在背景持續存取網際網路。
• 您只能對 LAN 上的電腦使用 MAC 位址複製功能。
• 如果您在 WAN 連線為 PPPoE 時變更了 WAN MAC 位址,該設定要在重新建立連線後才會生效。
• 連線檢查 (Connection Check):
路由器會定期使用 Ping 來檢查以太網路 / 熱點 / USB 網際網路連線類型的連線狀態,以確認網際網路是否可用。您可以編輯以下參數,然後點擊 儲存 (SAVE)。
• 追蹤間隔 (Track Interval) - 連續 ICMP 回應請求之間的時間間隔。建議保持預設值。
• 若 Ping 失敗/成功 X 次則變更為不可用/可用 (Change to unavailable/available if Ping failed/succeeded for X Times) - 當 Ping 失敗/成功的次數達到您設定的值時,連線狀態將變更為未連線/已連線。
• IPv4 追蹤 IP/網域名稱 (IPv4 Track IP/Domain Name) - 輸入您想要檢查路由器與其連線狀態的受測主機或其他網路設備的 IP 位址或網域名稱。您最多可以新增 4 個項目。
L2TP
如果您的 ISP 提供 L2TP 連線,請選擇 L2TP。
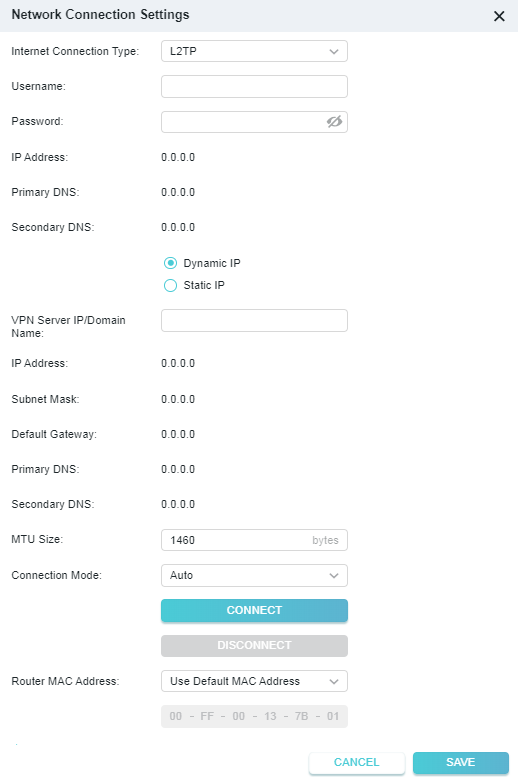
• 使用者名稱/密碼 (Username/Password) - 輸入由您的 ISP 提供的使用者名稱和密碼。這些欄位區分大小寫。
• VPN 伺服器 IP/網域名稱 (VPN Server IP/ Domain Name) - 輸入由您的 ISP 提供的 VPN 伺服器 IP 位址或網域名稱。
• MTU 大小 (MTU Size) - 預設 MTU 大小為「1460」位元組,通常運作良好。除非您的 ISP 要求,否則不建議變更預設的 MTU 大小。
• 連線模式 (Connection Mode):
• 自動 (Auto) - 在此模式下,每當網際網路連線中斷時,都會自動重新連線。
• 依需求 (On Demand) - 在此模式下,網際網路連線將在指定的閒置時間(最大閒置時間)後自動終止,並在您再次嘗試存取網際網路時重新建立。
• 手動 (Manual) - 在此模式下,網際網路連線是透過點擊連線/斷開連線按鈕手動控制的。此模式也像依需求模式一樣支援最大閒置時間功能。請在「最大閒置時間」中輸入網際網路連線在終止前可保持閒置的最大時間(以分鐘為單位)。預設值為 15 分鐘。如果您希望網際網路連線始終保持連線狀態,請輸入 0。
• 路由器 MAC 位址 (Router MAC Address):
• 使用預設 MAC 位址 (Use Default MAC Address) - 若 ISP 未將指派的 IP 位址與 MAC 位址綁定,請勿變更您路由器的預設 MAC 位址。
• 複製目前設備 MAC (Clone Current Device MAC) - 若 ISP 將指派的 IP 位址與 MAC 位址綁定,請選擇此項以複製目前連線至路由器的電腦 MAC 位址。
• 使用自訂 MAC 位址 (Use Custom MAC Address) - 若您的 ISP 要求您註冊 MAC 位址,請選擇此項並在此欄位中輸入正確的 MAC 位址,以防 ISP 將指派的 IP 位址綁定至特定 MAC 位址。
注意:
• 有時即使您指定了最大閒置時間,連線也無法終止,因為某些應用程式在背景持續存取網際網路。
• 您只能對 LAN 上的電腦使用 MAC 位址複製功能。
• 如果您在 WAN 連線為 PPPoE 時變更了 WAN MAC 位址,該設定要在重新建立連線後才會生效。
• 連線檢查 (Connection Check):
路由器會定期使用 Ping 來檢查以太網路 / 熱點 / USB 網際網路連線類型的連線狀態,以確認網際網路是否可用。您可以編輯以下參數,然後點擊 儲存 (SAVE)。
• 追蹤間隔 (Track Interval) - 連續 ICMP 回應請求之間的時間間隔。建議保持預設值。
• 若 Ping 失敗/成功 X 次則變更為不可用/可用 (Change to unavailable/available if Ping failed/succeeded for X Times) - 當 Ping 失敗/成功的次數達到您設定的值時,連線狀態將變更為未連線/已連線。
• IPv4 追蹤 IP/網域名稱 (IPv4 Track IP/Domain Name) - 輸入您想要檢查路由器與其連線狀態的受測主機或其他網路設備的 IP 位址或網域名稱。您最多可以新增 4 個項目。
PPTP
如果您的 ISP 提供 PPTP 連線,請選擇 PPTP。
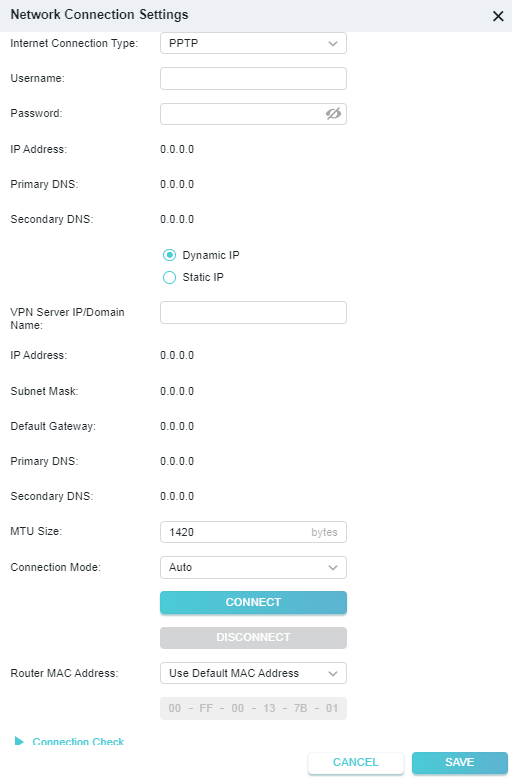
• 使用者名稱/密碼 (Username/Password) - 輸入由您的 ISP 提供的使用者名稱和密碼。這些欄位區分大小寫。
• VPN 伺服器 IP/網域名稱 (VPN Server IP/ Domain Name) - 輸入由您的 ISP 提供的 VPN 伺服器 IP 位址或網域名稱。
• MTU 大小 (MTU Size) - 預設 MTU 大小為「1420」位元組,通常運作良好。除非您的 ISP 要求,否則不建議變更預設的 MTU 大小。
• 連線模式 (Connection Mode):
• 自動 (Auto) - 在此模式下,每當網際網路連線中斷時,都會自動重新連線。
• 依需求 (On Demand) - 在此模式下,網際網路連線將在指定的閒置時間(最大閒置時間)後自動終止,並在您再次嘗試存取網際網路時重新建立。
• 手動 (Manual) - 在此模式下,網際網路連線是透過點擊連線/斷開連線按鈕手動控制的。此模式也像依需求模式一樣支援最大閒置時間功能。請在「最大閒置時間」中輸入網際網路連線在終止前可保持閒置的最大時間(以分鐘為單位)。預設值為 15 分鐘。如果您希望網際網路連線始終保持連線狀態,請輸入 0。
• 路由器 MAC 位址 (Router MAC Address):
• 使用預設 MAC 位址 (Use Default MAC Address) - 若 ISP 未將指派的 IP 位址與 MAC 位址綁定,請勿變更您路由器的預設 MAC 位址。
• 複製目前設備 MAC (Clone Current Device MAC) - 若 ISP 將指派的 IP 位址與 MAC 位址綁定,請選擇此項以複製目前連線至路由器的電腦 MAC 位址。
• 使用自訂 MAC 位址 (Use Custom MAC Address) - 若您的 ISP 要求您註冊 MAC 位址,請選擇此項並在此欄位中輸入正確的 MAC 位址,以防 ISP 將指派的 IP 位址綁定至特定 MAC 位址。
注意:
• 有時即使您指定了最大閒置時間,連線也無法終止,因為某些應用程式在背景持續存取網際網路。
• 您只能對 LAN 上的電腦使用 MAC 位址複製功能。
• 如果您在 WAN 連線為 PPPoE 時變更了 WAN MAC 位址,該設定要在重新建立連線後才會生效。
• 連線檢查 (Connection Check):
路由器會定期使用 Ping 來檢查以太網路 / 熱點 / USB 網際網路連線類型的連線狀態,以確認網際網路是否可用。您可以編輯以下參數,然後點擊 儲存 (SAVE)。
• 追蹤間隔 (Track Interval) - 連續 ICMP 回應請求之間的時間間隔。建議保持預設值。
• 若 Ping 失敗/成功 X 次則變更為不可用/可用 (Change to unavailable/available if Ping failed/succeeded for X Times) - 當 Ping 失敗/成功的次數達到您設定的值時,連線狀態將變更為未連線/已連線。
• IPv4 追蹤 IP/網域名稱 (IPv4 Track IP/Domain Name) - 輸入您想要檢查路由器與其連線狀態的受測主機或其他網路設備的 IP 位址或網域名稱。您最多可以新增 4 個項目。
3.3.6 NAT
注意:3G/4G/5G USB 數據機模式和 USB 網路共享模式沒有此功能。
路由器的 NAT(網路位址轉換)功能可讓 LAN 上的設備使用相同的公網 IP 位址與網際網路上的設備進行通訊,從而透過隱藏設備的 IP 位址來保護區域網路。
1. 造訪 http://tplinkwifi.net,並使用您的 TP-Link ID 或您為路由器設定的密碼登入。
2. 前往 進階 > 網路 > 網際網路 (Advanced > Network > Internet) 並尋找 NAT 區域。
3. 啟用 NAT,然後點擊 儲存 (SAVE)。

4. NAT 預設為啟用且強烈建議保持啟用。如果您停用它,您可能無法存取網際網路,且 NAT 轉發將不會生效。
3.3.7 DoT/DoH
透過 TLS/HTTPS 加密 DNS 查詢,DoT/DoH 可以為您提供更安全且具隱私性的網際網路連線。
1. 造訪 http://tplinkwifi.net,並使用您的 TP-Link ID 或您為路由器設定的密碼登入。
2. 前往 進階 > 網路 > 網際網路 (Advanced > Network > Internet) 並尋找 DoT/DoH 區域。
3. 選擇 DNS 隱私權:DoT/DoH。
4. 選擇 DNS 模式。
• 預設模式 (Default Mode): 在此模式下,路由器會優先使用您選擇的安全 DNS 伺服器。若該伺服器不可用,預設的 DNS 伺服器將會生效。
• 超安全模式 (Ultra Secure Mode): 在此模式下,路由器僅使用您選擇的安全 DNS 伺服器。若該伺服器不可用,網際網路連線將會受到影響。
5. 輸入 DNS 伺服器。您可以檢測所選的 DNS 伺服器是否可用。當您儲存設定時,DoH/DoT 將套用至這些 DNS 伺服器,以及主要與次要 DNS
章節 4. USB數據模式
6. 按一下 儲存。現在您的訪客可以使用您設定的 SSID 和密碼存取您的訪客網路了!
• 自訂訪客網路選項
1. 造訪 http://tplinkwifi.net,並使用您的 TP-Link ID 或您為便攜式路由器設定的密碼登入。
2. 前往 進階 > 無線網路 > 訪客網路。找到 訪客權限 區塊。
3. 根據您的需求自訂訪客網路選項。
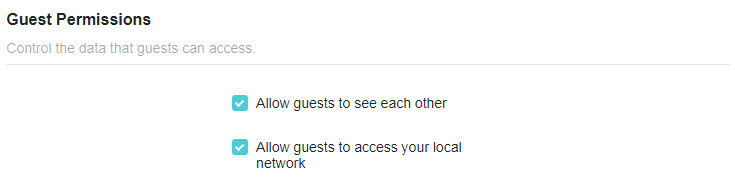
• 允許訪客相互查看
如果您希望允許訪客網路上的無線用戶端透過網路芳鄰和 Ping 等方式互相通訊,請勾選此核取方塊。
• 允許訪客存取我的區域網路
如果您希望允許訪客網路上的無線用戶端透過網路芳鄰和 Ping 等方式與連接到便攜式路由器 LAN 連接埠或主網路的設備進行通訊,請勾選此核取方塊。
4. 按一下 儲存。現在您可以確保網路安全與隱私了!
4.5.4 無線排程
當您不需要無線功能時,無線功能可以在指定時間自動關閉。
1. 造訪 http://tplinkwifi.net,並使用您的 TP-Link ID 或您為便攜式路由器設定的密碼登入。
2. 前往 進階 > 無線網路 > 無線排程。
3. 啟用 無線排程 功能。
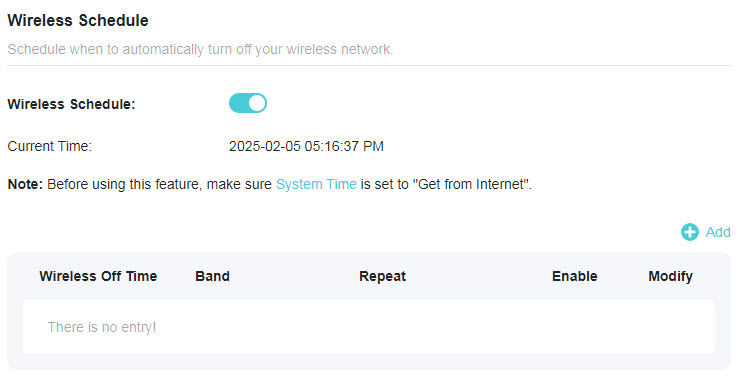
4. 按一下 新增 指定需要自動關閉無線網路的時間段,然後按一下 儲存。
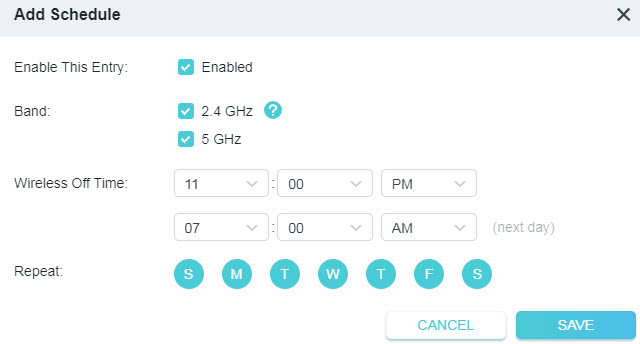
注意:
• 生效的無線排程以便攜式路由器的時間為準。您可以前往 進階 > 系統 > 時間設定 來修改時間。
• 無線網路將在您設定的時間段結束後自動開啟。
4.5.5 WPS
WPS(Wi-Fi 保護設定)可以協助您快速安全地連接到網路。本節將指引您透過 WPS 快速將新的無線設備新增至便攜式路由器的網路中。
注意:
• 如果便攜式路由器的無線功能已停用,則無法設定 WPS 功能。設定前請確保無線功能已啟用。
1. 造訪 http://tplinkwifi.net,並使用您的 TP-Link ID 或您為便攜式路由器設定的密碼登入。
2. 前往 進階 > 無線網路 > WPS。
3. 按照以下方法之一將您的用戶端設備連接到便攜式路由器的 Wi-Fi 網路。
方法 1:使用 PIN 碼
• 透過用戶端的 PIN 碼連接
1. 保持 WPS 狀態為 已啟用 並選擇 用戶端的 PIN 碼。
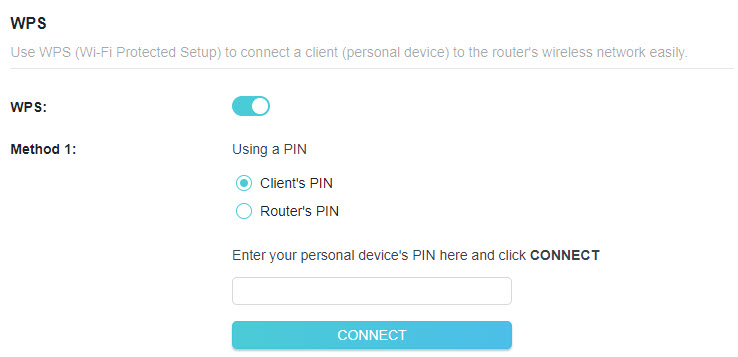
2. 輸入您設備的 PIN 碼,然後按一下 連接。接著您的設備將連接到便攜式路由器。
• 透過路由器的 PIN 碼連接
1. 保持 WPS 狀態為 已啟用 並選擇 路由器的 PIN 碼。
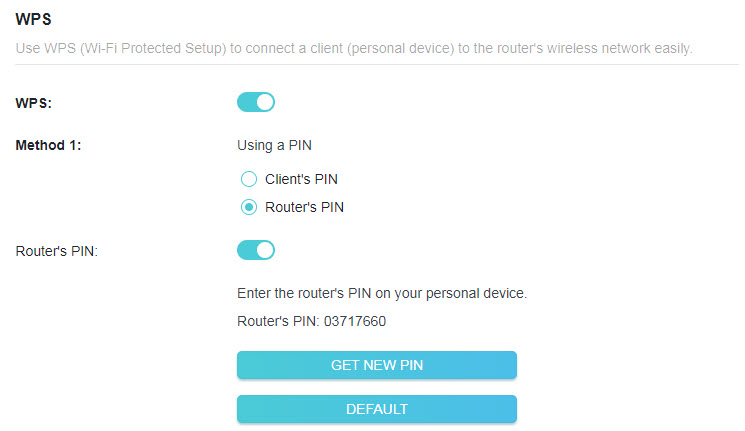
2. 在您的個人設備上輸入便攜式路由器的 PIN 碼。您也可以產生一個新的 PIN 碼。
注意:PIN(個人識別碼)是每台便攜式路由器預設的 8 位數識別碼。支援 WPS 的設備可以透過 PIN 碼連接到您的便攜式路由器。
方法 2:使用網頁畫面上的 WPS 按鈕
按一下畫面上的 開始。在兩分鐘內,於您的個人設備上啟用 WPS。
畫面上應出現 設備-(XX-XX-XX-XX-XX-XX) 已連接 的訊息,指示 WPS 連接成功。
注意:XX-XX-XX-XX-XX-XX 是您設備的 MAC 地址。
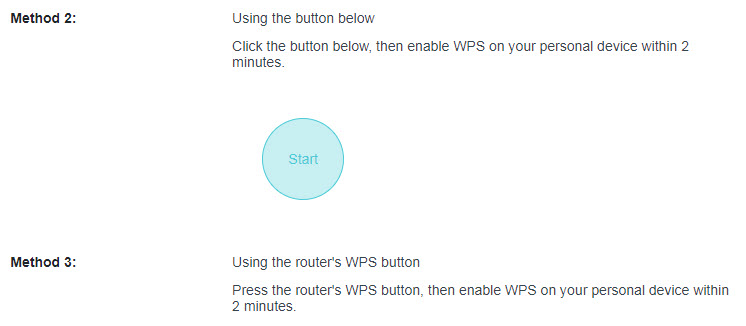
方法 3:使用便攜式路由器上的 WPS 按鈕
按下便攜式路由器上的 WPS 按鈕。在兩分鐘內,於您的個人設備上啟用 WPS。
4.5.6 其他設定
1. 造訪 http://tplinkwifi.net,並使用您的 TP-Link ID 或您為便攜式路由器設定的密碼登入。
2. 前往 進階 > 無線網路 > 其他設定。
3. 設定無線網路的進階設定,然後按一下 儲存。
注意:如果您不熟悉此頁面上的設定項目,強烈建議保持提供的預設值;否則可能會導致無線網路效能降低。
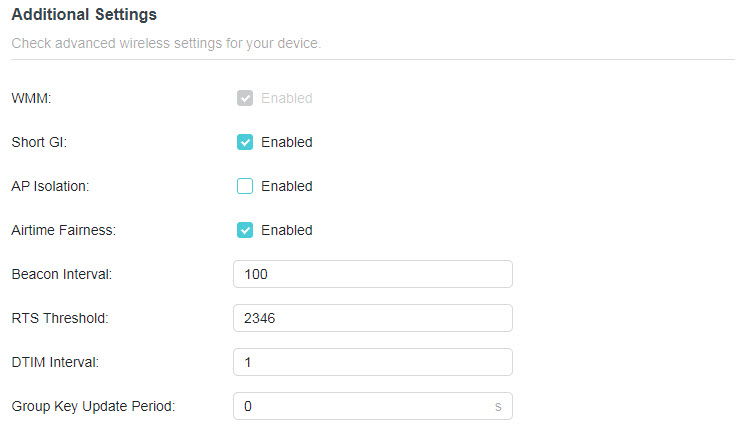
• WMM - WMM 功能可以保證帶有高優先順序訊息的封包被優先傳輸。
• Short GI - 此功能可縮短資料封包之間的時間,從而潛在提高無線網路的吞吐量。
• AP 隔離 - 此功能隔離所有連接的無線站點,使無線站點無法透過 WLAN 互相存取。
• 訊號輕重公平分配 - 此功能可以透過犧牲慢速設備的一點網路時間來提高整體網路效能。
• 信標間隔 - 此處輸入 40-1000 毫秒之間的信標間隔值。信標間隔值決定信標的時間間隔。信標是便攜式路由器發送的用於同步無線網路的封包。預設值為 100。
• RTS 門檻 - 此處您可以指定 RTS(請求發送)門檻。如果封包大於指定的 RTS 門檻大小,便攜式路由器將向特定接收站發送 RTS 訊框並協商發送資料訊框。預設值為 2346。
• DTIM 間隔 - 此值決定交付流量指示訊息 (DTIM) 的間隔。DTIM 欄位是一個倒數欄位,用於告知用戶端下一個收聽廣播和多播訊息的時間視窗。當便攜式路由器為相關用戶端快取了廣播或多播訊息時,它會發送帶有 DTIM 間隔值的下一個 DTIM。您可以指定 1-255 個信標間隔之間的值。預設值為 1,表示 DTIM 間隔與信標間隔相同。
• 群組金鑰更新週期 - 輸入秒數(最少 30 秒)以控制加密金鑰自動更新的時間間隔。預設值為 0,表示不更新金鑰。
4.6 USB 儲存設備
將您的 USB 儲存設備插入便攜式路由器的 USB 連接埠,然後在本地或遠端存取儲存在其中的檔案。
提示:
• 如果您使用 USB 集線器,請確保連接到便攜式路由器的設備不超過 4 個。
• 如果 USB 儲存設備需要使用隨附的外接電源,請確保外接電源已連接。
• 如果您使用 USB 硬碟,請確保其檔案系統為 FAT32、exFat、NTFS 或 HFS+。
• 在從便攜式路由器實體斷開 USB 設備之前,請安全移除它以避免資料損壞:前往 進階 > USB > 儲存設備,然後按一下 移除。
4.6.1 在本地存取 USB 設備
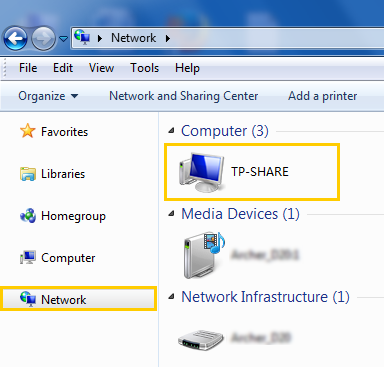
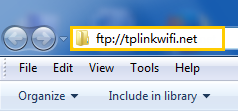
將您的 USB 儲存設備插入便攜式路由器的 USB 連接埠,然後參考下表存取儲存在 USB 儲存設備上的檔案。
| Windows 電腦 |
• 方法 1:
• 方法 2:
|
|---|---|
| Mac |
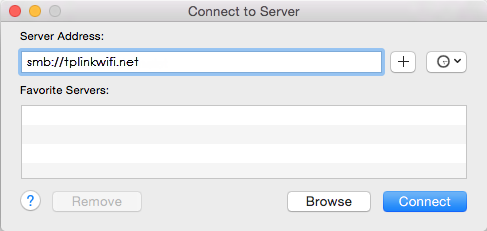
1 ) 選擇 前往 > 連接伺服器。
4 ) 出現提示時,選擇 訪客 單選框。(如果您設定了使用者名稱和密碼以拒絕匿名存取 USB 磁碟,則應選擇 註冊使用者 單選框。要了解如何設定存取帳戶,請參閱 設定資料安全的驗證。) |
| 平板電腦 | 使用第三方應用程式進行網路檔案管理。 |
提示:
您也可以使用網路/媒體伺服器名稱作為伺服器地址來存取您的 USB 儲存設備。欲了解更多資訊,請參閱自訂 USB 儲存設備的地址。
4.6.2 遠端存取 USB 設備
您可以在區域網路之外存取您的 USB 磁碟。例如,您可以:
• 與您的朋友分享相片和其他大型檔案,而無需登入(並付費使用)相片分享網站或電子郵件系統。
• 為簡報資料進行安全備份。
• 在旅途中定期清理相機記憶卡上的檔案。
注意:如果您的電信業者分配了私有 WAN IP 地址(例如 192.168.x.x 或 10.x.x.x),則您無法使用此功能,因為私有地址不會在網際網路上路由。
請按照以下步驟設定遠端存取設定。
1. 造訪 http://tplinkwifi.net,並使用您的 TP-Link ID 或您為便攜式路由器設定的密碼登入。
2. 前往 進階 > USB > 儲存設備。
3. 勾選 網際網路 FTP 核取方塊,然後按一下 儲存。
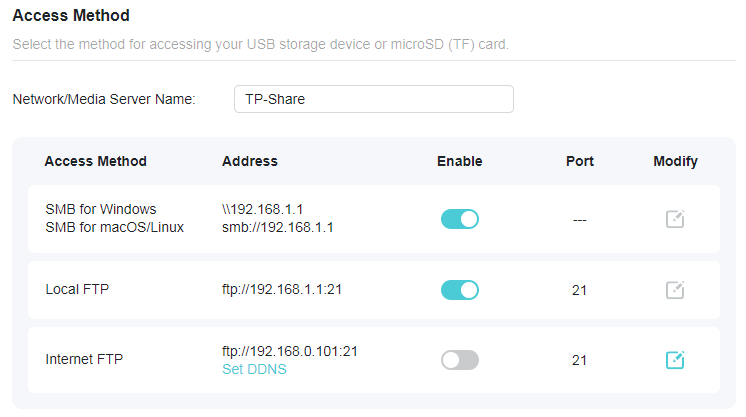
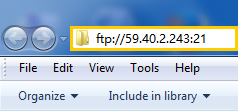
4. 參考下表遠端存取您的 USB 磁碟。
| 電腦 |
1 ) 開啟 檔案總管 (或前往 電腦,僅適用於 Windows 使用者)或開啟網頁瀏覽器。
3 ) 按下鍵盤上的 Enter。 |
|---|---|
| 平板電腦 | 使用第三方應用程式進行網路檔案管理。 |
提示:按一下 動態 DNS 以了解如何為您的便攜式路由器設定網域名稱。
4.6.3 自訂存取設定
預設情況下,所有網路用戶端都可以存取您 USB 磁碟上的所有資料夾。您可以在便攜式路由器的網頁管理頁面上透過設定共用帳戶、共用特定內容和設定新的共用地址來自訂共用設定。
1. 造訪 http://tplinkwifi.net,並使用您的 TP-Link ID 或您為便攜式路由器設定的密碼登入。
2. 前往 進階 > USB > 儲存設備。
• 自訂 USB 儲存設備的地址
您可以自訂伺服器名稱,並使用該名稱存取您的 USB 儲存設備。
1. 在 存取方式 區塊中,確保已啟用 Windows Samba / macOS/Linux Samba,並根據您的喜好輸入 網路/媒體伺服器名稱(例如 MyShare),然後按一下 儲存。
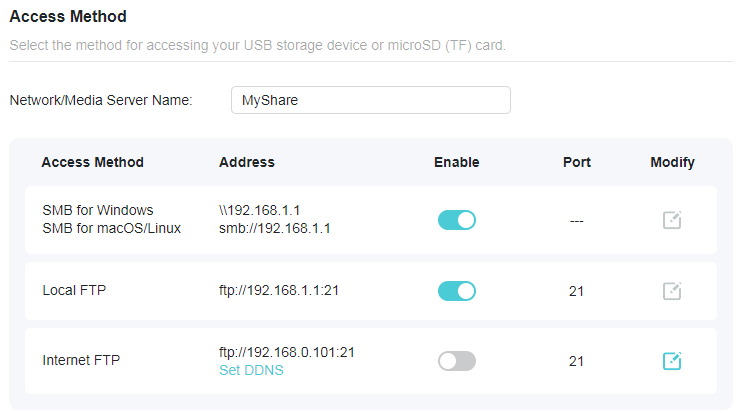
2. 現在您可以透過造訪 \\MyShare(適用於 Windows)或 smb://MyShare (適用於 Mac)來存取 USB 儲存設備。
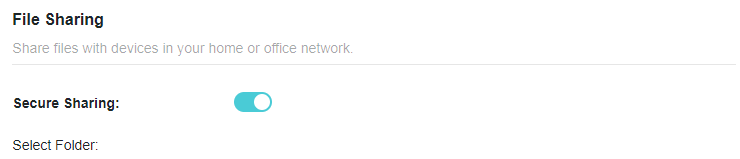
• 僅共用特定內容
聚焦於 檔案共用 區塊。指定您想要共用的共用資料夾,然後按一下 儲存。
• 設定資料安全的驗證
您可以為 USB 儲存設備設定驗證,以便網路用戶端在存取 USB 儲存設備時需要輸入使用者名稱和密碼。
1. 在 檔案共用 區塊中,啟用 安全共用。
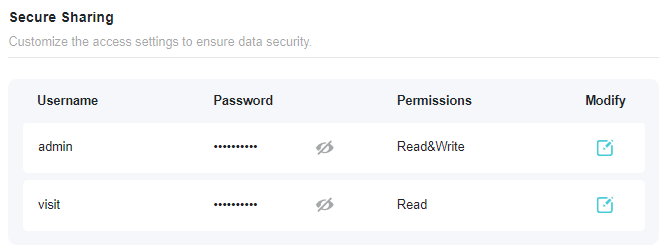
2. 按一下  修改存取帳戶,並注意預設的使用者名稱和密碼。作為管理員存取可以讀取和修改共用資料夾,而訪客只能讀取共用資料夾。
注意:
1. 對於 Windows 使用者,請勿將共用使用者名稱設定為與 Windows 使用者名稱相同。否則,Windows 憑證機制可能會導致以下問題:
• 如果共用密碼也與 Windows 密碼相同,則驗證將不起作用,因為 Windows 將自動使用其帳戶資訊進行 USB 存取。
• 如果共用密碼與 Windows 密碼不同,Windows 將無法記住您的憑證,您將始終需要輸入共用密碼進行 USB 存取。
2. 由於 Windows 憑證機制,變更驗證設定後您可能無法存取 USB 磁碟。請從 Windows 登出並嘗試重新存取。或者您可以參考 自訂 USB 儲存設備的地址 來變更 USB 磁碟的地址。
4.6.4 媒體共用
媒體共用功能允許您直接從支援 DLNA 的設備(例如電腦、平板電腦和 PS2/3/4)檢視儲存在 USB 儲存設備上的相片、播放音樂和觀看電影。
注意:某些型號可能不支援此功能。圖片可能與實際產品有所不同。
1. 造訪 http://tplinkwifi.net,並使用您的 TP-Link ID 或您為便攜式路由器設定的密碼登入。
2. 前往 進階 > USB > 儲存設備。
3. 啟用 媒體共用。

4. 當您的 USB 儲存設備插入便攜式路由器時,連接到便攜式路由器的支援 DLNA 的設備(如您的電腦和平板)可以檢測並播放 USB 儲存設備上的媒體檔案。
5. 詳細說明請參閱下表。
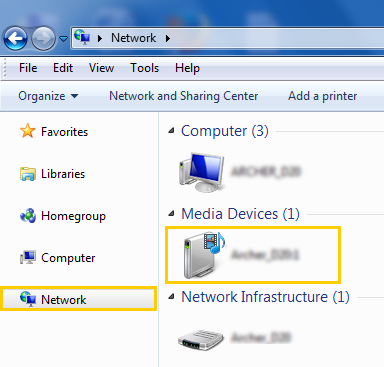
| Windows 電腦 |
前往 電腦 > 網路,然後按一下 媒體設備 區塊中的媒體伺服器名稱(預設為 型號-share)。
|
|---|---|
| 平板電腦 | • 使用第三方支援 DLNA 的播放器。 |
4.7 NAT 轉發
便攜式路由器的 NAT(網路地址轉換)功能使 LAN 上的設備使用相同的公網 IP 地址在網際網路上進行通訊,這透過隱藏設備的 IP 地址保護了區域網路。但是,這也帶來了外部主機無法主動與區域網路中指定設備進行通訊的問題。
透過轉發功能,便攜式路由器可以穿越 NAT 的隔離,使網際網路上的用戶端可以到達 LAN 上的設備並實現某些特定功能。水星 (Mercusys) 路由器包含四種轉發規則。如果設定了兩條或更多規則,實施優先順序從高到低依次為連接埠轉發、連接埠觸發、UPnP 和 DMZ。
4.7.1 連接埠轉發
當您在區域網路中建立伺服器並希望在網際網路上共用它時,連接埠轉發可以實現該服務並將其提供給網際網路使用者。同時,連接埠轉發可以保持區域網路的安全,因為其他服務對網際網路仍然不可見。
連接埠轉發可用於在區域網路中設定公共服務,如 HTTP、FTP、DNS、POP3/SMTP 和 Telnet。不同的服務使用不同的服務連接埠。HTTP 服務使用連接埠 80,FTP 服務使用連接埠 21,SMTP 服務使用連接埠 25,POP3 服務使用連接埠 110。設定前請確認服務連接埠號碼。
我想:
透過網際網路與我的朋友共用我在區域網路中建立的個人網站。
例如,個人網站已建立在我的家用 PC (192.168.1.100) 上。我希望網際網路上的朋友能以某種方式造訪我的網站。我的 PC 連接到 WAN IP 地址為 218.18.232.154 的便攜式路由器。
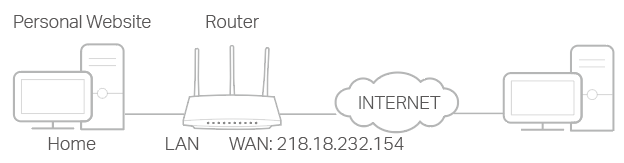
1. 將您的 PC 設定為固定 IP 地址,例如 192.168.1.100。
2. 造訪 http://tplinkwifi.net,並使用您的 TP-Link ID 或您為便攜式路由器設定的密碼登入。
3. 前往 進階 > NAT 轉發 > 連接埠轉發。
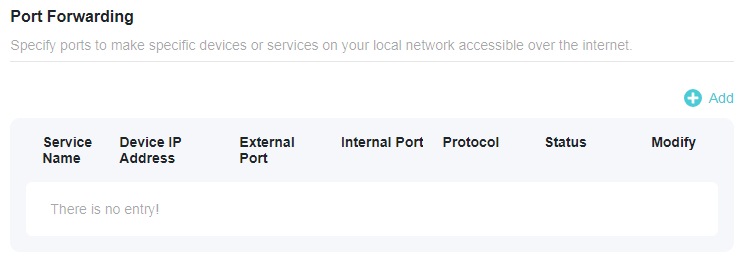
4. 按一下 新增。
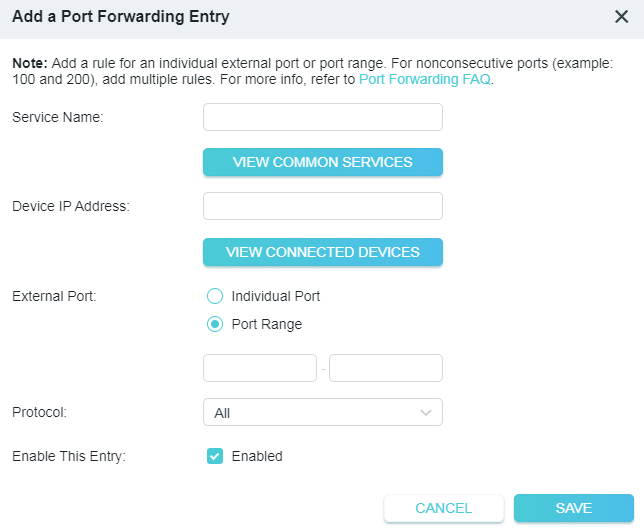
5. 按一下 檢視常用服務 並選擇 HTTP。外部連接埠、內部連接埠 和 協定 將自動填入。
6. 按一下 檢視已連接的設備 並選擇您的家用 PC。設備 IP 地址將自動填入。或者在 設備 IP 地址 欄位中手動輸入 PC 的 IP 地址 192.168.0.100。
7. 按一下 儲存。
提示:
• 如果您不清楚要使用哪個連接埠和協定,建議保持內部連接埠和協定的預設設定。
• 如果您想使用的服務不在常用服務清單中,您可以手動輸入相應的參數。您應該核實服務需要的連接埠號碼。
• 如果您要在便攜式路由器中提供多個服務,可以新增多條連接埠轉發規則。請注意,外部連接埠 不應重疊。
完成!
網際網路上的使用者可以輸入 http:// WAN IP(在本例中為:http:// 218.18.232.154)來造訪您的個人網站。
提示:
• WAN IP 應為公網 IP 地址。由於 WAN IP 是由電信業者動態分配的,建議參考 動態 DNS 為 WAN 申請並註冊一個網域名稱。然後網際網路上的使用者可以使用 http:// 網域名稱 來造訪網站。
• 如果您變更了預設的 外部連接埠,您應該使用 http:// WAN IP:外部連接埠 或 http:// 網域名稱:外部連接埠 來造訪網站。
4.7.2 連接埠觸發
連接埠觸發可以指定一個觸發連接埠及其對應的外部連接埠。當本地網路上的主機發起對觸發連接埠的連接時,所有外部連接埠都將開啟以供後續連接。便攜式路由器可以記錄主機的 IP 地址。當來自網際網路的資料返回到外部連接埠時,便攜式路由器可以將其轉發給相應的主機。連接埠觸發主要套用於線上遊戲、VoIP、視訊播放器和常用套用程式,包括 MSN Gaming Zone、Dialpad 和 Quick Time 4 播放器等。
按照以下步驟設定連接埠觸發規則:
1. 造訪 http://tplinkwifi.net,並使用您的 TP-Link ID 或您為便攜式路由器設定的密碼登入。
2. 前往 進階 > NAT 轉發 > 連接埠觸發 並按一下按鈕。
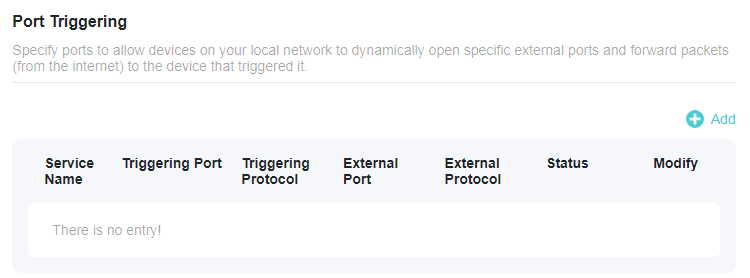
3. 按一下 檢視常用服務,然後選擇所需的套用程式。觸發連接埠、觸發協定 和 外部連接埠 將自動填入。下圖以套用程式 MSN Gaming Zone 為例。
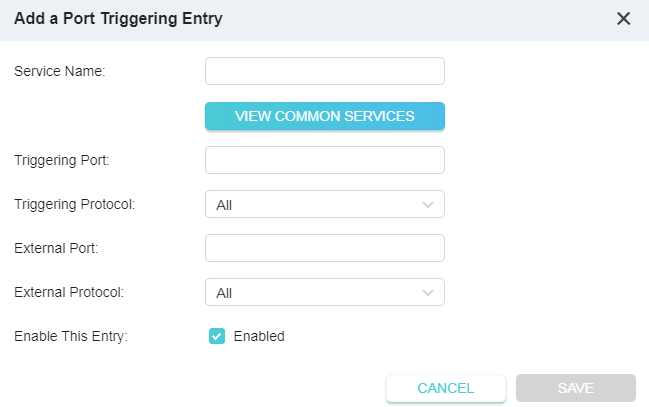
4. 按一下 儲存。
提示:
• 您可以根據網路需求新增多條連接埠觸發規則。
• 觸發連接埠不能重疊。
• 如果您需要的套用程式未列在「現有套用程式」清單中,請手動輸入參數。您應該先核實套用程式使用的外部連接埠,並根據頁面顯示的格式將其輸入到 外部連接埠 欄位中。
4.7.3 UPnP
UPnP(通用即插即用)協定允許套用程式或主機設備自動尋找前端 NAT 設備並向其發送請求以開啟相應的連接埠。啟用 UPnP 後,本地網路和網際網路上的套用程式或主機設備可以自由通訊,從而實現網路的無縫連接。如果您想將套用程式用於多人遊戲、對等連接、即時通訊(如 VoIP 或電話會議)或遠端協助等,您可能需要啟用 UPnP。
提示:
• 此便攜式路由器預設啟用 UPnP。
• 只有支援 UPnP 協定的套用程式才能使用此功能。
• UPnP 功能需要作業系統的支援(例如 Windows Vista/ Windows 7/ Windows 8 等。部分作業系統需要安裝 UPnP 元件)。
例如,當您將 Xbox 連接到已連接網際網路的便攜式路由器以玩線上遊戲時,UPnP 將向便攜式路由器發送請求以開啟相應的連接埠,允許後續資料穿透 NAT 進行傳輸。因此,您可以毫無障礙地玩 Xbox 線上遊戲。
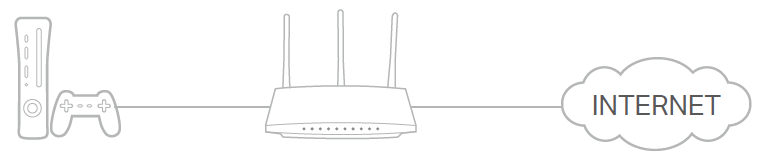
如有必要,您可以按照步驟變更 UPnP 的狀態。
1. 造訪 http://tplinkwifi.net,並使用您的 TP-Link ID 或您為便攜式路由器設定的密碼登入。
2. 前往 進階 > NAT 轉發 > UPnP 並根據需要切換開啟或關閉。

4.7.4 DMZ
當一台 PC 被設定為本地網路上的 DMZ(非軍事區)主機時,它會完全暴露在網際網路上,這可以實現內部主機和外部主機之間無限制的雙向通訊。DMZ 主機成為開放所有連接埠的虛擬伺服器。當您不清楚某些特殊套用程式(如 IP 攝影機和資料庫軟體)要開啟哪些連接埠時,您可以將 PC 設定為 DMZ 主機。
注意:
啟用 DMZ 時,DMZ 主機完全暴露在網際網路上,這可能會帶來一些潛在的安全隱患。如果不使用 DMZ,請及時停用。
我想:
讓家用 PC 無連接埠限制地加入線上遊戲。
例如,由於某些連接埠限制,在玩線上遊戲時,您可以正常登入但無法與其他玩家組隊。要解決此問題,請將您的 PC 設定為開放所有連接埠的 DMZ 主機。
我該怎麼做?
1. 為您的 PC 分配一個固定 IP 地址,例如 192.168.0.100。
2. 造訪 http://tplinkwifi.net,並使用您的 TP-Link ID 或您為便攜式路由器設定的密碼登入。
3. 前往 進階 > NAT 轉發 > DMZ 並勾選以啟用 DMZ。
4. 按一下 檢視已連接的設備 並選擇您的 PC。設備 IP 地址 將自動填入。或者在 DMZ 主機 IP 地址 欄位中手動輸入 PC 的 IP 地址 192.168.0.100。
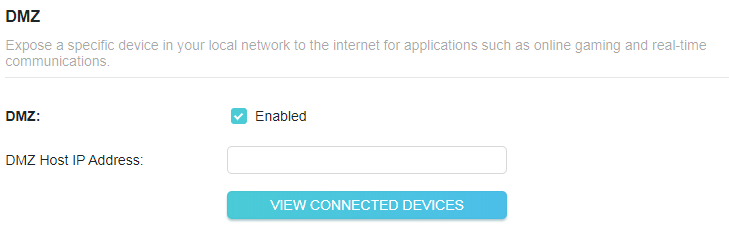
5. 按一下 儲存。
完成!
設定完成。您已將 PC 設定為 DMZ 主機,現在您可以組隊與其他玩家一起玩遊戲了。
4.8 安全性
4.8.1 保護網路免受網路攻擊
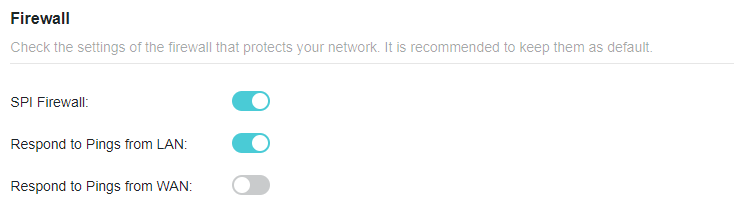
SPI(狀態封包檢查)防火牆保護便攜式路由器免受網路攻擊,並根據協定驗證通過便攜式路由器的流量。此功能預設啟用。
1. 造訪 http://tplinkwifi.net,並使用您的 TP-Link ID 或您為便攜式路由器設定的密碼登入。
2. 前往 進階 > 安全性 > 防火牆。建議保持預設設定。
4.8.2 存取控制
存取控制用於根據已阻擋設備清單(黑名單)或已允許設備清單(白名單),阻擋或允許特定用戶端設備存取您的網路(透過有線或無線)。
我想:
阻擋或允許特定的用戶端設備存取我的網路(透過有線或無線)。
我該怎麼做?
1. 造訪 http://tplinkwifi.net,並使用您的 TP-Link ID 或您為便攜式路由器設定的密碼登入。
2. 前往 進階 > 安全性 > 存取控制。
3. 切換開關以啟用 存取控制。
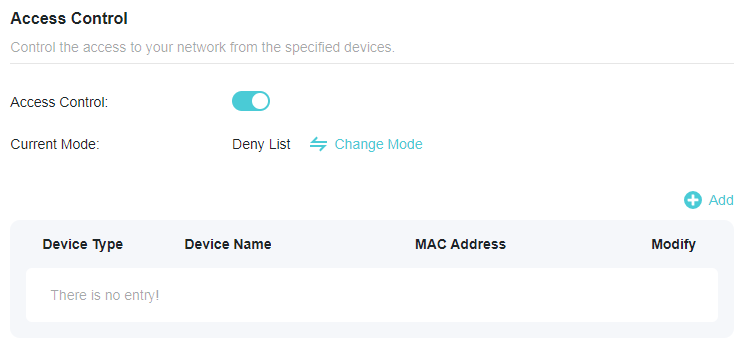
4. 按一下 變更模式 以選擇存取模式,以阻擋(推薦)或允許清單中的設備。
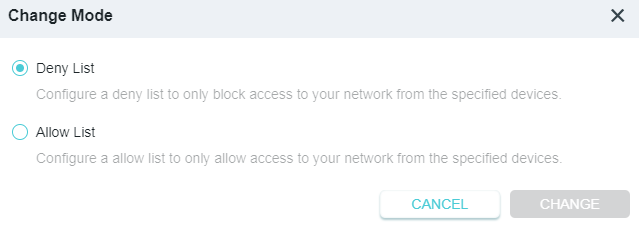
阻擋特定設備:
1 ) 選擇 黑名單。
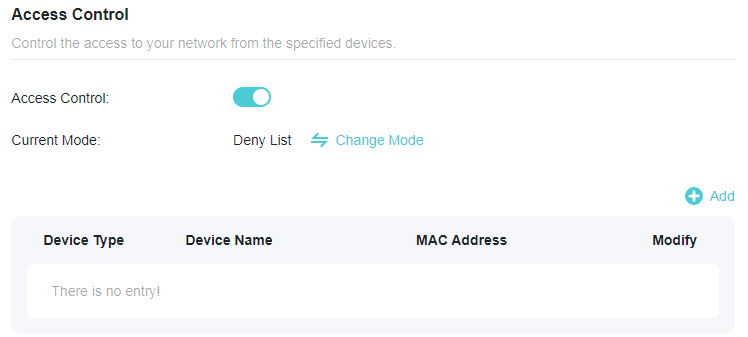
2 ) 按一下  並選擇要阻擋的設備,或手動輸入 MAC 地址,然後按一下 新增。
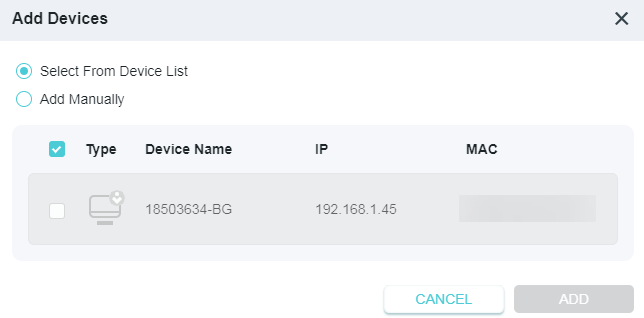
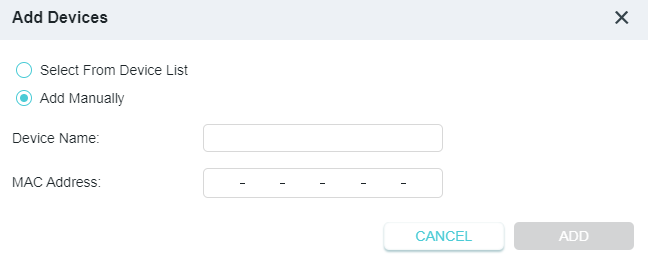
3 ) 畫面上將出現 操作成功 訊息,表示選定的設備已成功新增至黑名單。
允許特定設備:
1 ) 選擇 白名單 並按一下 變更。
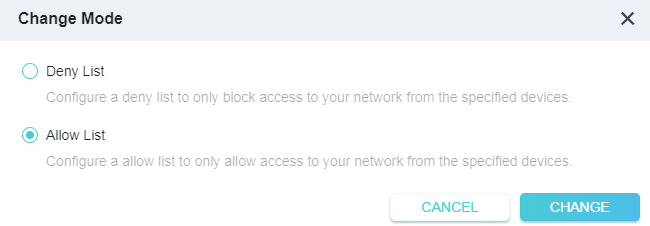
2 ) 您自己的設備預設在白名單中,無法刪除。按一下 將其他設備新增至白名單。
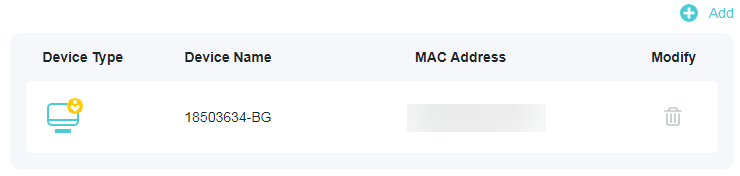
• 新增已連接的設備
1 ) 按一下 從設備清單中選擇。
2 ) 選擇您要允許的設備,然後按一下 新增。
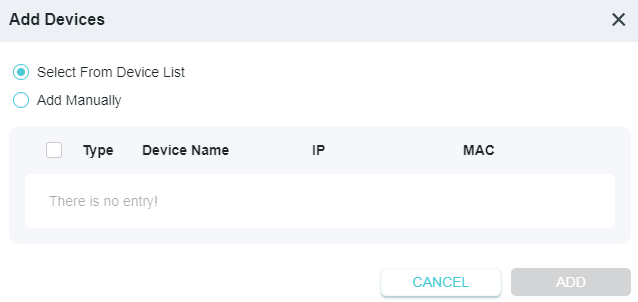
3 ) 畫面上將出現操作成功訊息,表示選定的設備已成功新增至白名單。
• 新增未連接的設備
1 ) 按一下 手動新增。
2 ) 輸入要允許的設備的 設備名稱 和 MAC 地址,然後按一下 新增。
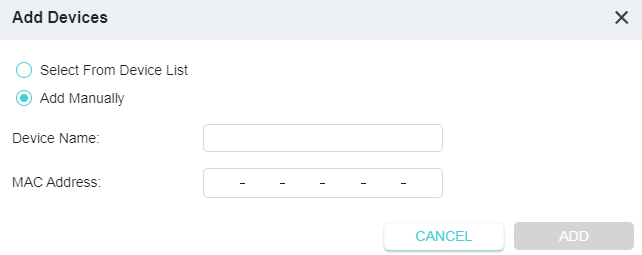
3 ) 畫面上將出現 操作成功 訊息,表示該設備已成功新增至白名單。
完成!
現在您可以透過使用黑名單或白名單來阻擋或允許特定用戶端設備存取您的網路(透過有線或無線)。
4.8.3 IP 與 MAC 綁定
IP 與 MAC 綁定,即 ARP(位址解析協定)綁定,用於將網路設備的 IP 地址與其 MAC 地址綁定。這將透過拒絕綁定清單中具有匹配 IP 地址但 MAC 地址無法識別的設備存取網路,來防止 ARP 欺騙和其他 ARP 攻擊。
我想:
防止 ARP 欺騙和 ARP 攻擊。
我該怎麼做?
1. 造訪 http://tplinkwifi.net,並使用您的 TP-Link ID 或您為便攜式路由器設定的密碼登入。
2. 前往 進階 > 安全性 > IP 與 MAC 綁定。
3. 啟用 IP 與 MAC 綁定。

4. 根據您的需求綁定您的設備。
綁定已連接的設備:
1 ) 找到 ARP 清單 區塊並啟用 綁定,以綁定特定設備的 IP 和 MAC 地址。
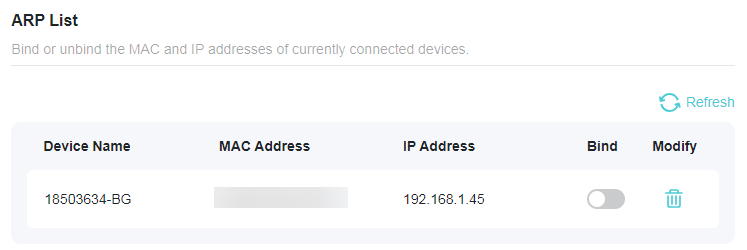
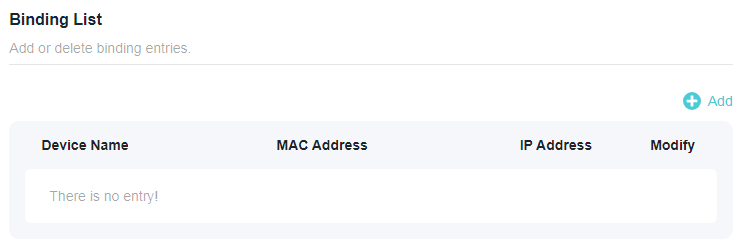
新增綁定條目:
1 ) 按一下 綁定清單 區塊中的 。
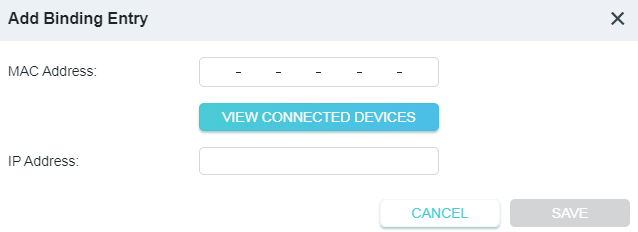
2 ) 按一下 檢視已連接的設備 並選擇要綁定的設備。MAC 地址 和 IP 地址 欄位將自動填入。
3 ) 按一下 儲存。
完成!
現在您不必擔心 ARP 欺騙和 ARP 攻擊了!
4.8.4 ALG
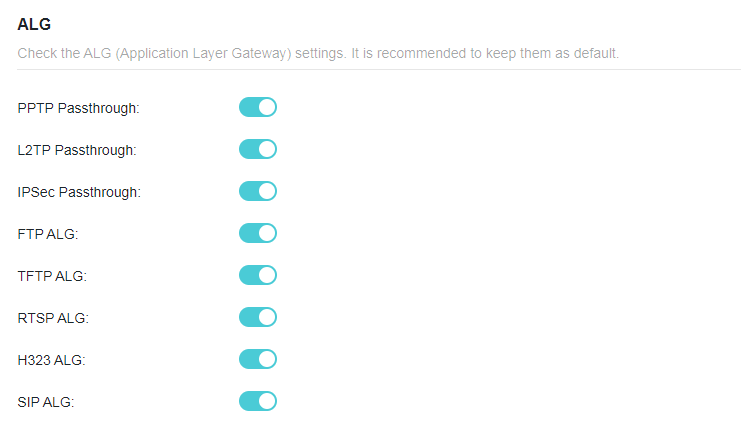
ALG 允許將自訂的網路地址轉換 (NAT) 穿越過濾器插入到閘道中,以支援某些套用層「控制/資料」協定(如 FTP、TFTP、H323 等)的地址和連接埠轉換。建議保持預設設定。
當您使用語音和視訊套用程式透過便攜式路由器建立和接受通話時,您可能需要停用 SIP ALG,因為某些語音和視訊通訊套用程式在啟用 SIP ALG 時無法正常工作。
造訪 http://tplinkwifi.net,並使用您的 TP-Link ID 或您為便攜式路由器設定的密碼登入。前往 進階 > 安全性 > ALG。
4.9 VPN 伺服器與合併
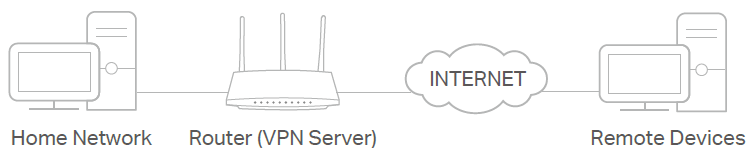
便攜式路由器提供幾種設定 VPN 連接的方法:
VPN 伺服器 允許遠端設備透過網際網路以安全的方式存取您的家庭網路。便攜式路由器支援四種類型的 VPN 伺服器:
OpenVPN 稍微複雜一些,但安全性更高、穩定性更好,適合校園網和公司內網等受限環境。
PPTP VPN 易於使用電腦和行動裝置內建的 VPN 軟體,但它較為脆弱,可能會被某些電信業者阻擋。
L2TP/IPSec VPN 比 PPTP VPN 更安全但速度較慢,並且在繞過防火牆方面可能會遇到困難。
WireGuard VPN 是一種安全、快速且現代化的 VPN 協定。它基於 UDP 協定,使用現代加密演算法來提高工作效率。VPN 合併允許您的用戶端設備同時存取多個 VPN 伺服器,以滿足您的工作、遊戲和串流視訊需求。
4.9.1 使用 OpenVPN 存取您的家庭網路
OpenVPN 伺服器用於建立 OpenVPN 連接,以供遠端設備存取您的家庭網路。
要使用 VPN 功能,您需要在便攜式路由器上啟用 OpenVPN 伺服器,並在遠端設備上安裝並執行 VPN 合併軟體。請按照以下步驟設定 OpenVPN 連接。
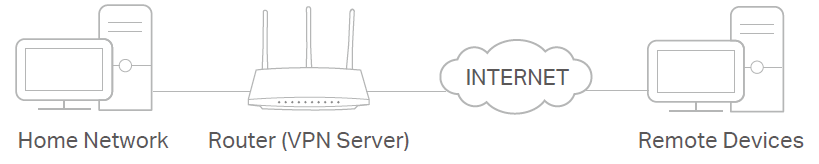
步驟 1. 在便攜式路由器上設定 OpenVPN 伺服器
1. 造訪 http://tplinkwifi.net,並使用您的 TP-Link ID 或您為便攜式路由器設定的密碼登入。
2. 前往 進階 > VPN 伺服器 > OpenVPN,然後勾選 OpenVPN 的啟用方塊。
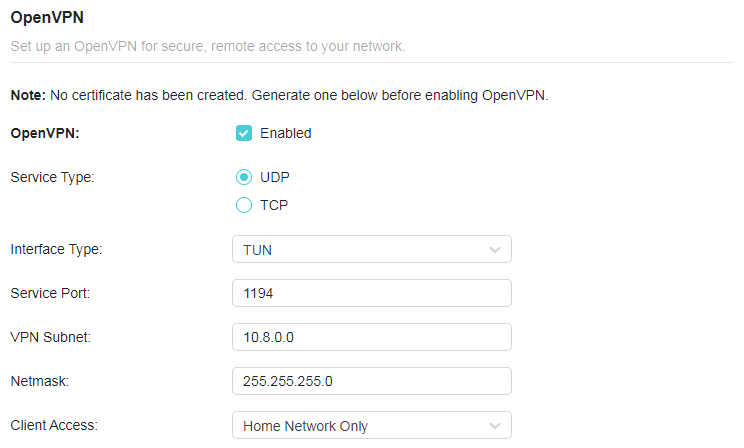
注意:
• 在啟用 VPN 伺服器之前,我們建議您設定動態 DNS 服務(推薦)或為便攜式路由器的 WAN 連接埠分配固定 IP 地址,並將系統時間與網際網路同步。
• 首次設定 OpenVPN 伺服器時,您可能需要在啟用 VPN 伺服器之前產生憑證。
3. 選擇 OpenVPN 伺服器的 服務類型(通訊協定):UDP、TCP。
4. 輸入 VPN 設備連接的 VPN 服務連接埠,連接埠號碼應在 1024 到 65535 之間。
5. 在 VPN 子網路/網路遮罩 欄位中,輸入 OpenVPN 伺服器可以租用給設備的 IP 地址範圍。
6. 選擇您的 用戶端存取 類型。如果您只想讓遠端設備存取您的家庭網路,請選擇 僅家庭網路;如果您還想讓遠端設備透過 VPN 伺服器存取網際網路,請選擇 網際網路和家庭網路。
7. 按一下 儲存。
8. 按一下 產生 以獲取新憑證。

注意:如果您已經產生了一個憑證,請跳過此步驟,或按一下 產生 以更新憑證。
9. 按一下 匯出 以儲存 OpenVPN 設定檔,遠端設備將使用該檔案來存取您的便攜式路由器。

步驟 2. 在您的遠端設備上設定 OpenVPN 連接
1. 造訪 http://openvpn.net/index.php/download/community-downloads.html 下載 OpenVPN 軟體,並將其安裝在您要執行 OpenVPN 用戶端工具程式的設備上。
注意:您需要在計劃套用 VPN 功能以存取便攜式路由器的每台設備上安裝 OpenVPN 用戶端工具程式。行動裝置應從 Google Play 或 Apple App Store 下載第三方應用程式。
2. 安裝完成後,將從便攜式路由器匯出的檔案複製到 OpenVPN 用戶端工具程式的「config」資料夾中(例如,Windows 上的 C:\Program Files\OpenVPN\config)。路徑取決於 OpenVPN 用戶端工具程式的安裝位置。
3. 執行 OpenVPN 用戶端工具程式並將其連接到 OpenVPN 伺服器。
4.9.2 使用 PPTP VPN 存取您的家庭網路
PPTP VPN 伺服器用於建立 PPTP VPN 連接,以供遠端設備存取您的家庭網路。
要使用 VPN 功能,您需要在便攜式路由器上設定 PPTP VPN 伺服器,並在遠端設備上設定 PPTP 連接。請按照以下步驟設定 PPTP VPN 連接。
步驟 1. 在便攜式路由器上設定 PPTP VPN 伺服器
1. 造訪 http://tplinkwifi.net,並使用您的 TP-Link ID 或您為便攜式路由器設定的密碼登入。
2. 前往 進階 > VPN 伺服器 > PPTP,然後勾選 PPTP 的 啟用 方塊。
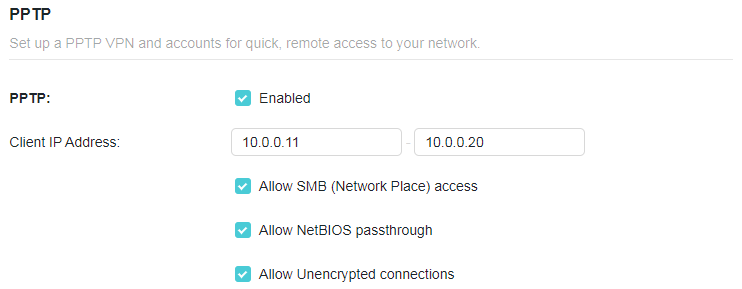
注意:在啟用 VPN 伺服器之前,我們建議您設定動態 DNS 服務(推薦)或為便攜式路由器的 WAN 連接埠分配固定 IP 地址,並將系統時間與網際網路同步。
3. 在 用戶端 IP 地址 欄位中,輸入 PPTP VPN 伺服器可以租用給設備的 IP 地址範圍(最多 10 個)。
4. 根據您的需求設定 PPTP 連接權限。
• 選擇 允許存取 Samba(網路芳鄰),以允許您的 VPN 設備存取您的本地 Samba 伺服器。
• 選擇 允許 NetBIOS 穿透,以允許您的 VPN 設備使用 NetBIOS 名稱存取您的 Samba 伺服器。
• 選擇 允許未加密的連接,以允許與您的 VPN 伺服器建立未加密的連接。
5. 按一下 儲存。
6. 為遠端設備設定 PPTP VPN 連接帳戶。您最多可以建立 16 個帳戶。
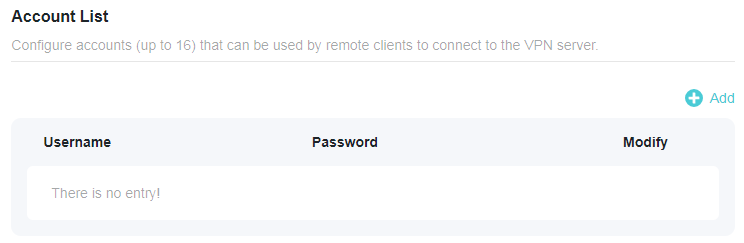
7. 按一下 新增。
8. 輸入 使用者名稱 和 密碼,以將設備驗證到 PPTP VPN 伺服器。
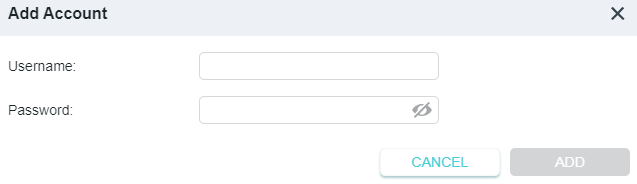
9. 按一下 新增。
步驟 2. 在您的遠端設備上設定 PPTP VPN 連接
遠端設備可以使用 Windows 內建的 PPTP 軟體或第三方 PPTP 軟體連接到 PPTP 伺服器。這裡我們以 Windows 內建的 PPTP 軟體 為例。
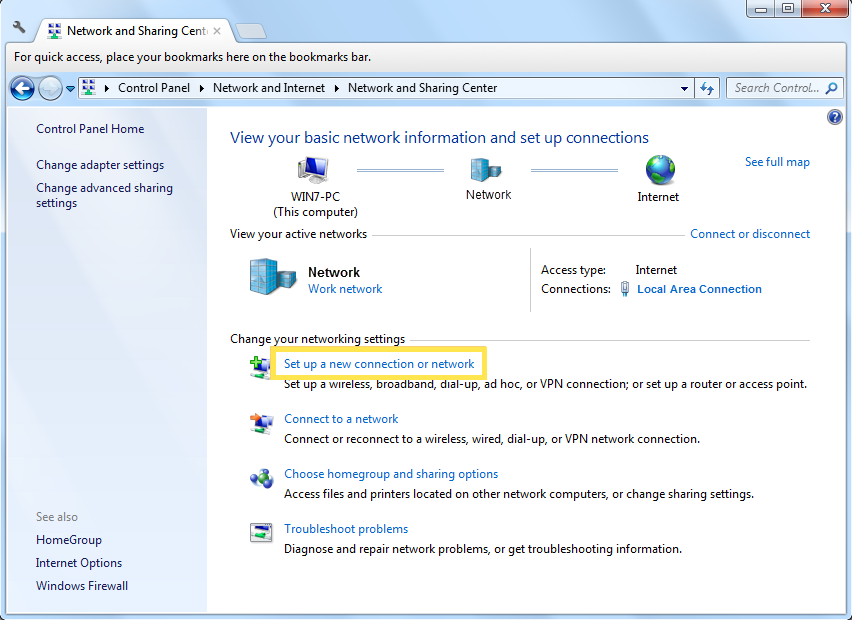
1. 前往 開始 > 控制台 > 網路和網際網路 > 網路和共用中心。
2. 選擇 設定新的連線或網路。
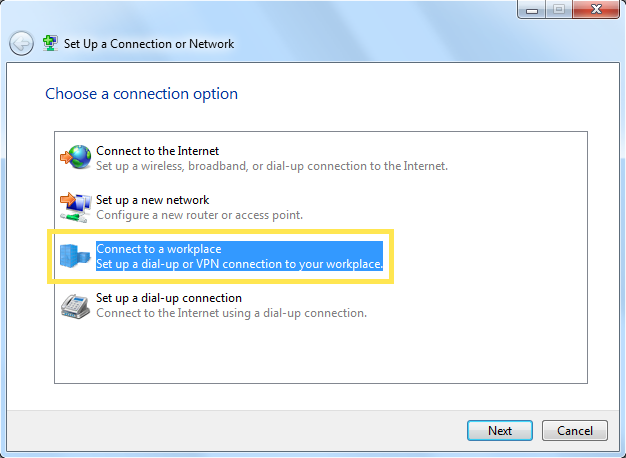
3. 選擇 連線到工作地點,然後按一下 下一步。
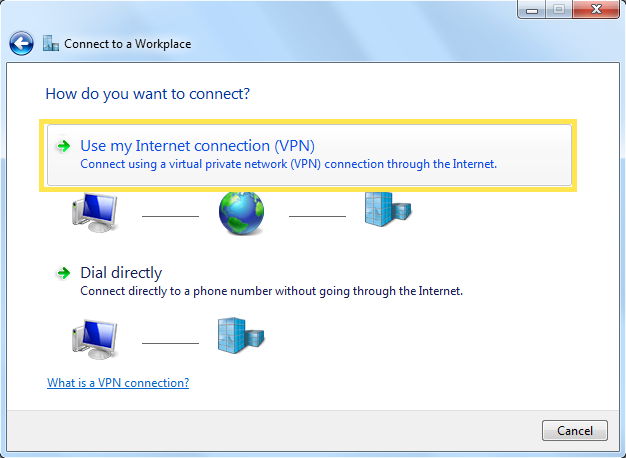
4. 選擇 使用我的網際網路連線 (VPN)。
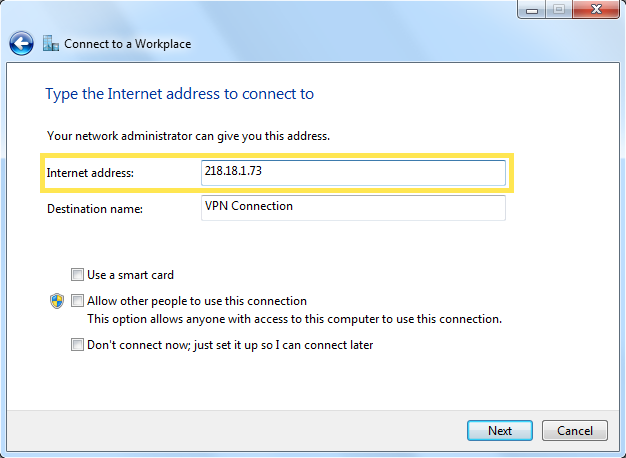
5. 在 網際網路地址 欄位中輸入便攜式路由器的網際網路 IP 地址(例如:218.18.1.73)。按一下 下一步。
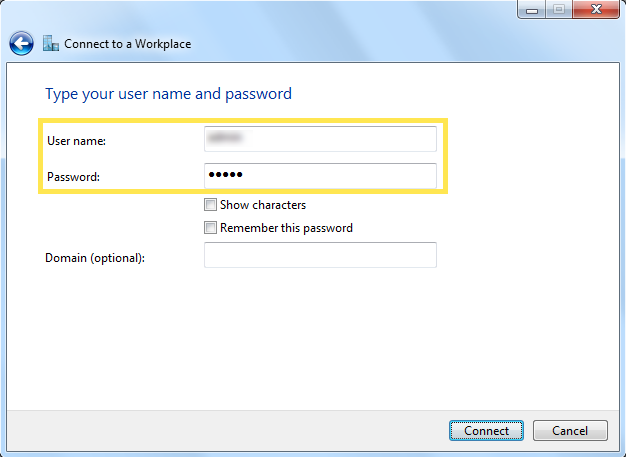
6. 輸入您在便攜式路由器上為 PPTP VPN 伺服器設定的 使用者名稱 和 密碼,然後按一下 連線。
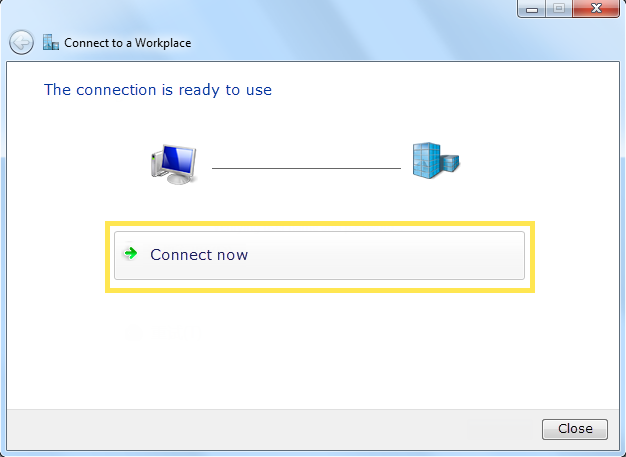
7. 當 VPN 連接準備好使用時,按一下 立即連線。
4.9.3 使用 L2TP/IPSec VPN 存取您的家庭網路
L2TP/IPSec VPN 伺服器用於建立 L2TP/IPSec VPN 連接,以供遠端設備存取您的家庭網路。
要使用 VPN 功能,您需要在便攜式路由器上設定 L2TP/IPSec VPN 伺服器,並在遠端設備上設定 L2TP/IPSec 連接。請按照以下步驟設定 L2TP/IPSec VPN 連接。
步驟 1. 在便攜式路由器上設定 L2TP/IPSec VPN 伺服器
1. 造訪 http://tplinkwifi.net,並使用您的 TP-Link ID 或您為便攜式路由器設定的密碼登入。
2. 前往 進階 > VPN 伺服器 > L2TP/IPSec,然後啟用 L2TP/IPSec。
注意:
• 可能需要升級韌體才能支援 L2TP/IPSec VPN 伺服器。
• 在啟用 VPN 伺服器 之前,我們建議您設定動態 DNS 服務(推薦)或為便攜式路由器的 WAN 連接埠分配固定 IP 地址,並將 系統時間 與網際網路同步。
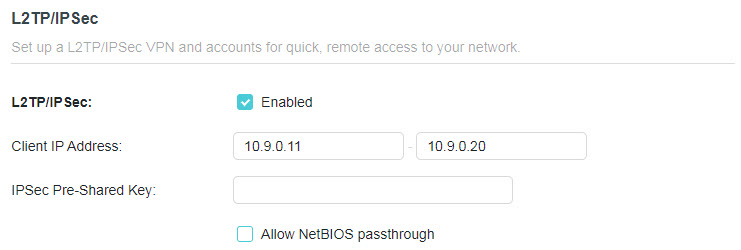
3. 在 用戶端 IP 地址 欄位中,輸入 L2TP/IPSec VPN 伺服器可以租用給設備的 IP 地址範圍(最多 10 個)。
4. 建立一個 IPSec 預共用金鑰。
5. 為遠端設備設定 L2TP/IPSec VPN 連接帳戶。您最多可以建立 16 個帳戶。
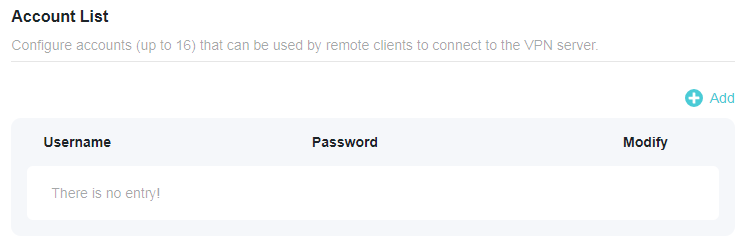
1 ) 按一下 新增。
2 ) 輸入 使用者名稱 和 密碼,以將設備驗證到 L2TP/IPSec VPN 伺服器。
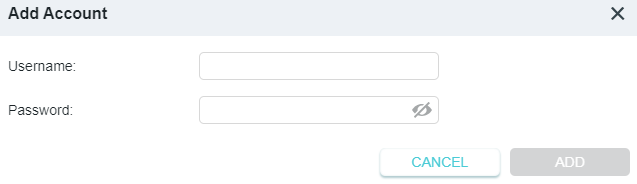
3 ) 按一下 新增。
6. 按一下 儲存。
步驟 2. 在您的遠端設備上設定 L2TP/IPSec VPN 連接
遠端設備可以使用 Windows 或 Mac OS 內建的 L2TP/IPSec 軟體或第三方 L2TP/IPSec 軟體連接到 L2TP/IPSec 伺服器。這裡我們以 Windows 內建的 L2TP/IPSec 軟體為例。
1. 前往 開始 > 控制台 > 網路和網際網路 > 網路和共用中心。
2. 選擇 設定新的連線或網路。
3. 選擇 連線到工作地點,然後按一下 下一步。
4. 選擇 使用我的網際網路連線 (VPN)。
5. 在 網際網路地址 欄位中輸入便攜式路由器的網際網路 IP 地址(例如:218.18.1.73),然後選擇核取方塊 現在不連線;僅進行設定以便稍後連線。按一下 下一步。
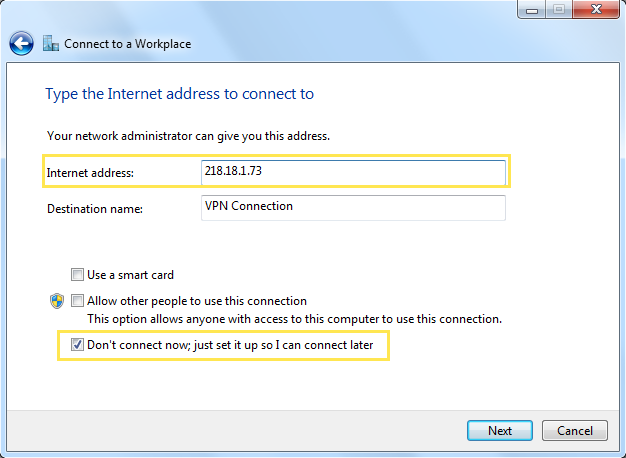
6. 輸入您在便攜式路由器上為 L2TP/IPSec VPN 伺服器設定的 使用者名稱和密碼,然後按一下 連線。
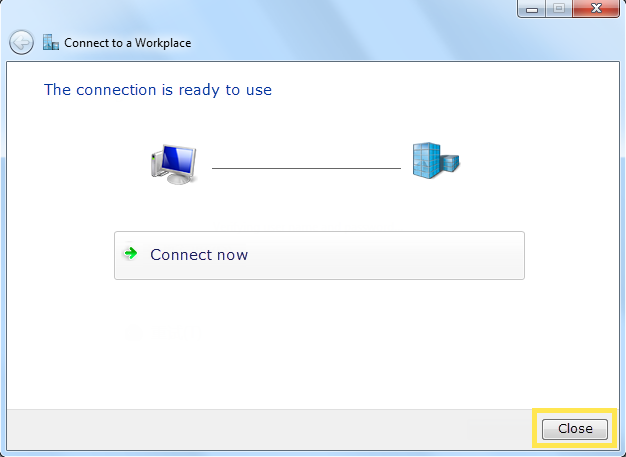
7. 當 VPN 連接準備好使用時,按一下 關閉 。
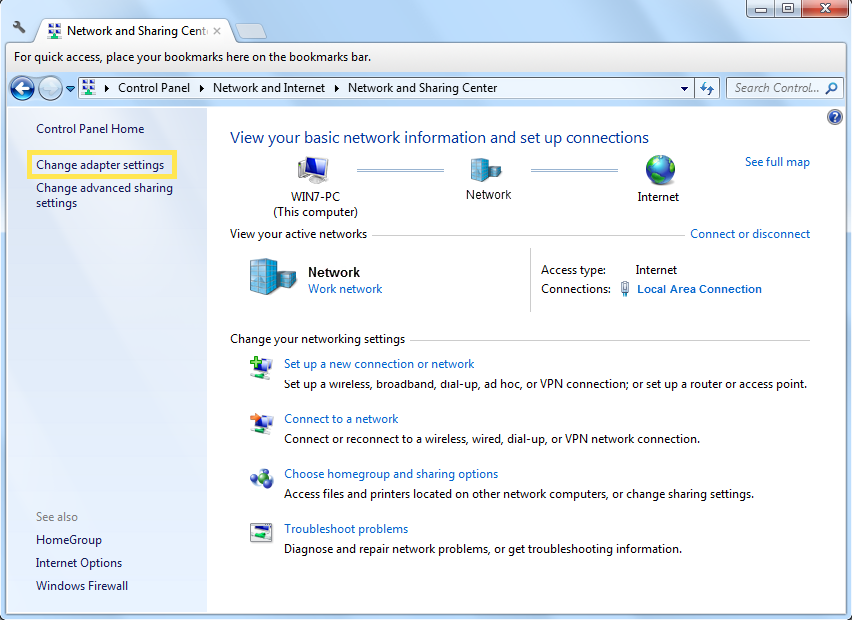
8. 前往 網路和共用中心,然後按一下 變更介面卡設定。
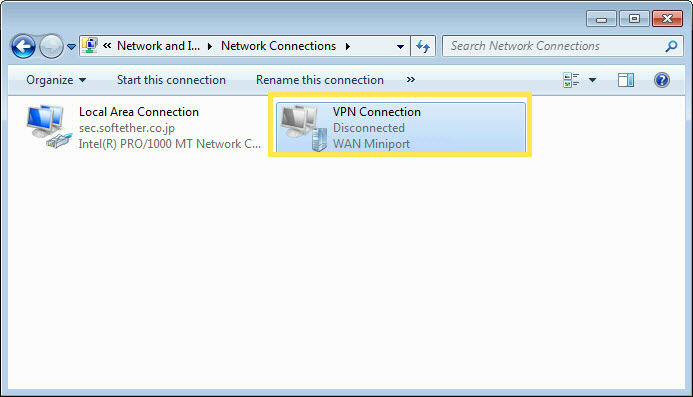
9. 找到您建立的 VPN 連接,然後按兩下它。
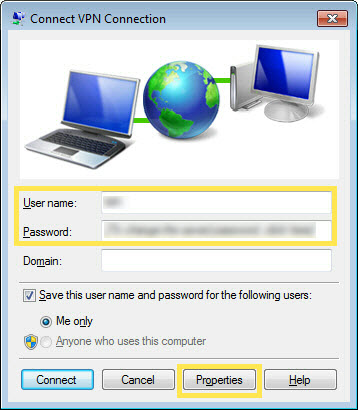
10. 輸入您在便攜式路由器上為 L2TP/IPSec VPN 伺服器設定的 使用者名稱和密碼,然後按一下 屬性。
11. 切換到 安全性 標籤,選擇 使用 IPsec 的第 2 層通道協定 (L2TP/IPSec),然後按一下 進階設定。
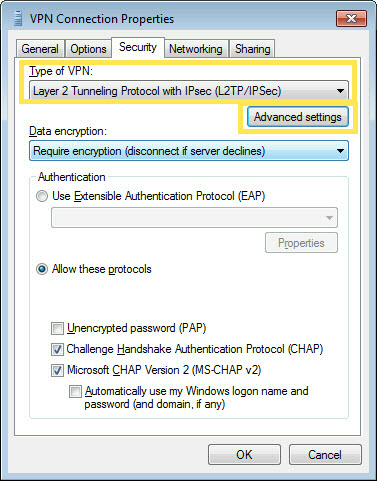
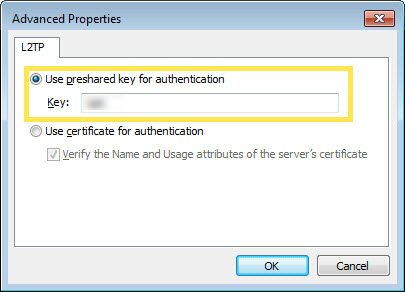
12. 選擇 使用預共用金鑰進行驗證 並輸入您在便攜式路由器上為 L2TP/IPSec VPN 伺服器設定的 IPSec 預共用金鑰。然後按一下 確定。
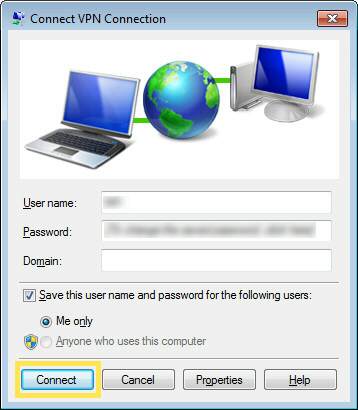
完成!按一下 連線 開始 VPN 連接。
4.9.4 使用 WireGuard VPN 存取您的家庭網路
WireGuard VPN 伺服器用於建立 WireGuard VPN 連接,以供遠端設備存取您的家庭網路。
步驟 1. 在便攜式路由器上設定 WireGuard VPN 伺服器
1. 造訪 http://tplinkwifi.net,並使用您的 TP-Link ID 或您為便攜式路由器設定的密碼登入。
2. 前往 進階 > VPN 伺服器 > WireGuard,然後勾選 WireGuard 的 啟用 方塊。
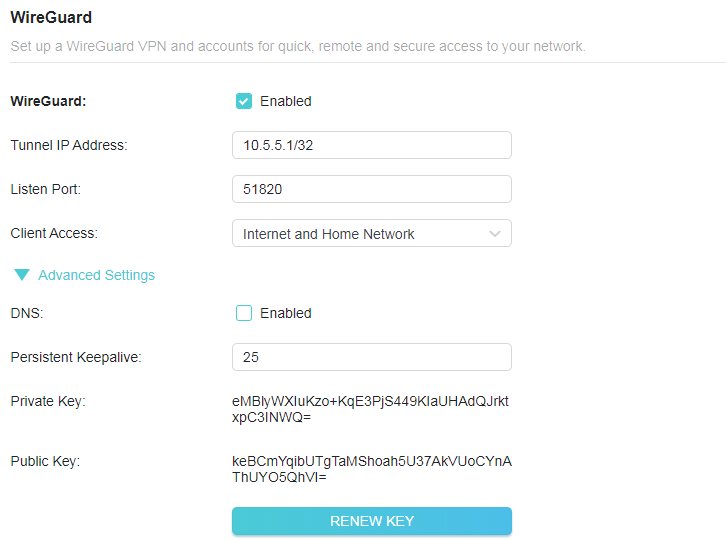
3. 設定通道 IP 地址和接聽連接埠。除非必要,否則請勿變更。
4. 選擇您的 用戶端存取 類型。如果您只想讓遠端設備存取您的家庭網路,請選擇 僅家庭網路;如果您還想讓遠端設備透過 VPN 伺服器存取網際網路,請選擇 網際網路和家庭網路 。
5. (選填)按一下 進階設定 以顯示更多設定。如果開啟了 DNS,便攜式路由器將成為與其建立連接的 VPN 用戶端的 DNS 伺服器。變更 持久保活 時間(預設為 25 秒)以定期發送心跳,您還可以按一下 更新金鑰 來更新私鑰和公鑰。
步驟 2. 建立遠端用戶端可用於連接到 VPN 伺服器的帳戶。
1. 找到 帳戶清單 區塊。
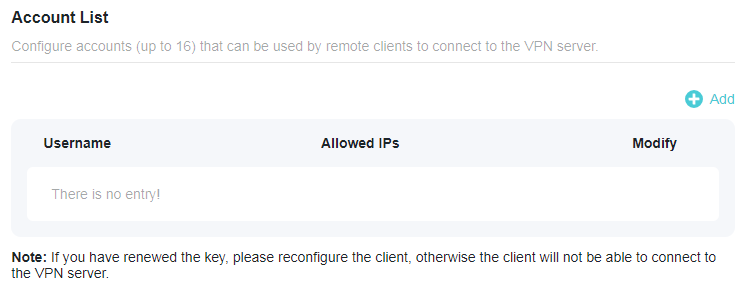
2. 按一下 新增 以建立帳戶。
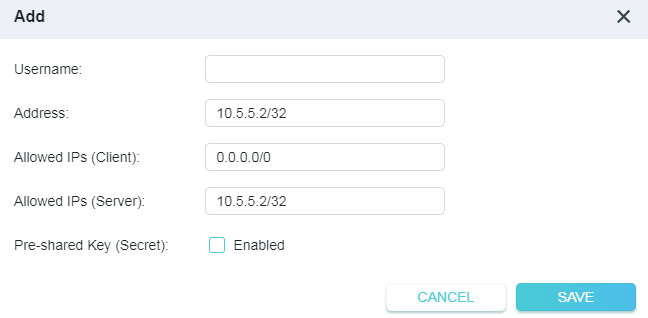
3. 為此帳戶命名。
4. 輸入分配給此帳戶的虛擬介面的地址。除非必要,否則請勿變更。
5. 從 WireGuard VPN 用戶端發送到允許的 IP(用戶端)的流量將透過通道傳輸。預設情況下,來自用戶端的所有網路流量都將透過通道傳輸。除非必要,否則請勿變更。
6. 從 WireGuard VPN 伺服器發送到允許的 IP(伺服器)的流量將透過通道傳輸。除非必要,否則請勿變更。
7. 啟用或停用預共用金鑰。
8. 按一下 儲存。
注意:一個帳戶同時只能由一個 WireGuard VPN 用戶端用於連接到 WireGuard VPN 伺服器。
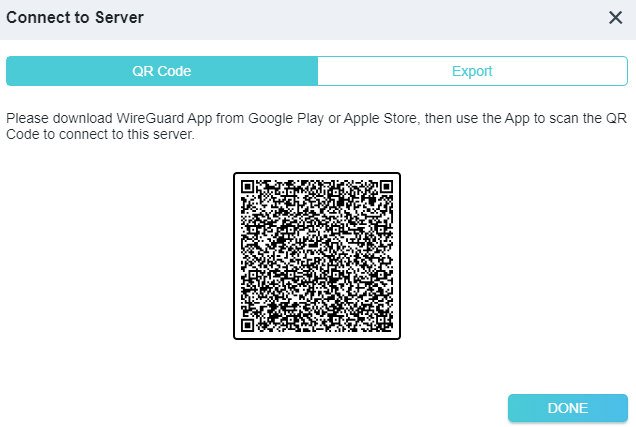
9. 連接到 WireGuard 伺服器。
• 對於手機,從 Google Play 或 Apple Store 下載 WireGuard 應用程式,然後使用該應用程式掃描二維碼以連接到此伺服器。
• 對於其他設備(例如 TP-Link WireGuard VPN 用戶端),按一下 匯出 以儲存 WireGuard VPN 設定檔,遠端設備將使用該檔案來存取您的便攜式路由器。
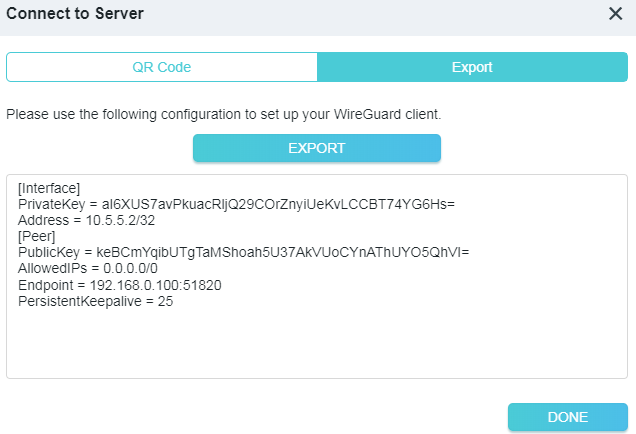
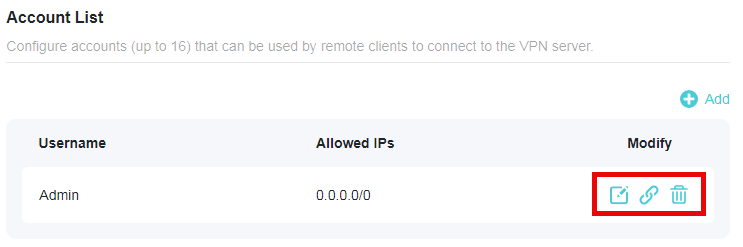
10. 在帳戶清單上,您可以按一下按鈕以修改 VPN 伺服器設定、連接到伺服器或刪除帳戶。
4.9.5 使用 VPN 合併存取遠端 VPN 伺服器
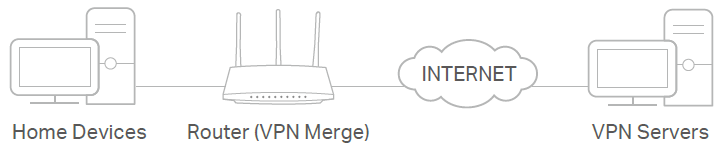
VPN 合併允許您的用戶端設備同時存取多個 VPN 伺服器,以滿足您的工作、遊戲和串流視訊需求。
要使用 VPN 合併功能,只需在便攜式路由器上新增遠端 VPN 伺服器並將 VPN 伺服器分配給您的用戶端設備。請按照以下步驟操作:
1. 造訪 http://tplinkwifi.net,並使用您的 TP-Link ID 或您為便攜式路由器設定的密碼登入。
2. 前往 進階 > VPN 合併, 然後啟用 VPN 合併。
注意:可能需要升級韌體才能支援 VPN 合併。

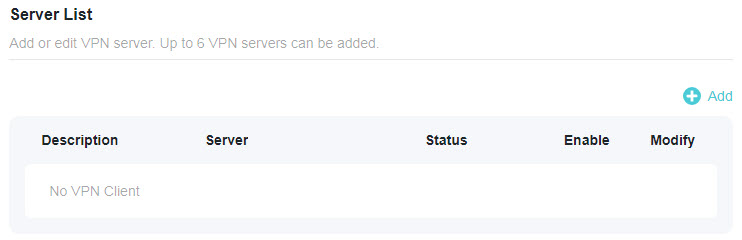
3. 新增 VPN 伺服器,並啟用您需要的伺服器。
1 ) 在 伺服器清單 區塊中,按一下 新增。
2 ) 指定 VPN 的描述,並選擇 VPN 類型。
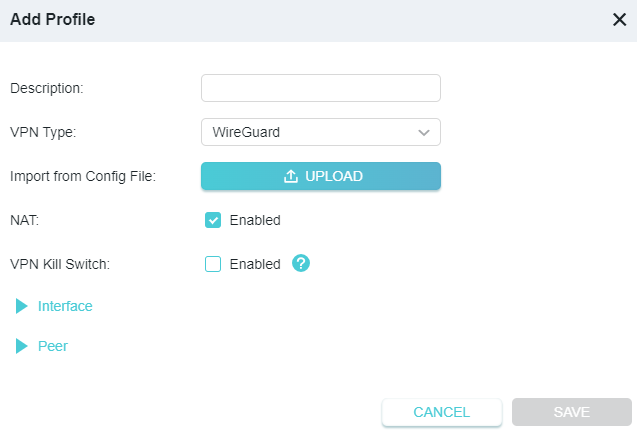
• VPN Kill Switch: 啟用後,如果 VPN 連接斷開,您設備的網際網路存取將被阻擋,從而保護您的資料安全。
3 ) 輸入您的 VPN 提供商提供的 VPN 資訊。
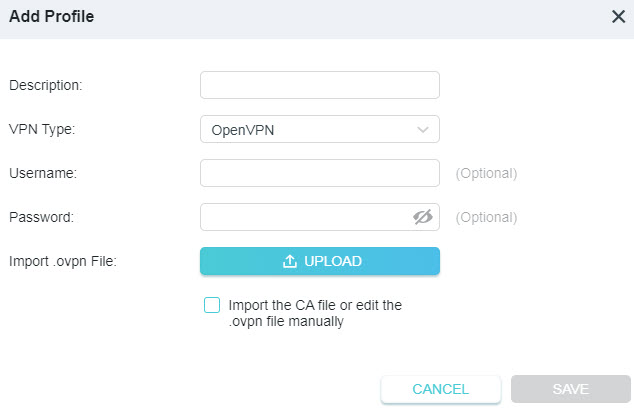
• OpenVPN: 如果您的 VPN 提供商要求,請輸入 VPN 使用者名稱和密碼,否則直接留空。然後匯入您的 VPN 提供商提供的設定檔。
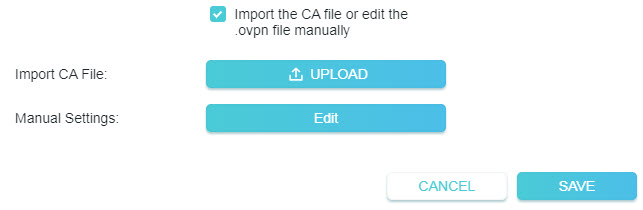
注意:您也可以勾選 手動匯入 CA 檔案或編輯 .ovpn 檔案 的核取方塊,然後上傳 CA 檔案或手動設定設定。
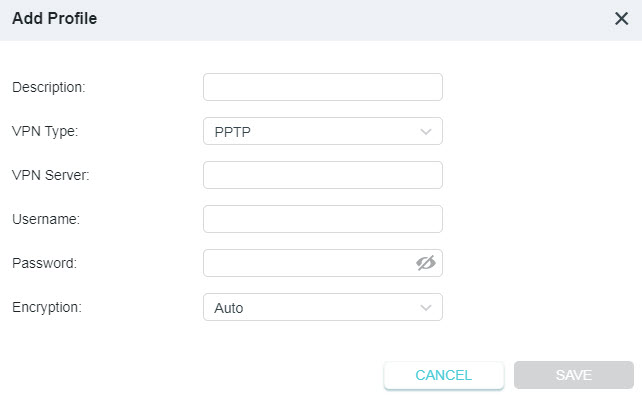
• PPTP: 輸入您的 VPN 提供商提供的 VPN 伺服器地址(例如:218.18.1.73)以及 VPN 使用者名稱和密碼。
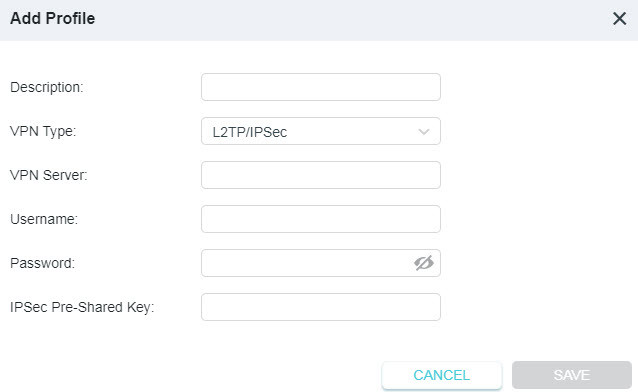
• L2TP/IPSec VPN: 輸入您的 VPN 提供商提供的 VPN 伺服器地址(例如:218.18.1.73)、VPN 使用者名稱和密碼,以及 IPSec 預共用金鑰。
• WireGuard VPN: 提供描述,然後按一下「瀏覽」以匯入 WireGuard VPN 伺服器設定。接著您將看到詳細的參數。除非必要,否則請勿變更參數。
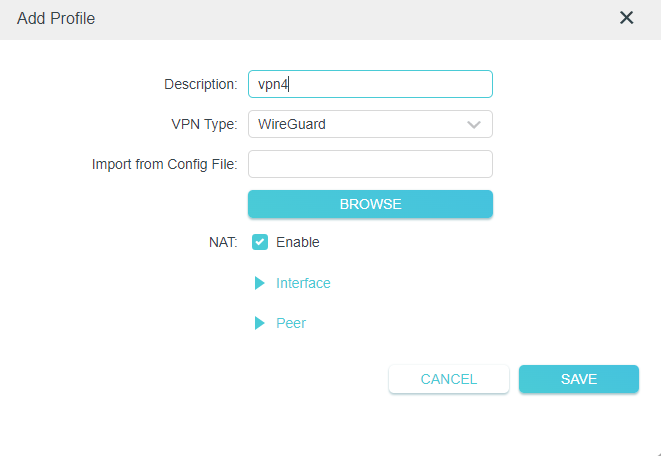
4 ) 儲存設定。
5 ) 在伺服器清單中,啟用您需要的伺服器。
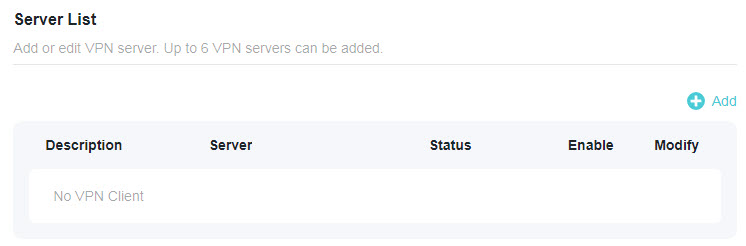
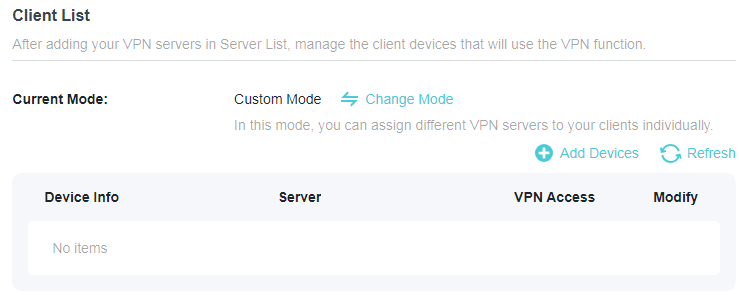
4. 新增並管理將使用 VPN 功能的設備。您可以按一下 變更模式 在不同模式之間切換。
1 ) 在 用戶端清單 區塊中,按一下 新增設備。
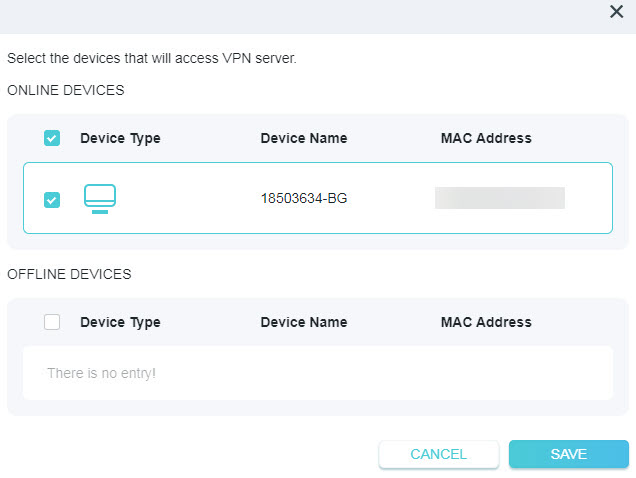
2 ) 選擇並新增將存取您已設定的 VPN 伺服器的設備。
5. 儲存設定。
完成!現在您指定的設備可以存取您啟用的 VPN 伺服器了。
4.10 IPv6
4.10.1 設定 IPv6 網際網路連線
此功能允許您使用電信業者 (ISP) 提供的資訊設定 IPv6 網際網路連線。
注意:某些型號可能不支援此功能。圖片可能與實際產品有所不同。
1. 造訪 http://tplinkwifi.net,並使用您的 TP-Link ID 或您為便攜式路由器設定的密碼登入。
2. 前往 進階 > IPv6。
3. 啟用 IPv6 並選擇您的電信業者提供的網際網路連線類型。
注意:如果您不知道您的網際網路連線類型是什麼,請聯繫您的電信業者。
4. 填寫不同連線類型所需的資訊。
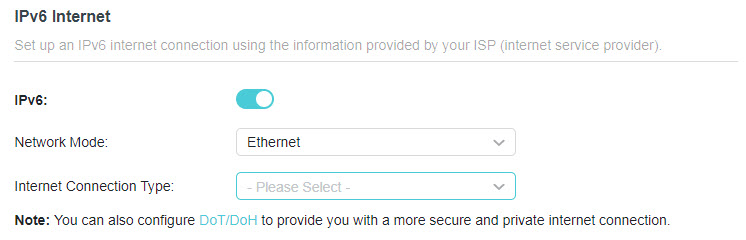
• 固定 IP: 填寫空白處並儲存設定。
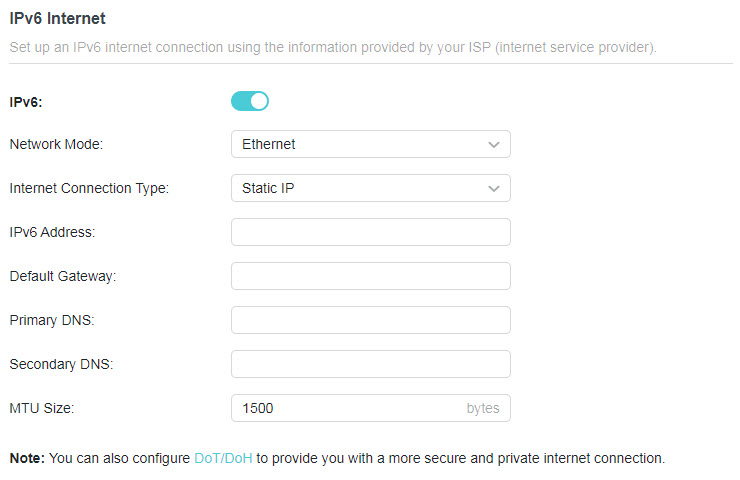
• 動態 IP (SLAAC/DHCPv6): 如果您的電信業者需要,請按一下 進階設定 以輸入更多資訊。儲存設定並按一下 重新取得。
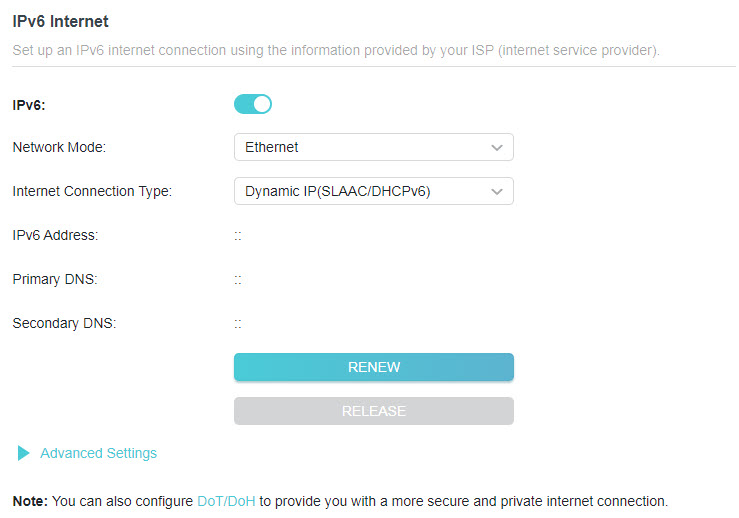
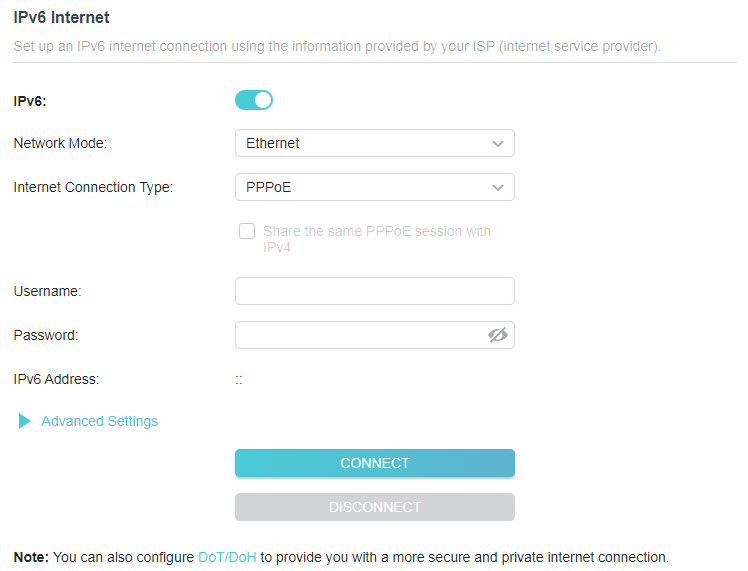
• PPPoE: 預設情況下,便攜式路由器使用 IPv4 帳戶連接到 IPv6 伺服器。如果您的電信業者需要,請按一下 進階設定 以輸入更多資訊。儲存設定並按一下 連線。
注意:如果您的電信業者為 IPv4 和 IPv6 連線提供兩個單獨的帳戶,請手動輸入 IPv6 連線的使用者名稱和密碼。
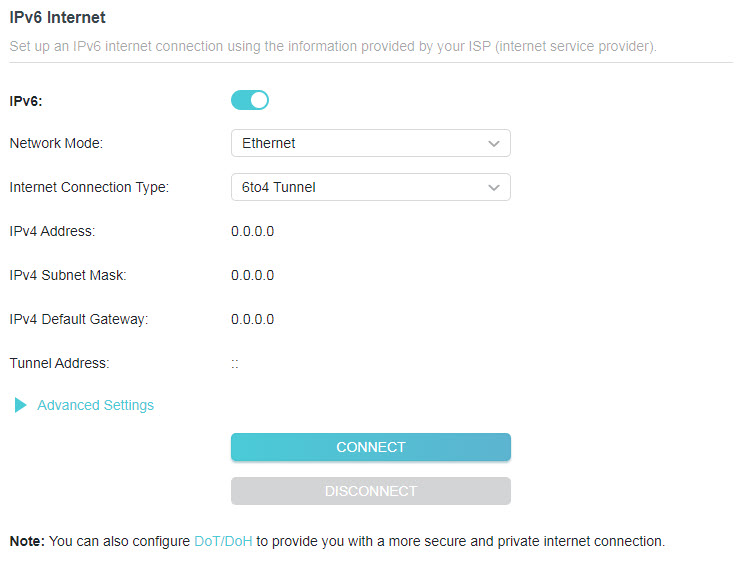
• 6to4 通道: IPv4 網際網路連線類型是此連線類型的先決條件。請先手動設定您的網際網路連線。如果您的電信業者需要,請按一下 進階設定 以輸入更多資訊。儲存設定並按一下 連線。
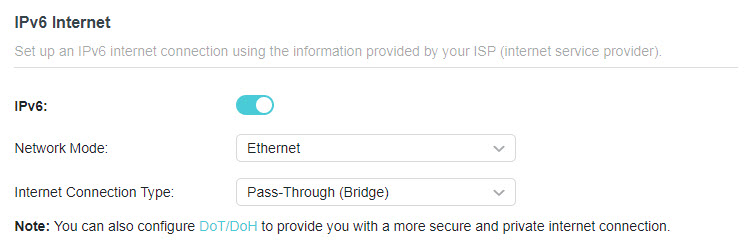
• 穿透(橋接): 儲存設定。不需要進行設定。
5. 設定 LAN 連接埠。建議 Windows 使用者從 DHCPv6 和 SLAAC+無狀態 DHCP 中進行選擇。
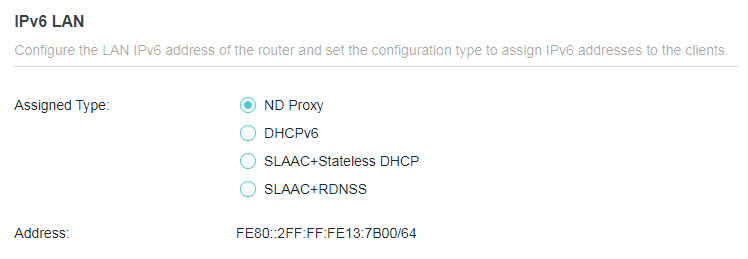
注意:如果網際網路連線類型為 穿透(橋接),則不需要設定 IPv6 LAN。
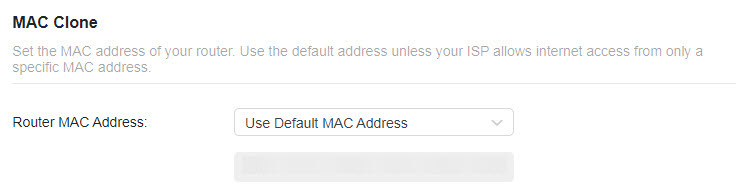
6. 在 MAC 複製區塊中,設定您便攜式路由器的 MAC 地址。除非您的電信業者僅允許來自特定 MAC 地址的網際網路存取,否則請使用預設地址。
4.11 系統
4.11.1 韌體升級
TP-Link 旨在為使用者提供更好的網路體驗。如果有適用於您便攜式路由器的韌體更新可用,我們將透過網頁管理頁面通知您。此外,最新的韌體將在 TP-Link 官方網站 www.tp-link.com 發布,您可以從「支援」頁面免費下載。
注意:
• 韌體升級前請備份您的便攜式路由器設定。
• 韌體升級期間請勿關閉便攜式路由器。
自動更新
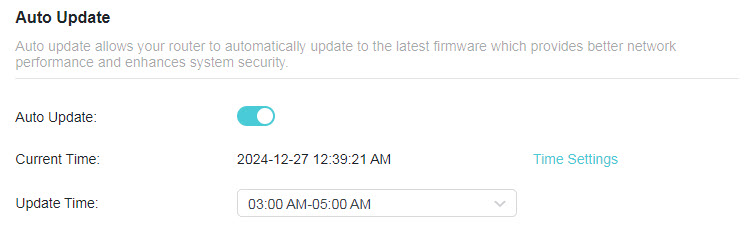
啟用 自動更新 並設定更新時間。當有新版本可用時,便攜式路由器將在指定時間自動更新韌體。
線上升級
1. 造訪 http://tplinkwifi.net,並使用您的 TP-Link ID 或您為便攜式路由器設定的密碼登入。
2. 當有適用於您便攜式路由器的最新韌體可用時,頁面右上角將顯示升級圖示。按一下圖示  前往 韌體升級 頁面。或者,您可以前往 進階 > 系統 > 韌體升級,然後按一下 檢查更新 以查看最新的韌體是否已發布。
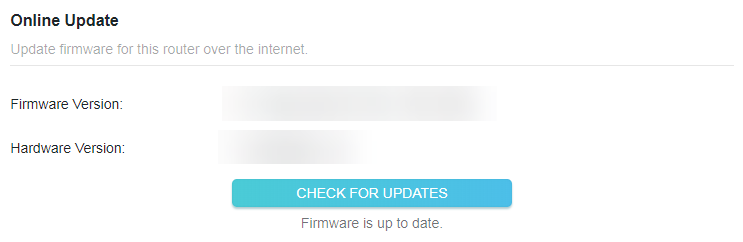
3. 如果有新韌體,按一下 升級。
4. 等待幾分鐘讓升級和重新啟動完成。
提示:如果您的便攜式路由器有新的且重要的韌體更新,只要開啟網頁瀏覽器,您就會在電腦上看到提示通知。按一下 升級,然後使用您為便攜式路由器設定的使用者名稱和密碼登入網頁管理頁面。您將看到 韌體升級 頁面。
本升級
1. 從 www.tp-link.com 下載適用於該便攜式路由器的最新韌體檔案。
2. 造訪 http://tplinkwifi.net,並使用您的 TP-Link ID 或您為便攜式路由器設定的密碼登入。
3. 前往 進階 > 系統 > 韌體升級。
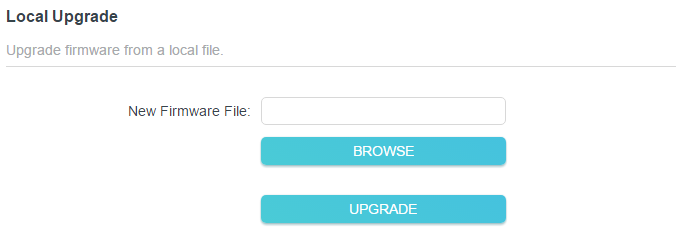
4. 聚焦於 本地升級 區塊。按一下 瀏覽 尋找下載的新韌體檔案,然後按一下 升級。
5. 等待幾分鐘讓升級和重新啟動完成。
注意:如果您無法升級便攜式路由器的韌體,請聯繫我們的技術支援。
4.11.2 備份與還原設定
設定儲存為便攜式路由器中的設定檔。您可以將設定檔備份到電腦以備將來使用,並在需要時從備份檔案將便攜式路由器還原至之前的設定。此外,如有必要,您可以擦除當前設定並將便攜式路由器重設為原廠預設設定。
1. 造訪 http://tplinkwifi.net,並使用您的 TP-Link ID 或您為便攜式路由器設定的密碼登入。
2. 前往 進階 > 系統 > 備份與還原。
• 備份設定:
按一下 備份 將當前設定的副本儲存到本地電腦。當前設定的「.bin」檔案將儲存到您的電腦中。

• 還原設定:
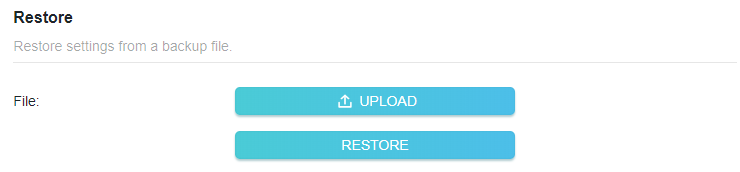
1. 按一下 上傳 尋找儲存在您電腦上的備份設定檔,然後按一下 還原。
2. 等待幾分鐘進行還原和重新啟動。
注意:在還原過程中,請勿關閉或重設便攜式路由器。
• 重設便攜式路由器(登入密碼和 TP-Link ID 除外):
1. 在 恢復原廠預設值 區塊中,按一下 還原。
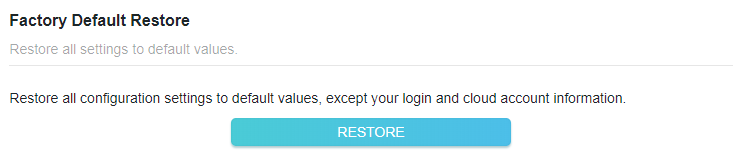
2. 等待幾分鐘進行重設和重新啟動。
注意:
• 在重設過程中,請勿關閉便攜式路由器。
• 重設後,您仍可以使用當前的登入密碼或 TP-Link ID 登入網頁管理頁面。
• 將便攜式路由器重設為原廠預設設定:
1. 按一下 恢復原廠設定 以重設便攜式路由器。

2. 等待幾分鐘進行重設和重新啟動。
注意:
• 在重設過程中,請勿關閉或重設便攜式路由器。
• 我們強烈建議您在重設便攜式路由器之前備份當前的設定。
4.11.3 變更登入密碼
帳戶管理功能允許您變更網頁管理頁面的登入密碼。
注意:如果您使用 TP-Link ID 登入網頁管理頁面,帳戶管理功能將被停用。要管理 TP-Link ID,請前往「進階 > TP-Link ID」。
1. 造訪 http://tplinkwifi.net,並使用您的 TP-Link ID 或您為便攜式路由器設定的密碼登入。
2. 前往 進階 > 系統 > 權限管理 並聚焦於 變更密碼 區塊。
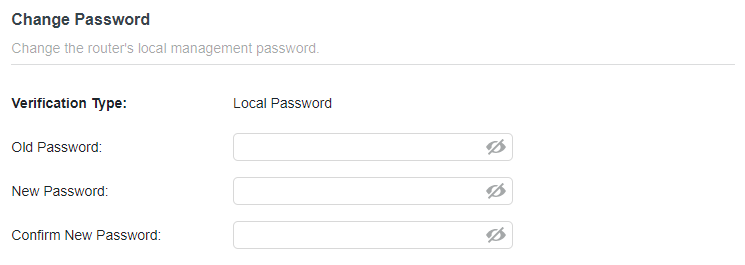
3. 輸入舊密碼,然後輸入兩次新密碼(均區分大小寫)。按一下 儲存。
4. 以後的登入請使用新密碼。
4.11.4 管理員密碼找回
此功能允許您在忘記密碼時找回為便攜式路由器設定的登入密碼。
注意:如果您使用 TP-Link ID 登入網頁管理頁面,密碼找回功能將被停用。要管理 TP-Link ID,請前往 進階 > TP-Link ID。
1. 造訪 http://tplinkwifi.net,並使用您為便攜式路由器設定的密碼登入。
2. 前往 進階 > 系統 > 權限管理 並聚焦於 管理員密碼找回 區塊。
3. 按一下 安全問題設定 來設定安全問題。
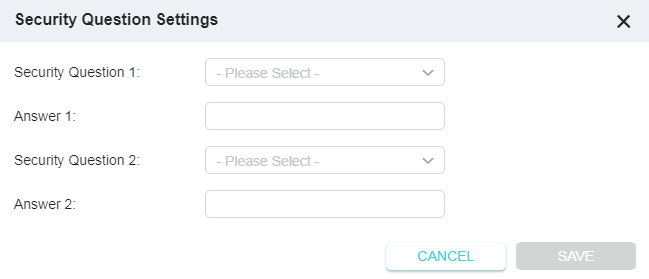
4. 勾選 密碼找回 的 啟用 方塊。
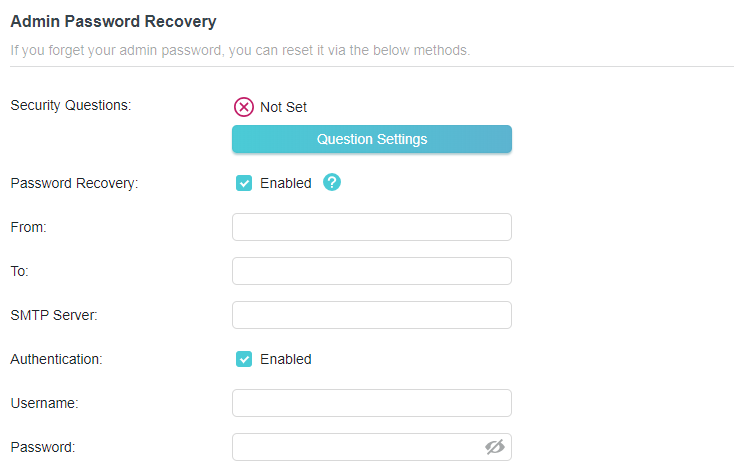
5. 指定用於發送找回郵件的 信箱(寄件者) 並輸入其 SMTP 伺服器 地址。指定用於接收找回郵件的 信箱(收件者)。如果發送找回郵件的信箱(寄件者)需要加密,請勾選 驗證 的 啟用 方塊並輸入其使用者名稱和密碼。
提示:
• 大多數 Web 郵件系統中的使用者都可以使用 SMTP 伺服器。例如,Gmail 的 SMTP 伺服器地址是 smtp.gmail.com。
• 通常,如果信箱登入需要使用者名稱和密碼,則應啟用驗證。
6. 按一下 儲存。
要找回登入密碼,請造訪 http://tplinkwifi.net,按一下登入頁面上的 忘記密碼? 並按照說明設定新密碼。
4.11.5 本地管理
此功能允許您透過使用基於 MAC 地址的驗證,限制 LAN 上存取便攜式路由器的用戶端設備數量。
1. 造訪 http://tplinkwifi.net,並使用您的 TP-Link ID 或您為便攜式路由器設定的密碼登入。
2. 前往 進階 > 系統 > 權限管理,並根據需要在 本地管理 區塊中完成設定。
• 透過 HTTPS 和 HTTP 存取便攜式路由器:
勾選 透過 HTTPS 進行本地管理 的 啟用 方塊以透過 HTTPS 和 HTTP 存取便攜式路由器,或保持其停用以僅透過 HTTP 存取便攜式路由器。
• 允許所有連接 LAN 的設備管理便攜式路由器:
為本地管理者選擇 所有設備 。
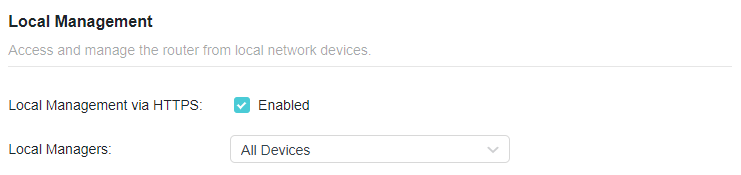
• 允許特定設備管理便攜式路由器:
1. 為本地管理者選擇 指定設備,然後按一下 儲存。
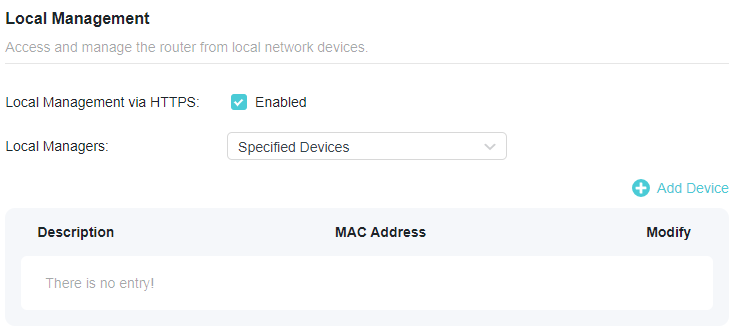
2. 按一下 新增設備。
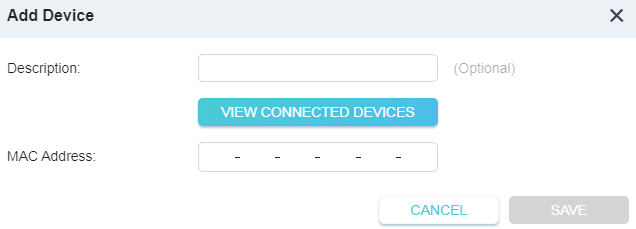
3. 按一下 檢視已連接的設備 並從已連接的設備清單中選擇要管理便攜式路由器的設備,或手動輸入設備的 MAC 地址。
4. 為此條目指定一個 描述。
5. 按一下 儲存。
4.11.6 遠端管理
此功能允許您控制遠端設備管理便攜式路由器的權限。
1. 造訪 http://tplinkwifi.net,並使用您的 TP-Link ID 或您為便攜式路由器設定的密碼登入。
2. 前往 進階 > 系統 > 權限管理,並根據需要在 遠端管理 區塊中完成設定。
• 禁止所有設備遠端管理便攜式路由器:
請勿勾選 遠端管理 的 啟用 核取方塊。
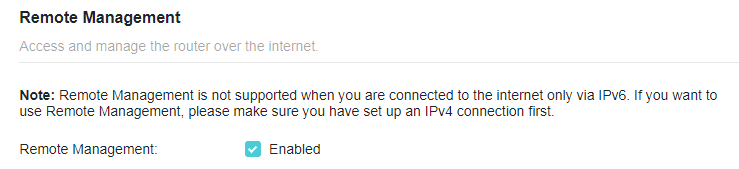
• 允許所有設備遠端管理便攜式路由器:
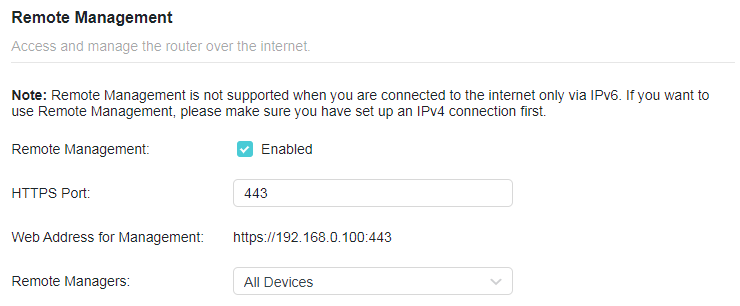
1. 勾選 遠端管理 的 啟用 核取方塊。
2. 保持 HTTPS 連接埠為預設設定(推薦),或輸入 1024 到 65535 之間的值。
3. 為 遠端管理者 選擇 所有設備。
4. 按一下 儲存。網際網路上的設備可以登入 https://便攜式路由器的 WAN IP 地址:連接埠號碼(例如 https://113.116.60.229:1024)來管理便攜式路由器。
提示:
• 您可以在 網路地圖 > 網際網路 上找到便攜式路由器的 WAN IP 地址。
• 便攜式路由器的 WAN IP 通常是動態 IP。如果您想透過網域名稱登入便攜式路由器,請參閱 動態 DNS。
• 允許特定設備遠端管理便攜式路由器:
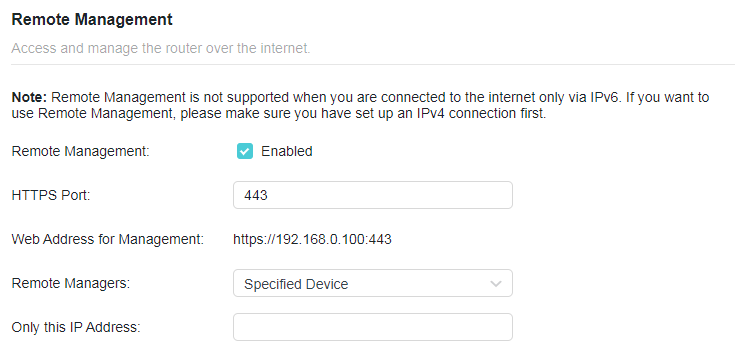
1. 勾選 遠端管理 的 啟用 核取方塊。
2. 保持 HTTPS 連接埠為預設設定(推薦),或輸入 1024 到 65535 之間的值。
3. 為遠端管理者選擇 指定設備。
4. 在 僅此 IP 地址 欄位中,輸入用於管理便攜式路由器的遠端設備的 IP 地址。
5. 按一下 儲存。
使用此 WAN IP 的設備可以透過登入 https://便攜式路由器的 WAN IP:連接埠號碼(例如 https://113.116.60.229:1024)來管理便攜式路由器。
提示:便攜式路由器的 WAN IP 通常是動態 IP。如果您想透過網域名稱登入便攜式路由器,請參閱 動態 DNS。
4.11.7 系統記錄
當便攜式路由器無法正常工作時,您可以儲存系統記錄並將其發送給技術支援以進行疑難排解。
• 在本地儲存系統記錄:
1. 造訪 http://tplinkwifi.net,並使用您的 TP-Link ID 或您為便攜式路由器設定的密碼登入。
2. 前往 進階 > 系統 > 系統記錄。
3. 根據需要選擇系統記錄的類型和等級。
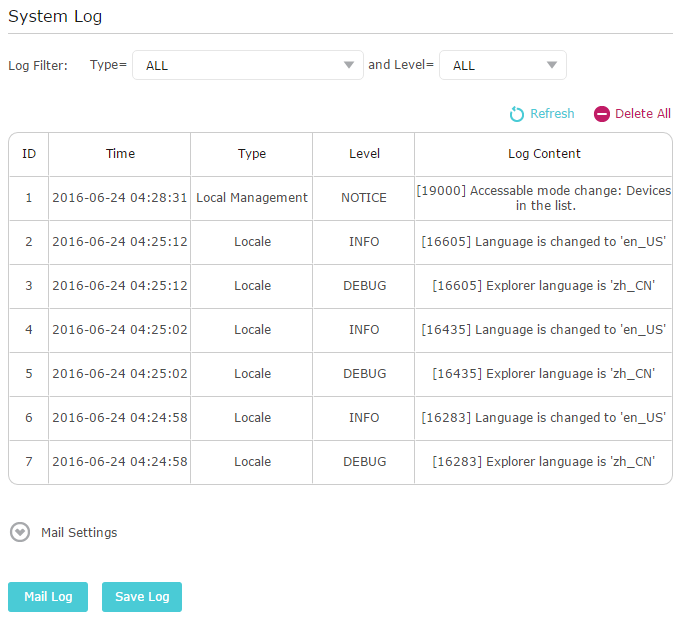
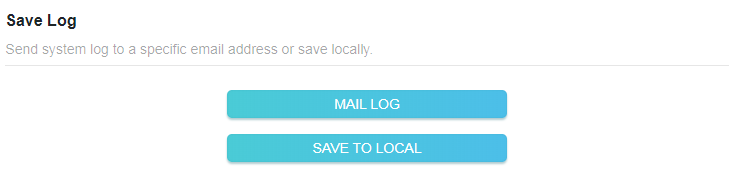
4. 在 儲存記錄 區塊中,按一下 儲存到本地 將系統記錄儲存到本地磁碟。
• 定時將系統記錄發送到信箱:
例如,我想每天在固定時間檢查我便攜式路由器的工作狀態,但是每次想去檢查都要登入網頁管理頁面太麻煩了。如果每天早上 8 點能把系統記錄發送到我的信箱就太好了。
1. 造訪 http://tplinkwifi.net,並使用您的 TP-Link ID 或您為便攜式路由器設定的密碼登入。
2. 前往 進階 > 系統 > 系統記錄。
3. 在 儲存記錄 區塊中,按一下 郵寄記錄。
4. 輸入所需的資訊:
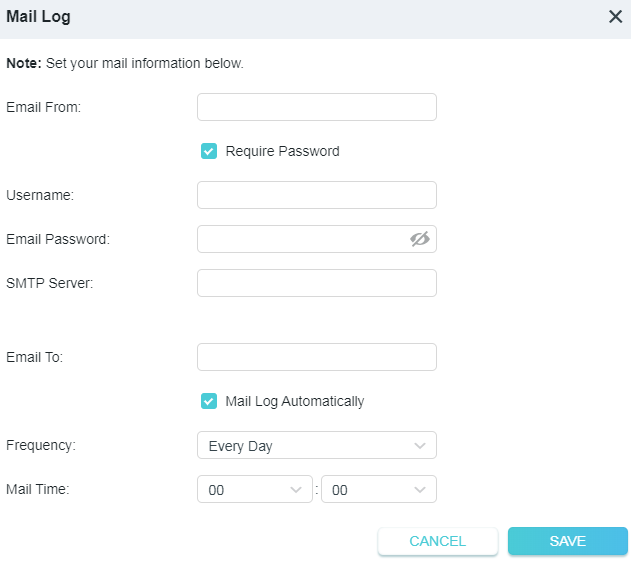
• 寄件者電子郵件: 輸入用於發送系統記錄的電子郵件地址。
• 選擇 需要密碼。
提示:通常,如果信箱登入需要使用者名稱和密碼,則應選擇「需要密碼」。
• 使用者名稱: 輸入用於發送系統記錄的電子郵件地址。
• 電子郵件密碼: 輸入登入發件人電子郵件地址的密碼。
• SMTP 伺服器: 輸入 SMTP 伺服器地址。
提示:大多數 Web 郵件系統中的使用者都可以使用 SMTP 伺服器。例如,Hotmail 的 SMTP 伺服器地址是 smtp-mail.outlook.com。
• 收件者電子郵件: 輸入收件者的電子郵件地址,可以與發件人的電子郵件地址相同或不同。
• 選擇 自動郵寄記錄。
提示:如果啟用此選項,便攜式路由器將把系統記錄發送到指定的電子郵件地址。
• 頻率: 這決定了收件者接收系統記錄的頻率。
5. 按一下 儲存。
4.11.8 測試網路連線
診斷用於測試便攜式路由器與主機或其他網路設備之間的連線。
1. 造訪 http://tplinkwifi.net,並使用您的 TP-Link ID 或您為便攜式路由器設定的密碼登入。
2. 前往 進階 > 系統 > 診斷工具。
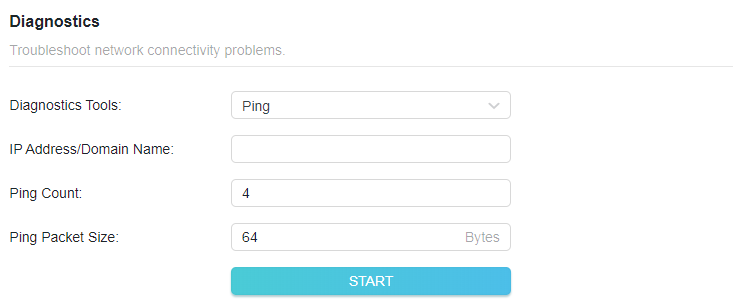
3. 輸入資訊:
1 ) 選擇 Ping 或 Traceroute 作為診斷工具來測試連線;
• Ping 用於測試便攜式路由器與被測主機之間的連線,並測量往返時間。
• Traceroute 用於顯示您的便攜式路由器到達被測主機所經過的路由(路徑),並測量封包跨網際網路協定網路的傳輸延遲。
2 ) 輸入被測主機的 IP 地址 或 網域名稱 。
3 ) 修改 Ping 次數 數字和 Ping 封包大小。建議保持預設值。
4 ) 如果您選擇了 Traceroute,您可以修改 Traceroute 最大 TTL。建議保持預設值。
4. 按一下 開始 開始診斷。
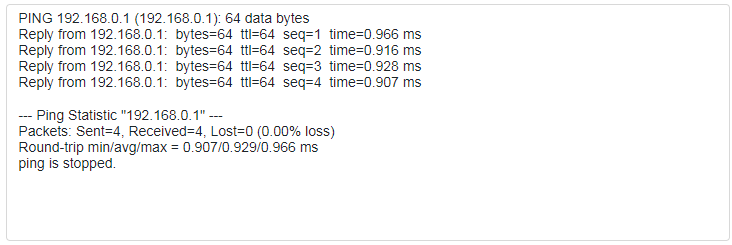
下圖顯示透過 Ping 測試的便攜式路由器與 Yahoo 伺服器 (www.Yahoo.com) 之間的正常連接。
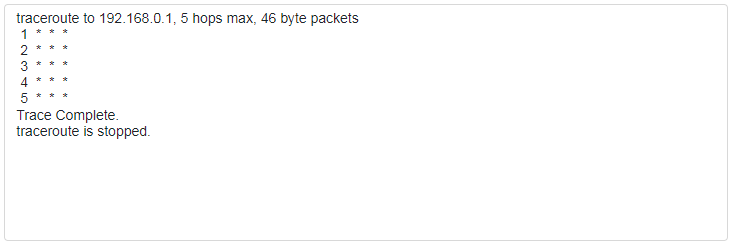
下圖顯示透過 Traceroute 測試的便攜式路由器與 Yahoo 伺服器 (www.Yahoo.com) 之間的正常連接。
4.11.9 設定系統時間
系統時間是便攜式路由器執行時顯示的時間。您在此處設定的系統時間將用於其他基於時間的功能(如家長監護)。您可以根據需要選擇獲取系統時間的方式。
1. 造訪 http://tplinkwifi.net,並使用您的 TP-Link ID 或您為便攜式路由器設定的密碼登入。
2. 前往 進階 > 系統 > 時間設定。
• 從網際網路獲取時間:
1. 如果您希望時間以 24 小時制顯示,請啟用 24 小時制時間 。
2. 在 設定時間 欄位中,選擇 從網際網路獲取。
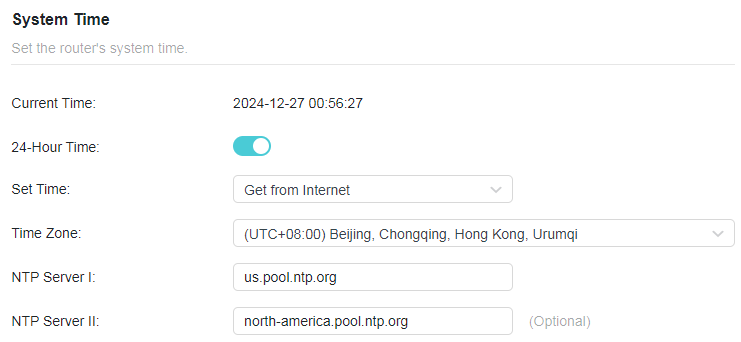
3. 從下拉式清單中選擇您當地的 時區。
4. 在 NTP 伺服器 I 欄位中,輸入您想要的 NTP 伺服器的 IP 地址或網域名稱。
5. (選填)在 NTP 伺服器 II 欄位中,輸入第二個 NTP 伺服器的 IP 地址或網域名稱。
6. 按一下 儲存。
• 從您的電腦獲取時間:
1. 在設定時間欄位中,選擇從管理設備獲取。
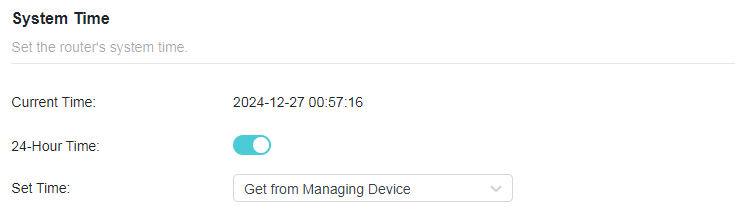
2. 隨後將顯示您電腦的時間,按一下儲存。
• 手動設定日期和時間:
1. 在 設定時間 欄位中,選擇 手動。
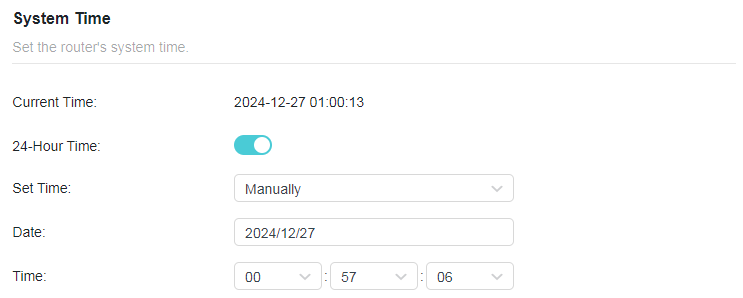
2. 設定當前 日期 (格式為 月/日/年)。
3. 設定當前 時間 (格式為 時/分/秒)。
4. 按一下 儲存。
• 設定日光節約時間(夏令時間):
1. 勾選日光節約時間的 啟用 方塊。
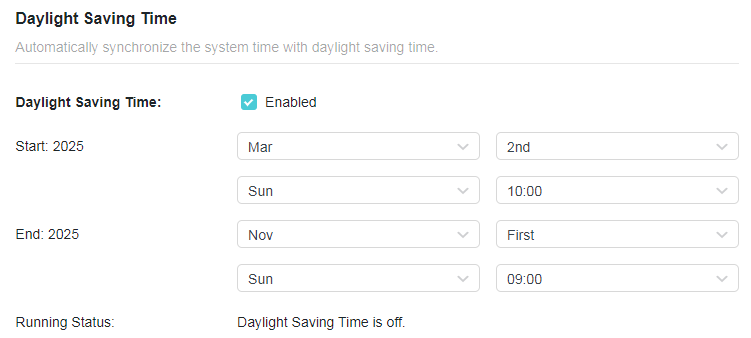
2. 選擇您當地時區日光節約時間開始的正確 開始 日期和時間。
3. 選擇您當地時區日光節約時間結束的正確 結束 日期和時間。
4. 按一下 儲存。
4.11.10 設定便攜式路由器定期重新啟動
定期重新啟動功能可清除快取以提高便攜式路由器的執行效能。
1. 造訪 http://tplinkwifi.net,並使用您的 TP-Link ID 或您為便攜式路由器設定的密碼登入。
2. 前往 進階 > 系統 > 重新啟動。
3. 勾選重新啟動排程的 啟用 方塊。
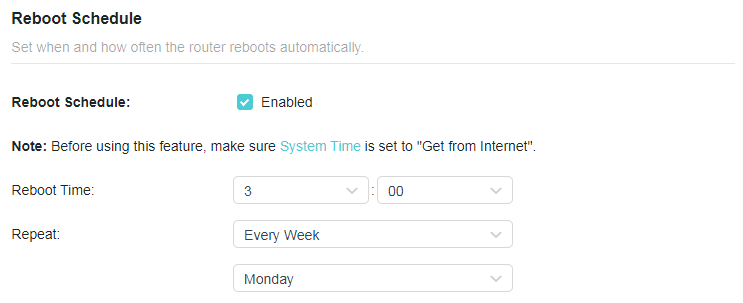
4. 指定便攜式路由器重新啟動的 重新啟動時間,並指定 重複 以決定重新啟動的頻率。
5. 按一下 儲存。
4.11.11 控制 LED 燈
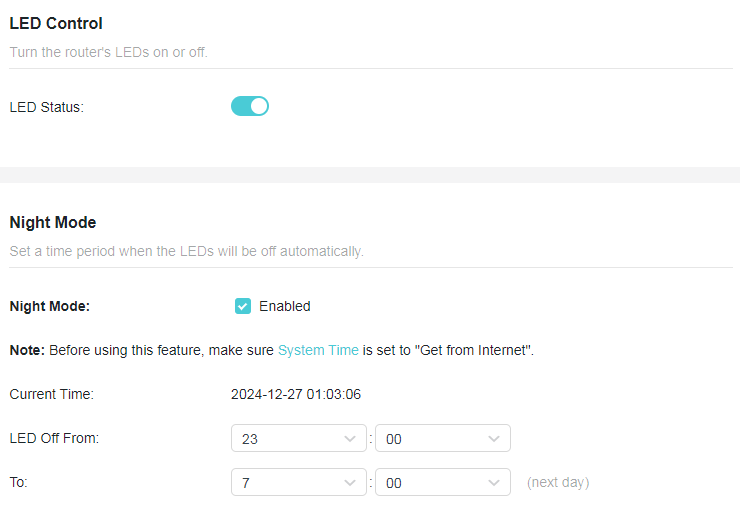
便攜式路由器的 LED 燈指示其活動和狀態。您可以啟用夜間模式功能來指定關閉 LED 燈的時間段。
1. 造訪 http://tplinkwifi.net,並使用您的 TP-Link ID 或您為便攜式路由器設定的密碼登入。
2. 前往 進階 > 系統 > LED 控制。
3. 啟用 夜間模式。
4. 指定 LED 關閉 時間,每天在此期間 LED 燈將關閉。
5. 按一下 儲存。
4.11.12 自訂按鍵 (Action Switch)
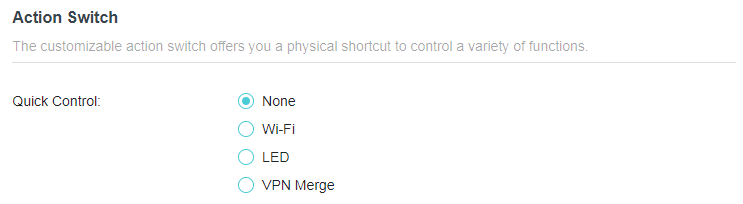
可自訂的實體切換按鍵為您提供控制各種功能(包括 Wi-Fi、LED 和 VPN 合併)的實體快捷方式。
1. 造訪 http://tplinkwifi.net,並使用您的 TP-Link ID 或您為便攜式路由器設定的密碼登入。
2. 前往 進階 > 系統 > 自訂按鍵。
3. 選擇一個快速控制選項,然後按一下 儲存。
4.11.13 ECO 節能模式
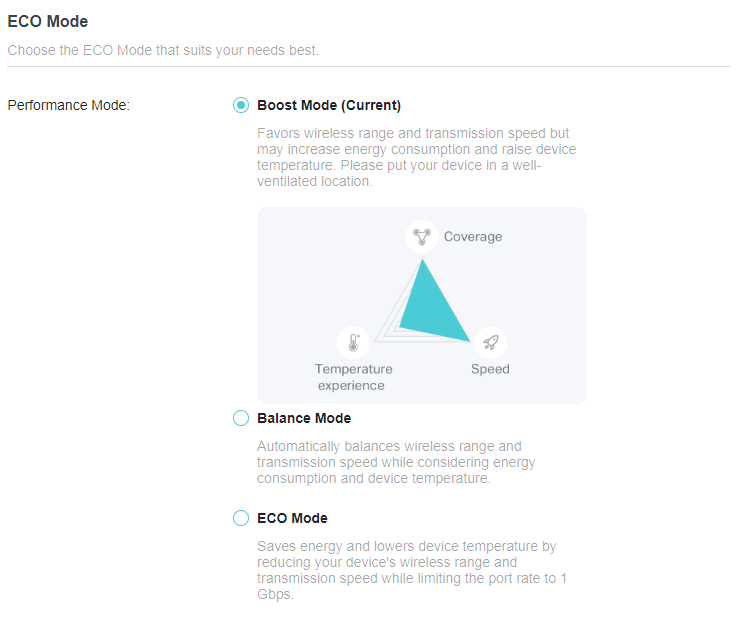
ECO 模式開關用於變更便攜式路由器的省電模式。要變更 ECO 模式,請將設備上的模式開關切換到您想要的模式。
1. 造訪 http://tplinkwifi.net,並使用您的 TP-Link ID 或您為便攜式路由器設定的密碼登入。
2. 前往 進階 > 系統 > ECO 模式。
3. 選擇偏好模式,然後按一下 儲存。
• 效能模式: 有利於無線涵蓋範圍和傳輸速度,但可能會增加能源消耗並提高設備溫度。
• 平衡模式: 在考量能源消耗和設備溫度的同時,自動平衡無線涵蓋範圍和傳輸速度。
• ECO 模式: 透過降低設備的無線涵蓋範圍和傳輸速度來節省能源並降低設備溫度。
4.11.14 授權第三方服務
將您用戶端的資訊分享給第三方服務,以更好地識別您的用戶端。我們不會儲存您的私有資訊。
1. 造訪 http://tplinkwifi.net,並使用您的 TP-Link ID 或您為便攜式路由器設定的密碼登入。
2. 前往 進階 > 系統 > 授權第三方服務。
3. 啟用 用戶端識別。

章節 5. 熱點模式(WISP模式)
本章介紹如何設定便攜式路由器工作在熱點模式下的各項功能。
*網頁管理頁面上可用的功能可能因型號和軟體版本而異。
5.1 運作模式
1. 造訪 http://tplinkwifi.net,並使用您的 TP-Link ID 或您為便攜式路由器設定的密碼登入。
2. 前往網際網路。
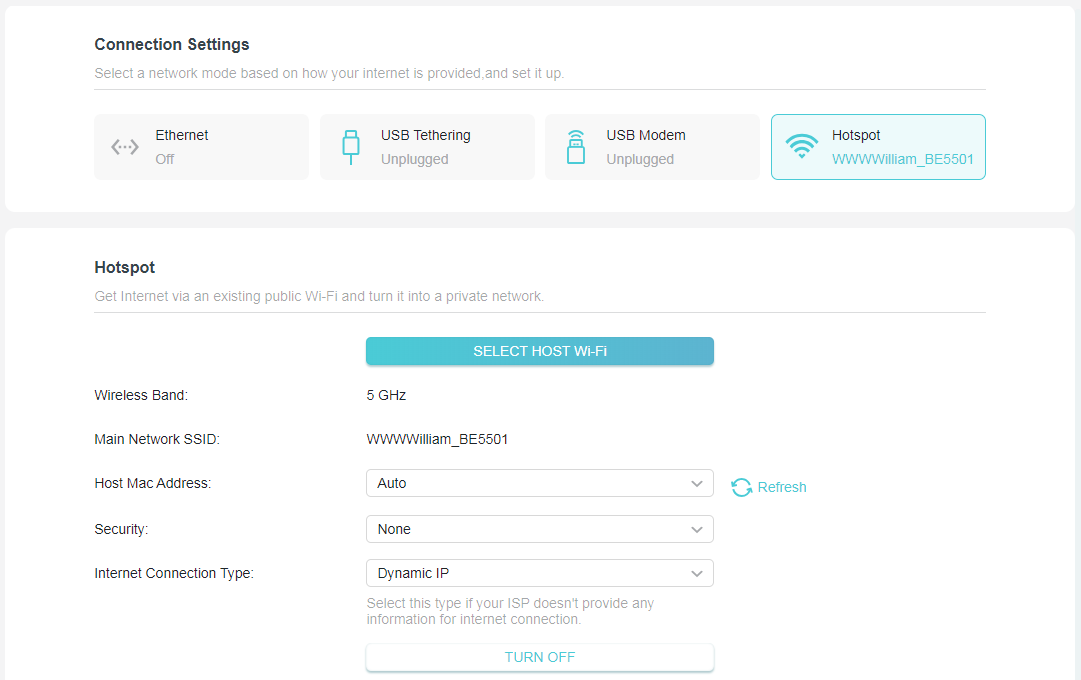
• 查看便攜式路由器當前的模式:
找到連線設定區塊。便攜式路由器當前的運作模式會被高亮顯示。
• 變更便攜式路由器的網路模式:
1. 造訪 http://tplinkwifi.net,並使用您的 TP-Link ID 或您為便攜式路由器設定的密碼登入。
2. 前往 網際網路 > 連線設定。
3. 選擇您想要的網路模式,設定參數,然後按一下儲存。
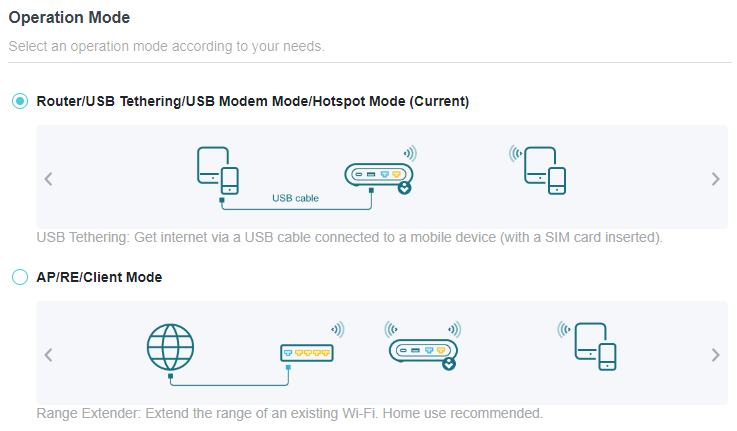
• 變更便攜式路由器的運作模式(變更為 AP/RE/用戶端模式):
1. 造訪 http://tplinkwifi.net,並使用您的 TP-Link ID 或您為便攜式路由器設定的密碼登入。
2. 前往 進階 > 系統 > 運作模式。
3. 選擇您想要的運作模式,然後按一下儲存。
5.2 網路地圖
網路地圖直觀地概述了您網路的設備連線情況,並協助您管理網路的一般設定。
1. 造訪 http://tplinkwifi.net,並使用您的 TP-Link ID 或您為便攜式路由器設定的密碼登入。
2. 前往 網路地圖。
3. 按一下每個網路設備圖示以檢查和管理一般網路設定。
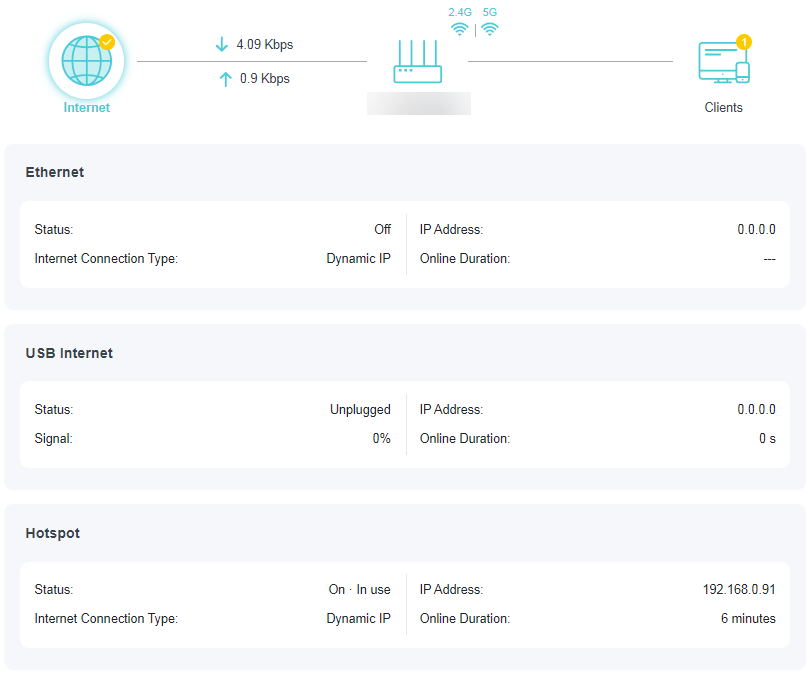
• 按一下 公共 Wi-Fi 以檢查網際網路狀態。
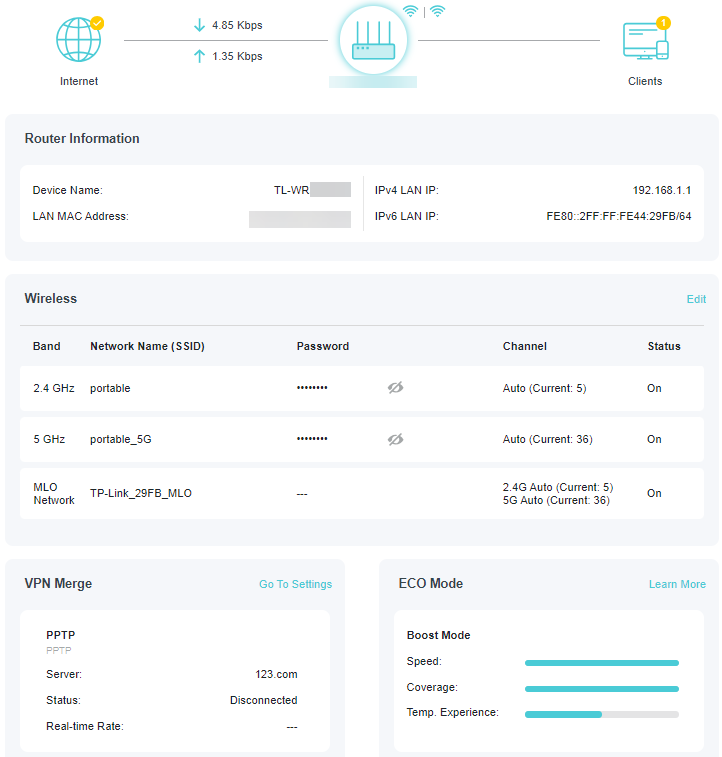
• 按一下便攜式路由器以檢查設備狀態和網路設定。您可以按一下 編輯 來變更相關設定。
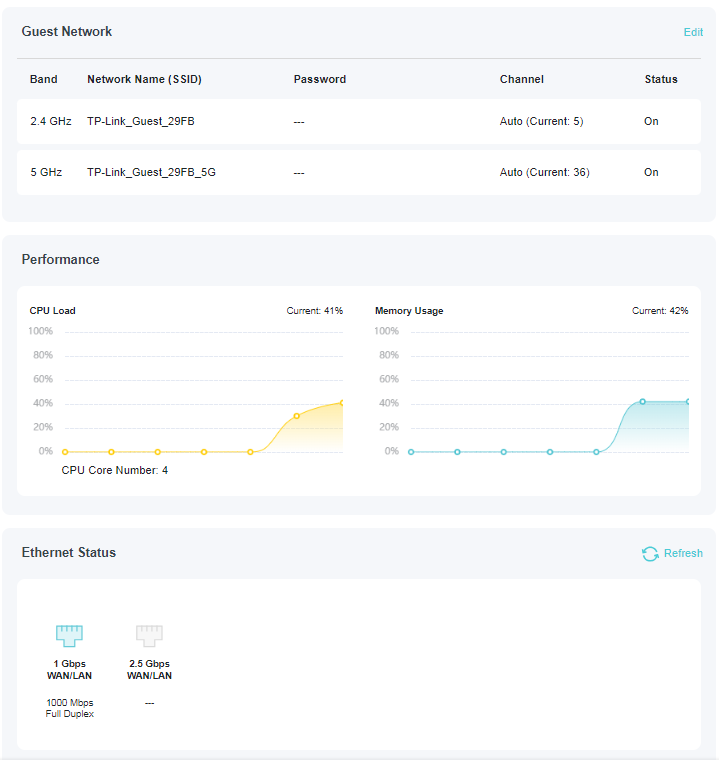
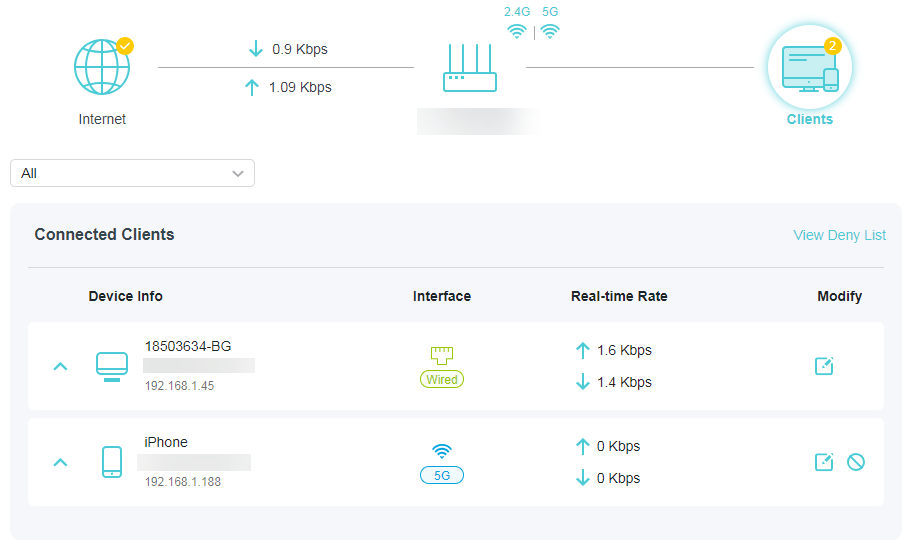
• 按一下 用戶端 以檢視您網路中的用戶端設備。您可以阻擋設備,使其無法存取您的網路。
5.3 網路設定
5.3.1 狀態
1. 造訪 http://tplinkwifi.net,並使用您為便攜式路由器設定的使用者名稱和密碼登入。
2. 前往 進階 > 網路設定 > 狀態。您可以檢視便攜式路由器當前的狀態資訊。
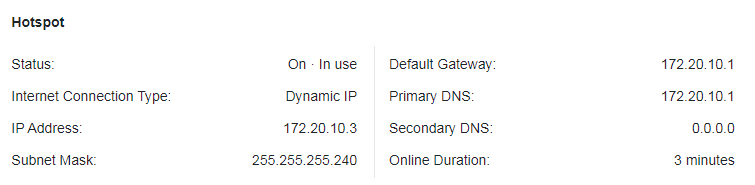
• 熱點 - 此欄位顯示網際網路的當前設定,您可以在「進階 > 網路設定 > 網際網路」頁面上對其進行設定。• 狀態 - 指示便攜式路由器是否已連接到網際網路。
• 網際網路連線類型 - 指示您便攜式路由器連接到網際網路的方式。
• IP 地址 - 便攜式路由器的 WAN IP 地址。
• 子網路遮罩 - 與 WAN IP 地址關聯的子網路遮罩。
• 預設閘道 - 此處顯示當前使用的閘道。
• 主要與次要 DNS - DNS(網域名稱系統)伺服器的 IP 地址。
• 連線時間 - 顯示便攜式路由器已連接到網際網路的時間長短。
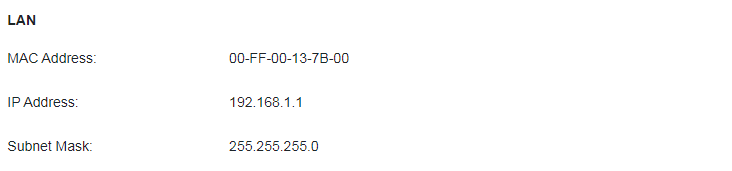
• LAN - 此欄位顯示 LAN 的當前設定,您可以在 網路設定 > LAN 頁面上對其進行設定。
• MAC 地址 - 便攜式路由器的實體地址。
• IP 地址 - 便攜式路由器的 LAN IP 地址。
• 子網路遮罩 - 與 LAN IP 地址關聯的子網路遮罩。

• DHCP 伺服器 - 指示 DHCP 伺服器已啟用還是已停用。預設情況下已啟用,便攜式路由器充當 DHCP 伺服器。
• IP 地址池 - DHCP 伺服器分配 IP 地址的 IP 地址範圍。

• 動態 DNS - 此欄位顯示動態 DNS(網域名稱系統)的當前設定,您可以在 進階 > 網路設定 > 動態 DNS 頁面上對其進行設定。
• 服務提供者 - 您註冊的動態 DNS 服務提供者。
4.3.2 網際網路連接埠
1. 造訪 http://tplinkwifi.net,並使用您為便攜式路由器設定的使用者名稱和密碼登入。
2. 前往 進階 > 網路設定 > 網際網路連接埠。
3. 選擇用於網際網路服務的連接埠。確保網路線已穩固連接到便攜式路由器上的此連接埠。
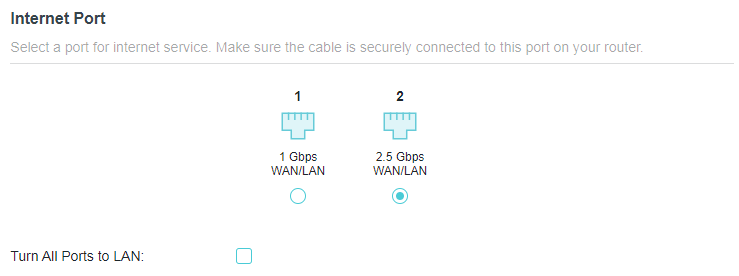
• 將所有連接埠轉為 LAN - 啟用此功能後,所有乙太網路連接埠都將用作 LAN 連接埠。
5.3.3 網際網路連接埠協商速度設定
注意:3G/4G USB 網卡模式和 USB 網路分享模式沒有此功能。
1. 造訪 http://tplinkwifi.net,並使用您為便攜式路由器設定的使用者名稱和密碼登入。
2. 前往 進階 > 網路設定 > 網際網路連接埠 並找到 網際網路連接埠協商速度設定 區塊。
3. 從下拉式清單中選擇雙工類型,然後按一下儲存。

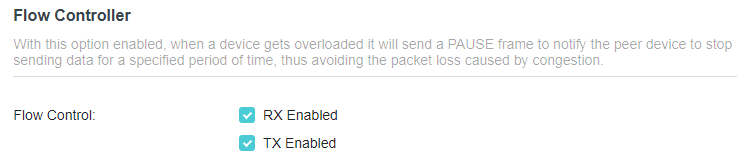
5.3.4 流量控制器
啟用後,當設備過載時,它將發送 PAUSE 訊框以通知對等設備在指定時間內停止發送資料,從而避免由壅塞引起的封包遺失。
1. 造訪 http://tplinkwifi.net,並使用您為便攜式路由器設定的使用者名稱和密碼登入。
2. 前往 進階 > 網路設定 > 網際網路連接埠。找到 流量控制器 區塊。
3. 選擇所需的選項,然後按一下儲存。
5.3.5 網際網路設定
1. 造訪 http://tplinkwifi.net,並使用您的 TP-Link ID 或您為便攜式路由器設定的密碼登入。
2. 前往 進階 > 網路設定 > 網際網路。
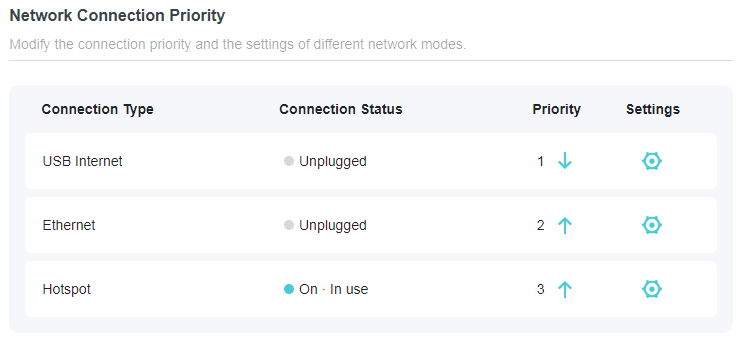
3. 找到 網路連線優先順序 區塊。選擇您的網際網路連線類型並點選設定圖示,然後輸入您的電信業者提供的設定。
動態 IP
如果您選擇 動態 IP,您需要選擇是否複製 MAC 地址。動態 IP 使用者通常配備有有線電視或光纖纜線。
• 按一下 重新取得 以從您的電信業者重新取得 IP 參數。
• 按一下 釋放 以釋放 IP 參數。
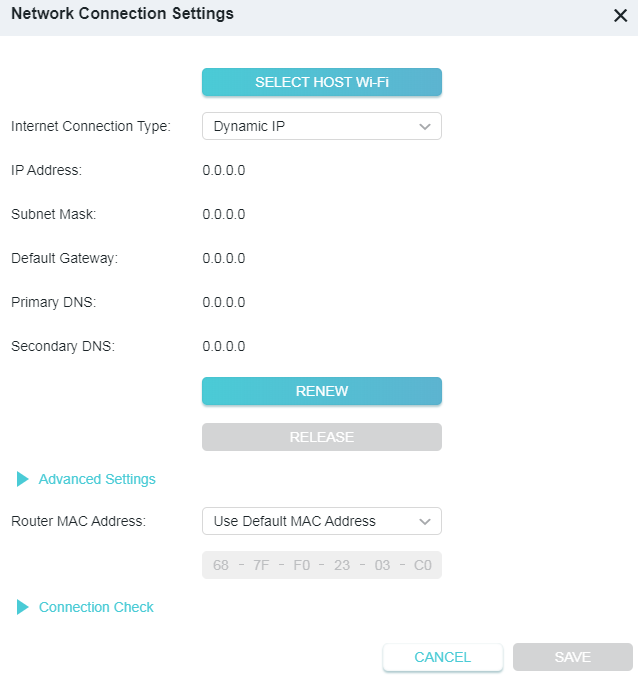
• DNS 地址- 預設設定是從您的電信業者動態獲取 IP 地址。如果您的電信業者沒有自動向便攜式路由器分配 DNS 地址,請選擇「使用以下 DNS 地址」,並輸入您的電信業者主要 DNS 伺服器的點分十進位制格式 IP 地址。如果有次要 DNS 伺服器地址可用,也請輸入。
• MTU 大小 - 大多數乙太網路的正常 MTU(最大傳輸單位)值為 1500 位元組。除非您的電信業者要求,否則不建議您變更預設 MTU 大小。
• 主機名稱 - 此選項指定便攜式路由器的名稱。
• 使用單播 DHCP 獲取 IP - 少數電信業者的 DHCP 伺服器不支援廣播套用。如果您無法正常獲取 IP 地址,可以選擇此選項。(極少需要。)
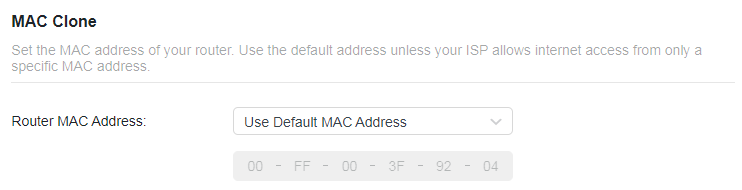
• 路由器 MAC 地址:
• 使用預設 MAC 地址 - 請勿變更便攜式路由器的預設 MAC 地址,以防電信業者未將分配的 IP 地址綁定到 MAC 地址。
• 複製當前設備 MAC - 選擇複製當前連接到便攜式路由器的電腦的 MAC 地址,以防電信業者將分配的 IP 地址綁定到該 MAC 地址。
• 使用自訂 MAC 地址 - 如果您的電信業者要求您註冊 MAC 地址,請選擇此項並在此欄位中輸入正確的 MAC 地址,以防電信業者將分配的 IP 地址綁定到特定的 MAC 地址。
注意:您只能對 LAN 上的 PC 使用 MAC 地址複製功能。
• 連線檢查:
便攜式路由器定期使用 Ping 檢查乙太網路/熱點/USB 網際網路連線類型的連線狀態,以檢查網際網路是否可用。您可以編輯以下參數,然後按一下 儲存。
• 追蹤間隔 - 連續 ICMP 回應請求之間的時間間隔。建議您保持預設值。
• 如果 Ping 失敗/成功 X 次則變更為不可用/可用 - 如果 Ping 失敗/成功次數達到您設定的值,連線狀態將變更為已斷開/已連接。
• IPv4 追蹤 IP/網域名稱 - 輸入您想要檢查與便攜式路由器之間連線的被測主機或其他網路設備的 IP 地址或網域名稱。您最多可以新增 4 個項目。
固定 IP
如果您的電信業者提供固定 IP 地址、子網路遮罩、預設閘道和 DNS 設定,請選擇 固定 IP。
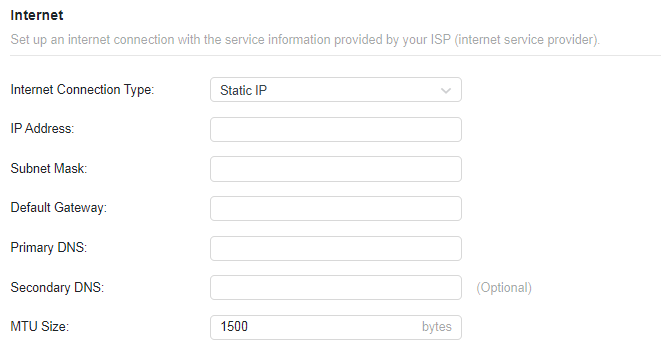
• IP 地址 - 輸入您的電信業者提供的點分十進位制格式 IP 地址。
• 子網路遮罩 - 輸入您的電信業者提供的點分十進位制格式子網路遮罩。通常使用 255.255.255.0 作為子網路遮罩。
• 預設閘道 - 輸入您的電信業者提供的點分十進位制格式閘道 IP 地址。
• 主要/次要 DNS - (選填)輸入您的電信業者提供的點分十進位制格式的一個或兩個 DNS 地址。
• MTU 大小 - 大多數乙太網路的正常 MTU(最大傳輸單位)值為 1500 位元組。除非您的電信業者要求,否則不建議您變更預設 MTU 大小。
• 路由器 MAC 地址:
• 使用預設 MAC 地址 - 請勿變更便攜式路由器的預設 MAC 地址,以防電信業者未將分配的 IP 地址綁定到 MAC 地址。
• 複製當前設備 MAC - 選擇複製當前連接到便攜式路由器的電腦的 MAC 地址,以防電信業者將分配的 IP 地址綁定到該 MAC 地址。
• 使用自訂 MAC 地址 - 如果您的電信業者要求您註冊 MAC 地址,請選擇此項並在此欄位中輸入正確的 MAC 地址,以防電信業者將分配的 IP 地址綁定到特定的 MAC 地址。
注意:
• 您只能對 LAN 上的 PC 使用 MAC 地址複製功能。
• 如果您在 WAN 連接為 PPPoE 時變更了 WAN MAC 地址,則在重新建立連接之前它不會生效。
• 連線檢查:
便攜式路由器定期使用 Ping 檢查乙太網路/熱點/USB 網際網路連線類型的連線狀態,以檢查網際網路是否可用。您可以編輯以下參數,然後按一下儲存。
• 追蹤間隔 - 連續 ICMP 回應請求之間的時間間隔。建議您保持預設值。
• 如果 Ping 失敗/成功 X 次則變更為不可用/可用 - 如果 Ping 失敗/成功次數達到您設定的值,連線狀態將變更為已斷開/已連接。
• IPv4 追蹤 IP/網域名稱 - 輸入您想要檢查與便攜式路由器之間連線的被測主機或其他網路設備的 IP 地址或網域名稱。您最多可以新增 4 個項目。
5.3.6 NAT
注意:3G/4G/5G USB 網卡模式和 USB 網路分享模式沒有此功能。
便攜式路由器的 NAT(網路地址轉換)功能使 LAN 上的設備使用相同的公網 IP 地址與網際網路上的設備通訊,從而透過隱藏設備的 IP 地址來保護區域網路。
1. 造訪 http://tplinkwifi.net,並使用您為便攜式路由器設定的使用者名稱和密碼登入。
2. 前往 進階 > 網路設定 > 網際網路 並找到 NAT 區塊。
3. 啟用 NAT,然後按一下 儲存。

4. NAT 預設為啟用,強烈推薦使用。如果停用它,您可能無法存取網際網路,且 NAT 轉發將不會生效。
5.3.7 DoT/DoH
透過 TLS/HTTPS 加密 DNS 查詢,DoT/DoH 可以為您提供更安全和私密的網際網路連線。
1. 造訪 http://tplinkwifi.net,並使用您為便攜式路由器設定的使用者名稱和密碼登入。
2. 前往 進階 > 網路設定 > 網際網路 並找到 DoT/DoH 區塊。
3. 選擇 DNS 隱私:DoT/DoH。
4. 選擇 DNS 模式。
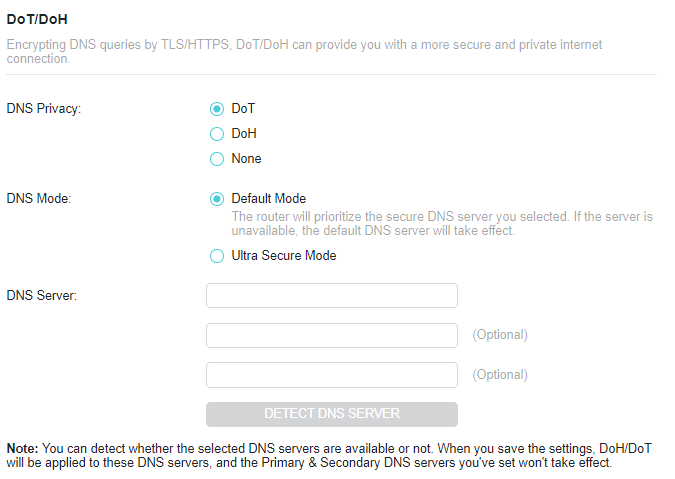
• 預設模式:在此模式下,便攜式路由器將優先考慮您選擇的安全 DNS 伺服器。如果該伺服器不可用,則預設 DNS 伺服器將生效。
• 超安全模式:在此模式下,便攜式路由器僅使用您選擇的安全 DNS 伺服器。如果該伺服器不可用,網際網路連線將受到影響。
5. 輸入 DNS 伺服器。您可以檢測所選的 DNS 伺服器是否可用。當您儲存設定時,DoH/DoT 將套用到這些 DNS 伺服器,且您設定的主要和次要 DNS 伺服器將不會生效。
5.3.8 LAN
1. 造訪 http://tplinkwifi.net,並使用您的 TP-Link ID 或您為便攜式路由器設定的密碼登入。
2. 前往 進階 > 網路設定 > LAN。
3. 設定 LAN 的 IP 參數,然後按一下 儲存。
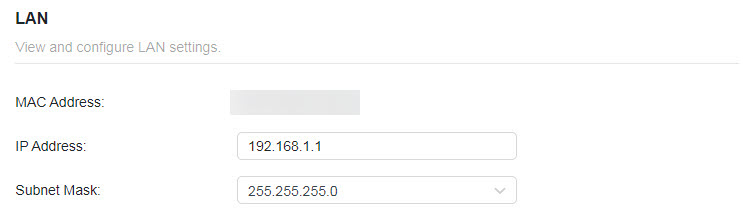
• MAC 地址 - LAN 連接埠的實體地址。該值無法變更。
• IP 地址 - 輸入您便攜式路由器的點分十進位制格式 IP 地址(預設值為 192.168.0.1)。
• 子網路遮罩 - 決定網路大小的地址碼。通常使用 255.255.255.0 作為子網路遮罩。
注意:
• 如果您變更了 IP 地址,則必須使用新 IP 地址登入。
• 如果您設定的新 IP 地址與舊 IP 地址不在同一子網路中,DHCP 伺服器中的 IP 地址池將自動設定,但虛擬伺服器和 DMZ 主機在重新設定之前不會生效。
5.3.9 IGMP
IGMP(網際網路組管理協定)協助便攜式路由器識別本地網路中哪些用戶端訂閱了特定的多播組。這有助於高效傳輸多播資料封包,避免不必要的流量浪費並提高網路效能。
IGMP 可用於管理 IPTV 中的多播傳輸。如果您想設定 IPTV 以啟用電信業者 (ISP) 提供的網際網路/IPTV/電話服務,請按以下步驟操作:
在開始之前,請確保您的電信業者提供基於 IGMP 技術的網路服務,例如英國的 British Telecom (BT) 和 Talk Talk:
1. 造訪 http://tplinkwifi.net,並使用您的 TP-Link ID 或您為便攜式路由器設定的密碼登入。
2. 前往 進階 > 網路設定 > IGMP。
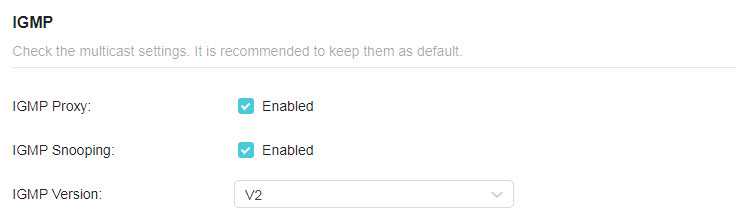
1 ) 勾選 IGMP 代理 和 IGMP 偵聽 核取方塊,然後根據您的電信業者要求選擇 IGMP 版本(V2 或 V3)。
2 ) 按一下 儲存。
3 ) 設定 IGMP 代理後,IPTV 現在可以在您的便攜式路由器後方運作。您可以將機上盒連接到便攜式路由器的任何乙太網路連接埠。
5.3.10 DHCP 伺服器
預設情況下,DHCP(動態主機設定協定)伺服器已啟用,便攜式路由器充當 DHCP 伺服器;它從 IP 地址池動態向用戶端設備分配 TCP/IP 參數。如有必要,您可以變更 DHCP 伺服器的設定,並且可以為指定的用戶端設備保留 LAN IP 地址。
• 指定便攜式路由器分配的 IP 地址:
1. 造訪 http://tplinkwifi.net,並使用您的 TP-Link ID 或您為便攜式路由器設定的密碼登入。
2. 前往 進階 > 網路設定 > DHCP 伺服器 並找到 DHCP 伺服器 區塊。
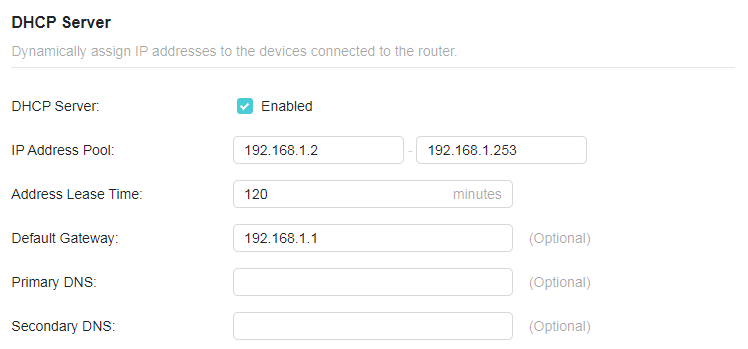
1. 勾選 啟用 核取方塊。
2. 在 IP 地址池 中輸入起始和結束 IP 地址。
3. 如果電信業者提供,請輸入其他參數。預設閘道 會自動填入,且與便攜式路由器的 LAN IP 地址相同。
4. 按一下 儲存。
注意:要使用便攜式路由器的 DHCP 伺服器功能,必須將 LAN 上的所有電腦設定為「自動獲取 IP 地址」。
• 為指定的用戶端設備保留 IP 地址:
1. 造訪 http://tplinkwifi.net,並使用您的 TP-Link ID 或您為便攜式路由器設定的密碼登入。
2. 前往 進階 > 網路設定 > DHCP 伺服器 並找到 地址保留 區塊。
3. 按一下 地址保留 區塊中的 新增。
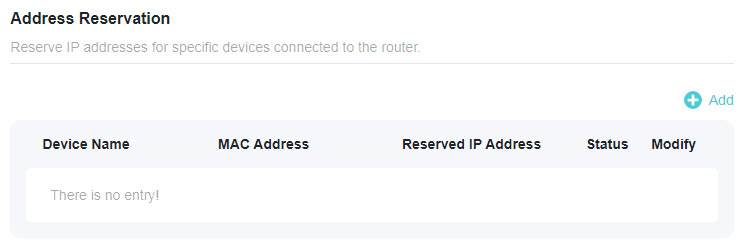
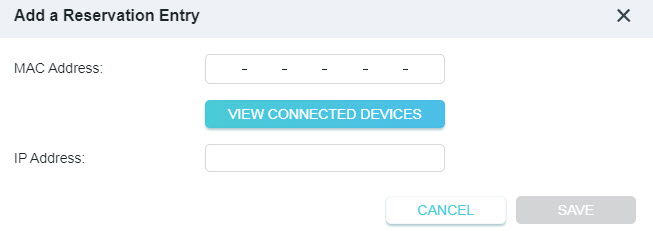
4. 按一下 檢視已連接的設備 並選擇要為其保留 IP 的設備。然後 MAC 和 IP 地址將自動填入。您也可以手動輸入用戶端設備的 MAC 和 IP 地址。
• 檢查 DHCP 用戶端清單:
1. 造訪 http://tplinkwifi.net,並使用您的 TP-Link ID 或您為便攜式路由器設定的密碼登入。
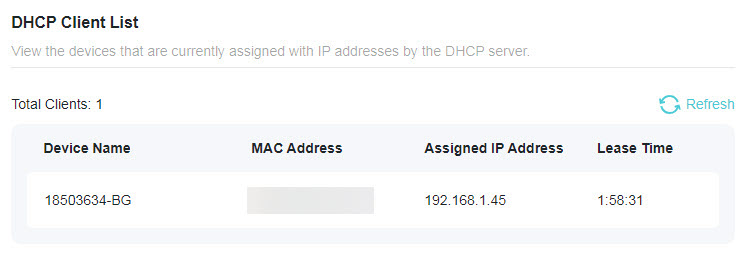
2. 前往 進階 > 網路設定 > DHCP 伺服器 並找到 DHCP 用戶端清單 區塊。您可以查看清單的設備資訊。
3. 按一下 重新整理 以查看當前連接的設備。
5.3.11 動態 DNS
便攜式路由器提供 DDNS(動態網域名稱系統)功能,允許使用固定網域名稱(由您自己命名)和動態 IP 地址託管網站、FTP 伺服器或電子郵件伺服器。因此,無論您的 IP 地址是什麼,您的朋友都可以透過輸入您的網域名稱連接到您的伺服器。
在使用此功能之前,您需要註冊 DDNS 服務提供者,例如 www.comexe.cn、www.dyndns.org 或 www.noip.com。動態 DNS 用戶端服務提供者將給您一個密碼或金鑰。
1. 造訪 http://tplinkwifi.net,並使用您的 TP-Link ID 或您為便攜式路由器設定的密碼登入。
2. 前往 進階 > 網路設定 > 動態 DNS。
3. 選擇 DDNS 服務提供者:TP-Link、NO-IP 或 DynDNS。建議選擇 TP-Link,以便享受 TP-Link 優質的 DDNS 服務。否則,請選擇 NO-IP 或 DynDNS。如果您沒有 DDNS 帳戶,則必須先按一下 立即註冊 進行註冊。
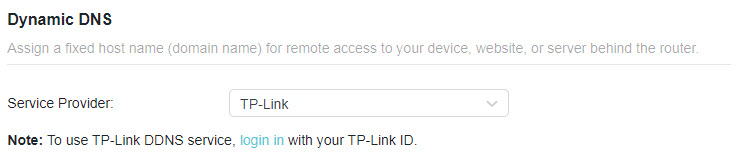
注意:要享受 TP-Link 的 DDNS 服務,您必須使用 TP-Link ID 登入。如果您尚未登入,請按一下登入。
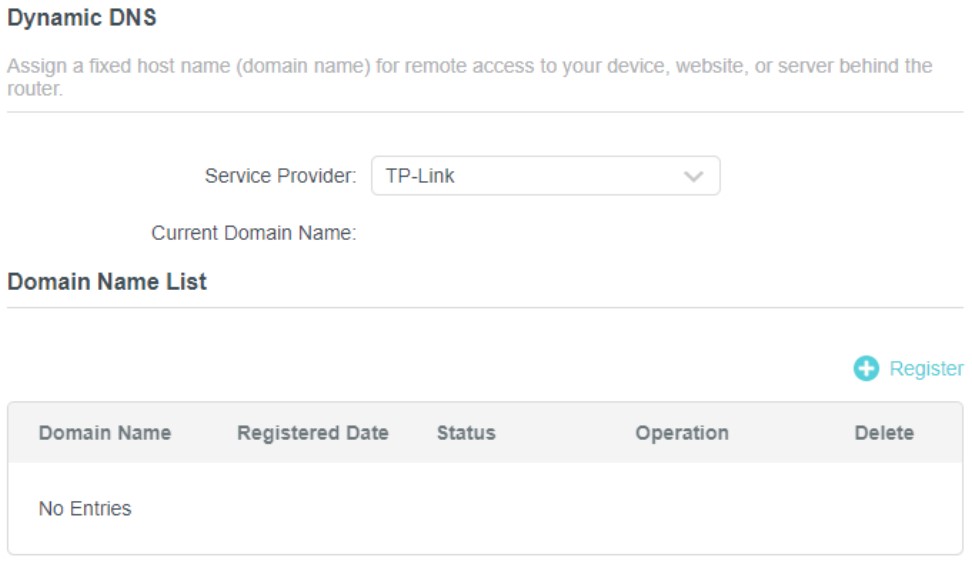
4. 如果選擇了 TP-Link,請按一下 網域名稱清單 中的 註冊,然後根據需要輸入 網域名稱。
如果選擇了 NO-IP 或 DynDNS,請輸入您帳戶的使用者名稱、密碼和網域名稱。
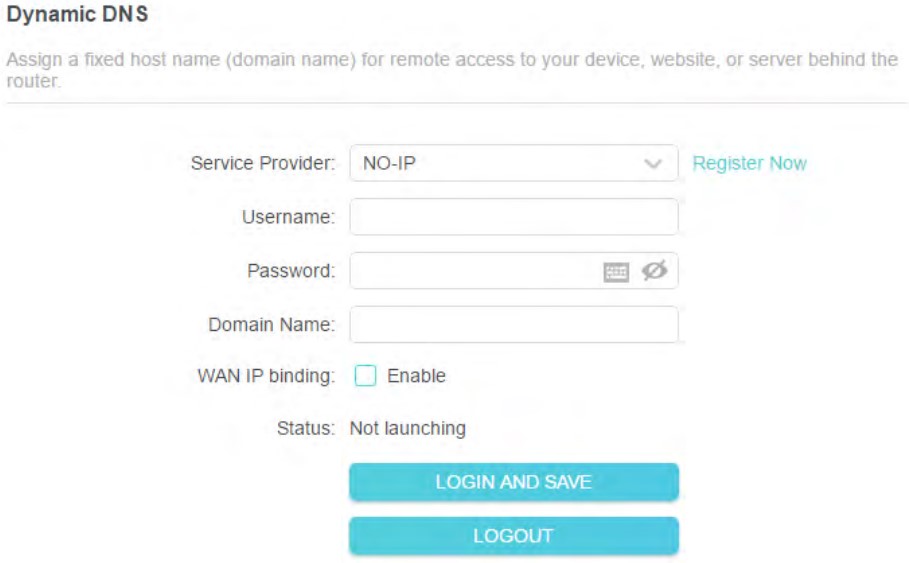
5. 按一下登入並儲存。
注意:如果您想使用新的 DDNS 帳戶,請先按一下 登出,然後使用新帳戶登入。
5.3.12 靜態路由
靜態路由是一種由網路管理員或使用者透過向路由表添加條目來手動設定的路由形式。手動設定的路由資訊指引便攜式路由器將資料封包轉發到特定目的地。
我想:
同時存取多個網路和伺服器。
例如,在小型辦公室中,我的 PC 可以透過路由器 A 上網,但我也想存取公司的網路。現在我有一個交換器和路由器 B。我按圖所示連接設備,以便建立我的 PC 與公司伺服器之間的實體連接。要同時上網和存取公司網路,我需要設定靜態路由。
*圖片可能與您的實際產品有所不同。
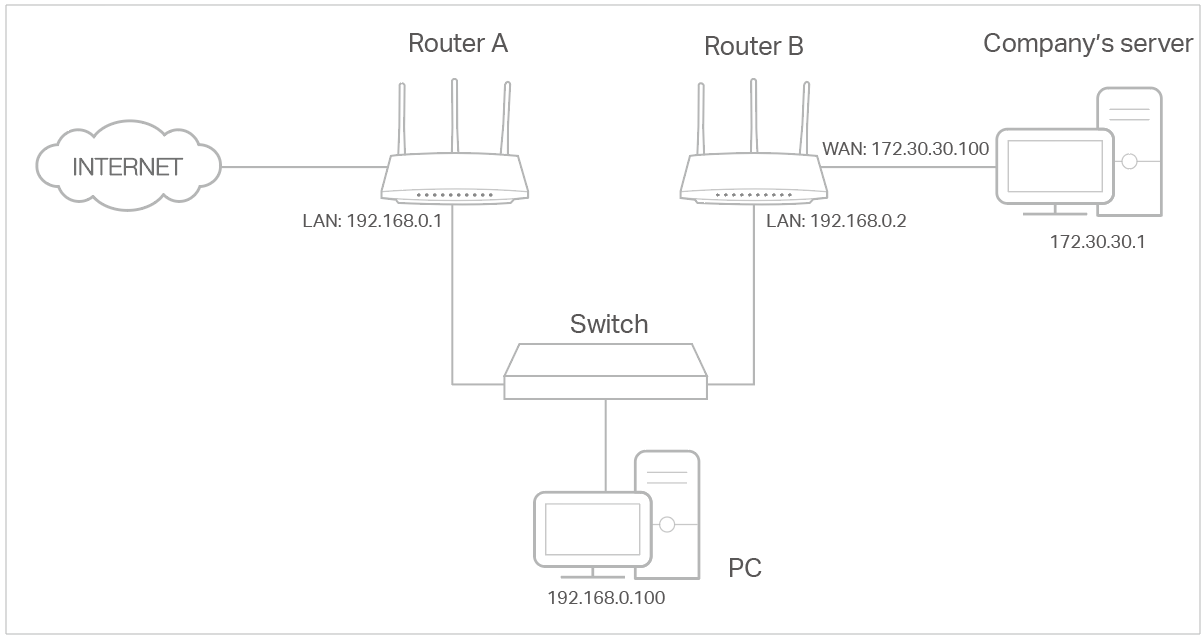
我該怎麼做?
1. 將路由器的 LAN IP 地址變更為同一子網路上的兩個不同 IP 地址。停用路由器 B 的 DHCP 功能。
2. 造訪 http://tplinkwifi.net,並使用您的 TP-Link ID 或您為路由器 A 設定的密碼登入。
3. 前往 進階 > 網路設定 > 路由 並找到靜態路由區塊。
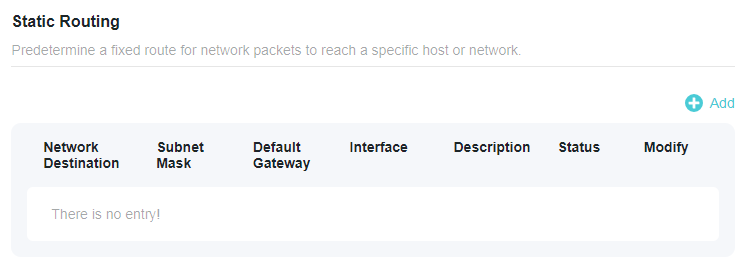
4. 按一下新增並根據以下說明完成設定:
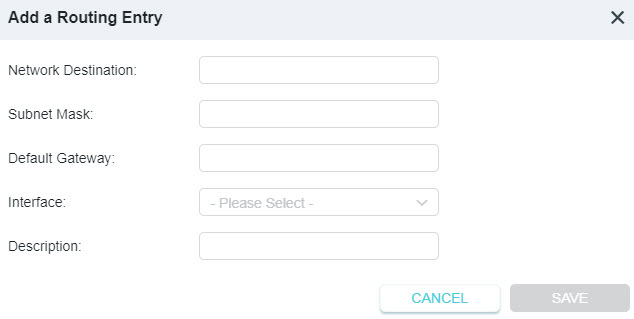
• 目的網路 - 您要分配給靜態路由的目的地 IP 地址,例如 192.168.0.100/24。此 IP 地址不能與路由器 A 的 WAN IP 或 LAN IP 在同一子網路上。
• 預設閘道 - 資料封包將發往的閘道設備的 IP 地址。此 IP 地址必須與發送資料的路由器 IP 在同一子網路上。在本例中,資料封包將發送到路由器 B 的 LAN 連接埠,然後發送到伺服器,因此預設閘道應為 192.168.1.2。
• 介面 - 由發送資料封包的連接埠 (WAN/LAN) 決定。在本例中,資料透過路由器 A 的 LAN 連接埠發送到閘道,因此應選擇 LAN/WLAN。
• 描述 - 輸入此靜態路由條目的描述。
5. 按一下 儲存。
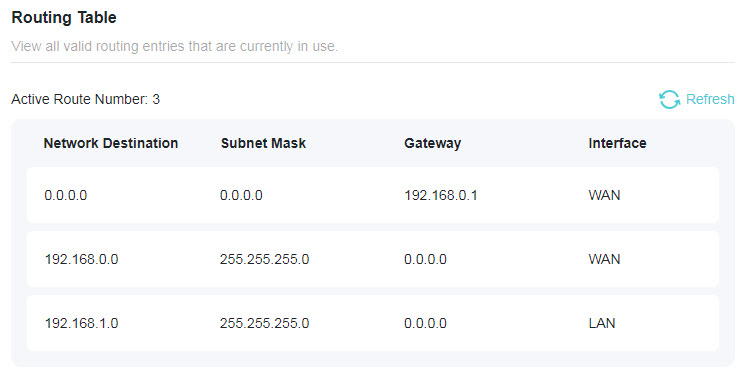
6. 檢查下方的 路由表。如果您能找到設定的條目,則靜態路由設定成功。
5.4 TP-Link 雲端服務
TP-Link 雲端服務提供了一種更好的方式來管理您的雲端設備。使用 TP-Link ID 登入便攜式路由器,無論身在何處,都可以透過 Tether 應用程式輕鬆監控和管理您的家庭網路。為了確保您的便攜式路由器保持最新狀態並隨時間推移變得更好,TP-Link 雲端將在有重要的韌體升級可用時通知您。當然,您也可以使用單個 TP-Link ID 管理多個 TP-Link 雲端設備。
本節介紹如何註冊新的 TP-Link ID、綁定或解綁 TP-Link ID 以管理便攜式路由器,以及無論您身在何處都可以使用它管理家庭網路的 Tether 應用程式。
5.4.1 註冊 TP-Link ID
如果您在快速設定過程中跳過了註冊,您可以:
1. 造訪 http://tplinkwifi.net,並使用您為便攜式路由器設定的密碼登入。
2. 前往 進階 > TP-Link ID 或按一下頁面最頂部的 TP-Link ID。
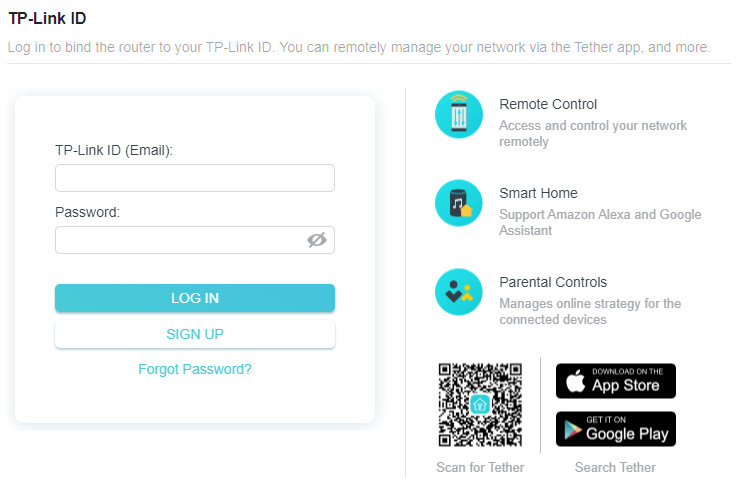
3. 按一下 註冊 並按照說明註冊 TP-Link ID。
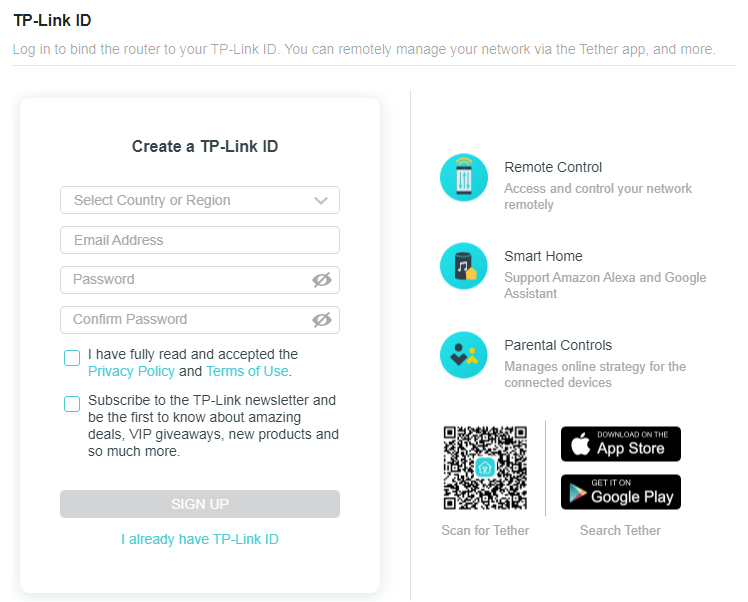
4. 啟用 TP-Link ID 後,返回 TP-Link ID 頁面進行登入。首次用於登入便攜式路由器的 TP-Link ID 將自動綁定為 管理員。
注意:
• 要了解有關 管理員 和 使用者 TP-Link ID 的更多資訊,請參閱 管理使用者 TP-Link ID。
• 在網頁管理頁面上註冊 TP-Link ID 後,只能透過 Tether 應用程式註冊另一個 TP-Link ID。請參閱 透過 Tether 登入 安裝應用程式。
• 如果您想從便攜式路由器解綁管理員 TP-Link ID,請前往 進階 > TP-Link ID,然後按一下設備資訊區塊中的解綁。
5.4.2 變更您的 TP-Link ID 資訊
按照以下步驟根據需要變更 TP-Link ID 的電子郵件地址和密碼。
1. 造訪 http://tplinkwifi.net,並使用您的 TP-Link ID 登入。
2. 前往 進階 > TP-Link ID,並聚焦於 TP-Link ID 區塊。
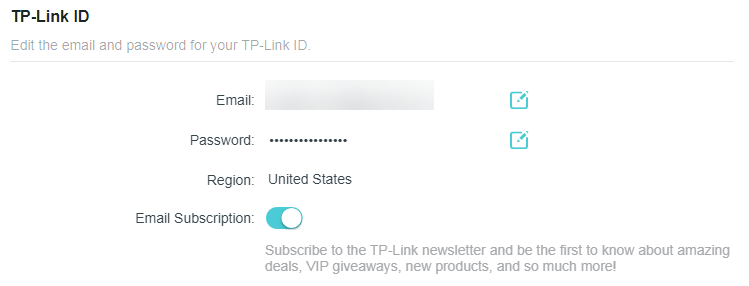
• 變更您的電子郵件地址:
1. 按一下電子郵件後面的 。
2. 輸入您 TP-Link ID 的密碼,然後輸入新的電子郵件地址。然後按一下 儲存。
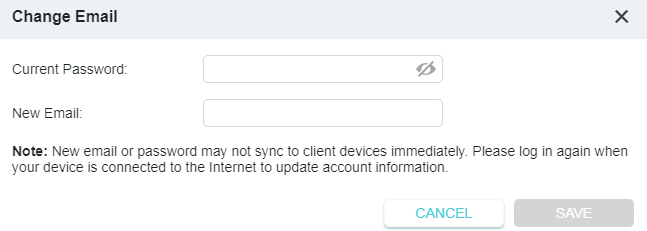
• 變更您的密碼:
1. 按一下密碼後面的 。
2. 輸入當前密碼,然後輸入兩次新密碼。然後按一下 儲存。
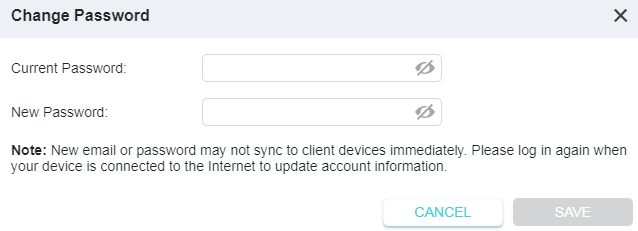
5.4.3 管理使用者 TP-Link ID
首次用於登入便攜式路由器的 TP-Link ID 將自動綁定為 擁有者 帳戶。擁有者帳戶可以在同一台便攜式路由器中添加或刪除其他 TP-Link ID。所有帳戶都可以在本地或遠端監控和管理便攜式路由器,但只有擁有者帳戶可以:
• 在網頁管理頁面或 Tether 應用程式中將便攜式路由器重設為原廠預設設定。
• 向便攜式路由器添加/從中刪除其他 TP-Link ID。
添加 TP-Link ID 以管理便攜式路由器
1. 造訪 http://tplinkwifi.net,並使用您的 TP-Link ID 登入。
2. 前往 進階 > TP-Link ID,並聚焦於 已綁定的 TP-Link ID 區塊。
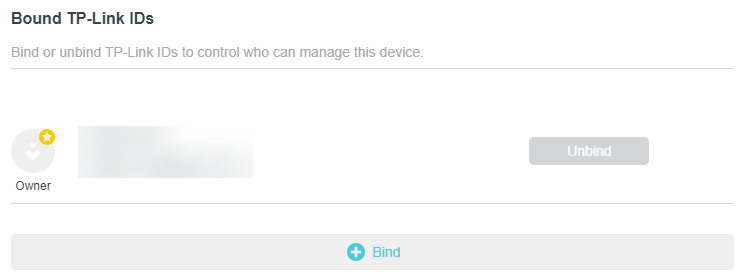
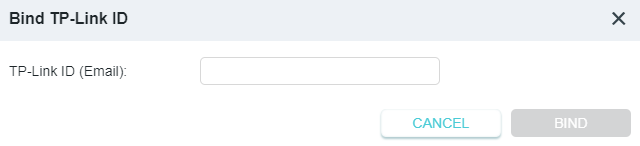
3. 按一下  ,根據需要輸入另一個 TP-Link ID,然後按一下 儲存。
注意:如果您需要另一個 TP-Link ID,請透過 Tether 應用程式註冊一個新 ID。請參閱 透過 TP-Link Tether 應用程式管理便攜式路由器 安裝應用程式並註冊新的 TP-Link ID。
4. 新的 TP-Link ID 將顯示在 已綁定的 TP-Link ID 表格中。
取消 TP-Link ID 對便攜式路由器的管理權限
1. 造訪 http://tplinkwifi.net,並使用您的 TP-Link ID 登入。
2. 前往 進階 > TP-Link ID,並聚焦於 已綁定的 TP-Link ID 區塊。
3. 勾選要刪除的 TP-Link ID 的 解綁。
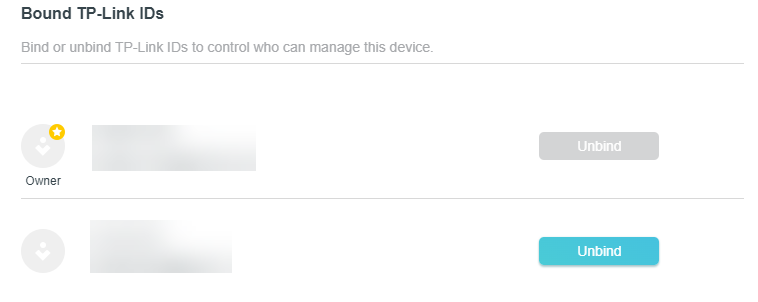
5.4.4 透過 TP-Link Tether 應用程式管理便攜式路由器
Tether 應用程式在 iOS 和 Android 設備(例如智慧型手機和平板電腦)上執行。
1. 啟動 Apple App Store 或 Google Play 商店,搜尋「TP-Link Tether」或直接掃描二維碼下載並安裝應用程式。

2. 啟動 Tether 應用程式並使用您的 TP-Link ID 登入。如果您沒有 TP-Link ID,請先建立一個。
3. 將您的設備連接到便攜式路由器的無線網路。
4. 返回 Tether 應用程式,選擇您便攜式路由器的型號,然後使用您為便攜式路由器設定的密碼登入。
5. 根據需要管理您的便攜式路由器。
注意:如果您需要從智慧型設備遠端存取便攜式路由器,您需要:
• 使用您的 TP-Link ID 登入。如果您沒有,請參閱 註冊 TP-Link ID。
• 確保您的智慧型手機和平板電腦可以透過行動數據或 Wi-Fi 網路存取網際網路。
5.5 無線網路
5.5.1 無線設定
1. 造訪 http://tplinkwifi.net,並使用您的 TP-Link ID 或您為便攜式路由器設定的密碼登入。
2. 前往 進階 > 無線網路 > 無線設定。
3. 為無線網路設定無線設定,然後按一下 儲存。
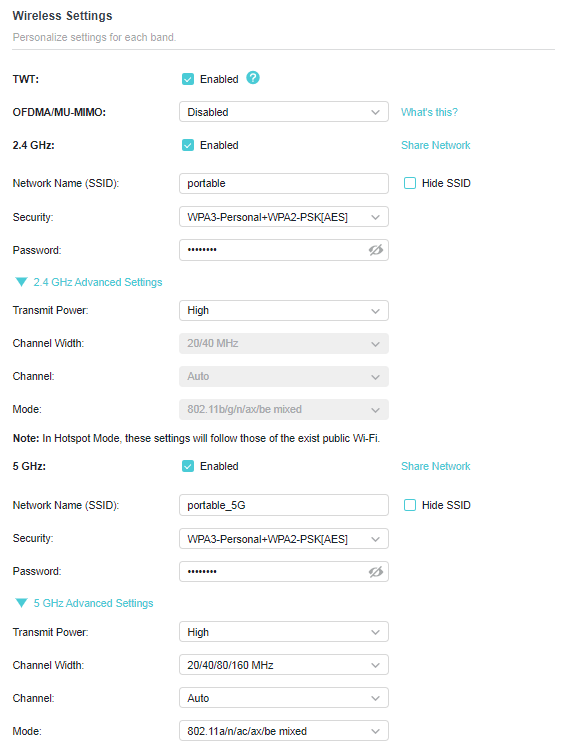
• TWT - 目標喚醒時間允許 802.11ax 路由器和用戶端協商其傳輸和接收資料封包的週期。用戶端僅在 TWT 工作階段喚醒,其餘時間保持休眠模式,從而顯著延長其電池壽命。
• OFDMA/MU-MIMO - 此功能使多個使用者能夠同時傳輸資料,從而大大提高速度和效率。請注意,只有當您的用戶端也支援 OFDMA 時,才能充分發揮優勢。
• 2.4GHz/5GHz - 選擇此核取方塊以啟用 2.4GHz/5GHz 無線網路。
• 分享網路- 按一下以儲存 Wi-Fi 設定以供分享。
• 網路名稱 (SSID) - 輸入最多 32 個字元的值。必須為您網路中的所有無線設備分配相同的名稱 (SSID)。
• 隱藏 SSID - 如果您想從 Wi-Fi 網路清單中隱藏網路名稱 (SSID),請選擇此核取方塊。在這種情況下,您需要手動加入網路。
• 安全性 - 從安全性下拉式選單中選擇一個選項。除非必要,否則建議您不要變更預設設定。
• 密碼 - 為無線網路設定密碼。該值區分大小寫。
• 傳輸功率 - 選擇 高、中 或 低 以指定資料傳輸功率。預設且建議的設定為高。
• 頻道寬度 - 為無線網路選擇頻道寬度(頻寬)。
• 頻道 - 為無線網路選擇工作頻道。對於 2.4 GHz 和 5GHz 頻段,如果您沒有遇到無線連線不穩定的問題,建議將頻道保持為 自動。
• 模式 - 您可以選擇適當的「混合」模式。
5.5.2 MLO 網路
MLO(多鏈路營運)網路使連接的 Wi-Fi 7 用戶端能夠跨不同頻段同時發送和接收資料,從而大大提高了傳輸速率和可靠性。
注意:某些型號可能沒有 MLO 網路。圖片可能與實際產品有所不同。
1. 前往 進階 > 無線網路 > 無線設定。
2. 找到 MLO 網路 區塊並啟用 MLO 網路。
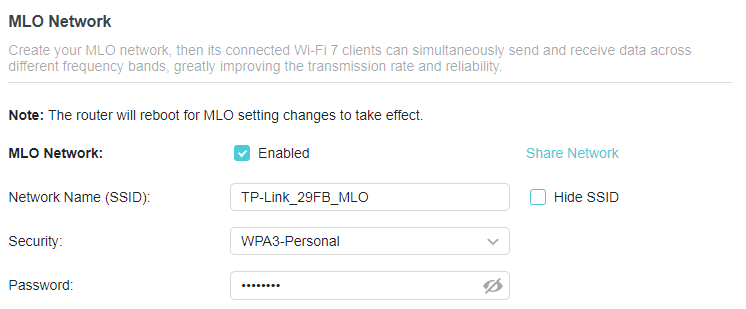
3. 在網路名稱 (SSID) 中指定 SSID。
4. 選擇安全性類型。如果您選擇的安全性類型需要密碼,請指定密碼。該值區分大小寫。
5. 您還可以按一下 分享網路 以與您的訪客分享 SSID 和密碼。
6. 如果選擇 隱藏 SSID,則在無線設備上掃描本地無線網路時不會顯示您的 SSID,您需要手動加入 MLO 網路。
7. 按一下 儲存 以儲存您的設定。
5.5.3 訪客網路
訪客網路允許您為訪客提供 Wi-Fi 存取權限,而無需透露您的主網路。當您的房屋、公寓或工作場所中有客人時,您可以為他們建立一個訪客網路。此外,您可以自訂訪客網路設定以確保網路安全和隱私。
• 建立訪客網路
1. 造訪 http://tplinkwifi.net,並使用您的 TP-Link ID 或您為便攜式路由器設定的密碼登入。
2. 前往 進階 > 無線網路 > 訪客網路。
3. 根據您的需要啟用 2.4GHz/5GHz 訪客網路。
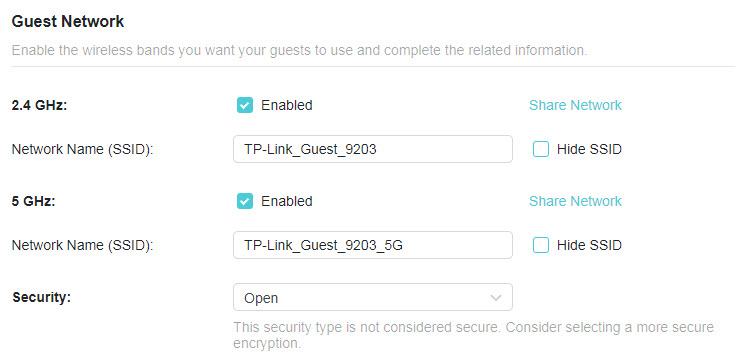
4. 自訂 SSID。除非您希望訪客手動輸入 SSID 以存取訪客網路,否則請勿選擇隱藏 SSID。
5. 選擇 安全性 類型並自訂您自己的密碼。如果選擇了 無安全性,則存取您的訪客網路不需要密碼。
6. 按一下 儲存。現在您的訪客可以使用您設定的 SSID 和密碼存取您的訪客網路了!
• 自訂訪客網路選項
1. 造訪 http://tplinkwifi.net,並使用您的 TP-Link ID 或您為便攜式路由器設定的密碼登入。
2. 前往 進階 > 無線網路 > 訪客網路。找到 訪客權限 區塊。
3. 根據您的需求自訂訪客網路選項。
• 允許訪客相互查看
如果您希望允許訪客網路上的無線用戶端透過網路芳鄰和 Ping 等方式互相通訊,請勾選此核取方塊。
• 允許訪客存取我的區域網路
如果您希望允許訪客網路上的無線用戶端透過網路芳鄰和 Ping 等方式與連接到便攜式路由器 LAN 連接埠或主網路的設備進行通訊,請勾選此核取方塊。
4. 按一下 儲存。現在您可以確保網路安全與隱私了!
5.5.4 無線排程
當您不需要無線功能時,無線功能可以在指定時間自動關閉。
1. 造訪 http://tplinkwifi.net,並使用您的 TP-Link ID 或您為便攜式路由器設定的密碼登入。
2. 前往 進階 > 無線網路 > 無線排程。
3. 啟用 無線排程 功能。
4. 按一下 新增 指定需要自動關閉無線網路的時間段,然後按一下 儲存。
注意:
• 生效的無線排程以便攜式路由器的時間為準。您可以前往 進階 > 系統 > 時間設定 來修改時間。
• 無線網路將在您設定的時間段結束後自動開啟。
5.5.5 WPS
WPS(Wi-Fi 保護設定)可以協助您快速安全地連接到網路。本節將指引您透過 WPS 快速將新的無線設備新增至便攜式路由器的網路中。
注意:
• 如果便攜式路由器的無線功能已停用,則無法設定 WPS 功能。設定前請確保無線功能已啟用。
1. 造訪 http://tplinkwifi.net,並使用您的 TP-Link ID 或您為便攜式路由器設定的密碼登入。
2. 前往 進階 > 無線網路 > WPS。
3. 按照以下方法之一將您的用戶端設備連接到便攜式路由器的 Wi-Fi 網路。
方法 1:使用 PIN 碼
• 透過用戶端的 PIN 碼連接
1. 保持 WPS 狀態為 已啟用 並選擇 用戶端的 PIN 碼。
2. 輸入您設備的 PIN 碼,然後按一下 連接。接著您的設備將連接到便攜式路由器。
• 透過路由器的 PIN 碼連接
1. 保持 WPS 狀態為 已啟用 並選擇 路由器的 PIN 碼。
2. 在您的個人設備上輸入便攜式路由器的 PIN 碼。您也可以產生一個新的 PIN 碼。
注意:PIN(個人識別碼)是每台便攜式路由器預設的 8 位數識別碼。支援 WPS 的設備可以透過 PIN 碼連接到您的便攜式路由器。
方法 2:使用網頁畫面上的 WPS 按鈕
按一下畫面上的 開始。在兩分鐘內,於您的個人設備上啟用 WPS。
畫面上應出現 設備-(XX-XX-XX-XX-XX-XX) 已連接 的訊息,指示 WPS 連接成功。
注意:XX-XX-XX-XX-XX-XX 是您設備的 MAC 地址。
方法 3:使用便攜式路由器上的 WPS 按鈕
按下便攜式路由器上的 WPS 按鈕。在兩分鐘內,於您的個人設備上啟用 WPS。
5.5.6 其他設定
1. 造訪 http://tplinkwifi.net,並使用您的 TP-Link ID 或您為便攜式路由器設定的密碼登入。
2. 前往 進階 > 無線網路 > 其他設定。
3. 設定無線網路的進階設定,然後按一下 儲存。
注意:如果您不熟悉此頁面上的設定項目,強烈建議保持提供的預設值;否則可能會導致無線網路效能降低。
• WMM - WMM 功能可以保證帶有高優先順序訊息的封包被優先傳輸。
• Short GI - 此功能可縮短資料封包之間的時間,從而潛在提高無線網路的吞吐量。
• AP 隔離 - 此功能隔離所有連接的無線站點,使無線站點無法透過 WLAN 互相存取。
• 訊號輕重公平分配 - 此功能可以透過犧牲慢速設備的一點網路時間來提高整體網路效能。
• 信標間隔 - 此處輸入 40-1000 毫秒之間的信標間隔值。信標間隔值決定信標的時間間隔。信標是便攜式路由器發送的用於同步無線網路的封包。預設值為 100。
• RTS 門檻 - 此處您可以指定 RTS(請求發送)門檻。如果封包大於指定的 RTS 門檻大小,便攜式路由器將向特定接收站發送 RTS 訊框並協商發送資料訊框。預設值為 2346。
• DTIM 間隔 - 此值決定交付流量指示訊息 (DTIM) 的間隔。DTIM 欄位是一個倒數欄位,用於告知用戶端下一個收聽廣播和多播訊息的時間視窗。當便攜式路由器為相關用戶端快取了廣播或多播訊息時,它會發送帶有 DTIM 間隔值的下一個 DTIM。您可以指定 1-255 個信標間隔之間的值。預設值為 1,表示 DTIM 間隔與信標間隔相同。
• 群組金鑰更新週期 - 輸入秒數(最少 30 秒)以控制加密金鑰自動更新的時間間隔。預設值為 0,表示不更新金鑰。
5.6 USB 儲存設備
將您的 USB 儲存設備插入便攜式路由器的 USB 連接埠,然後在本地或遠端存取儲存在其中的檔案。
提示:
• 如果您使用 USB 集線器,請確保連接到便攜式路由器的設備不超過 4 個。
• 如果 USB 儲存設備需要使用隨附的外接電源,請確保外接電源已連接。
• 如果您使用 USB 硬碟,請確保其檔案系統為 FAT32、exFat、NTFS 或 HFS+。
• 在從便攜式路由器實體斷開 USB 設備之前,請安全移除它以避免資料損壞:前往 進階 > USB > 儲存設備,然後按一下 移除。
5.6.1 在本地存取 USB 設備
將您的 USB 儲存設備插入便攜式路由器的 USB 連接埠,然後參考下表存取儲存在 USB 儲存設備上的檔案。
| Windows 電腦 |
• 方法 1:
• 方法 2:
|
|---|---|
| Mac |
1 ) 選擇 前往 > 連接伺服器。
4 ) 出現提示時,選擇 訪客 單選框。(如果您設定了使用者名稱和密碼以拒絕匿名存取 USB 磁碟,則應選擇 註冊使用者 單選框。要了解如何設定存取帳戶,請參閱 設定資料安全的驗證。) |
| 平板電腦 | 使用第三方應用程式進行網路檔案管理。 |
提示:
您也可以使用網路/媒體伺服器名稱作為伺服器地址來存取您的 USB 儲存設備。欲了解更多資訊,請參閱自訂 USB 儲存設備的地址。
5.6.2 遠端存取 USB 設備
您可以在區域網路之外存取您的 USB 磁碟。例如,您可以:
• 與您的朋友分享相片和其他大型檔案,而無需登入(並付費使用)相片分享網站或電子郵件系統。
• 為簡報資料進行安全備份。
• 在旅途中定期清理相機記憶卡上的檔案。
注意:如果您的電信業者分配了私有 WAN IP 地址(例如 192.168.x.x 或 10.x.x.x),則您無法使用此功能,因為私有地址不會在網際網路上路由。
請按照以下步驟設定遠端存取設定。
1. 造訪 http://tplinkwifi.net,並使用您的 TP-Link ID 或您為便攜式路由器設定的密碼登入。
2. 前往 進階 > USB > 儲存設備。
3. 勾選 網際網路 FTP 核取方塊,然後按一下 儲存。
4. 參考下表遠端存取您的 USB 磁碟。
| 電腦 |
1 ) 開啟 檔案總管 (或前往 電腦,僅適用於 Windows 使用者)或開啟網頁瀏覽器。
3 ) 按下鍵盤上的 Enter。 |
|---|---|
| 平板電腦 | 使用第三方應用程式進行網路檔案管理。 |
提示:按一下 動態 DNS 以了解如何為您的便攜式路由器設定網域名稱。
5.6.3 自訂存取設定
預設情況下,所有網路用戶端都可以存取您 USB 磁碟上的所有資料夾。您可以在便攜式路由器的網頁管理頁面上透過設定共用帳戶、共用特定內容和設定新的共用地址來自訂共用設定。
1. 造訪 http://tplinkwifi.net,並使用您的 TP-Link ID 或您為便攜式路由器設定的密碼登入。
2. 前往 進階 > USB > 儲存設備。
• 自訂 USB 儲存設備的地址
您可以自訂伺服器名稱,並使用該名稱存取您的 USB 儲存設備。
1. 在 存取方式 區塊中,確保已啟用 Windows Samba / macOS/Linux Samba,並根據您的喜好輸入 網路/媒體伺服器名稱(例如 MyShare),然後按一下 儲存。
2. 現在您可以透過造訪 \\MyShare(適用於 Windows)或 smb://MyShare (適用於 Mac)來存取 USB 儲存設備。
• 僅共用特定內容
聚焦於 檔案共用 區塊。指定您想要共用的共用資料夾,然後按一下 儲存。
• 設定資料安全的驗證
您可以為 USB 儲存設備設定驗證,以便網路用戶端在存取 USB 儲存設備時需要輸入使用者名稱和密碼。
1. 在 檔案共用 區塊中,啟用 安全共用。
2. 按一下 修改存取帳戶,並注意預設的使用者名稱和密碼。作為管理員存取可以讀取和修改共用資料夾,而訪客只能讀取共用資料夾。
注意:
1. 對於 Windows 使用者,請勿將共用使用者名稱設定為與 Windows 使用者名稱相同。否則,Windows 憑證機制可能會導致以下問題:
• 如果共用密碼也與 Windows 密碼相同,則驗證將不起作用,因為 Windows 將自動使用其帳戶資訊進行 USB 存取。
• 如果共用密碼與 Windows 密碼不同,Windows 將無法記住您的憑證,您將始終需要輸入共用密碼進行 USB 存取。
2. 由於 Windows 憑證機制,變更驗證設定後您可能無法存取 USB 磁碟。請從 Windows 登出並嘗試重新存取。或者您可以參考 自訂 USB 儲存設備的地址 來變更 USB 磁碟的地址。
5.6.4 媒體共用
媒體共用功能允許您直接從支援 DLNA 的設備(例如電腦、平板電腦和 PS2/3/4)檢視儲存在 USB 儲存設備上的相片、播放音樂和觀看電影。
注意:某些型號可能不支援此功能。圖片可能與實際產品有所不同。
1. 造訪 http://tplinkwifi.net,並使用您的 TP-Link ID 或您為便攜式路由器設定的密碼登入。
2. 前往 進階 > USB > 儲存設備。
3. 啟用 媒體共用。
4. 當您的 USB 儲存設備插入便攜式路由器時,連接到便攜式路由器的支援 DLNA 的設備(如您的電腦和平板)可以檢測並播放 USB 儲存設備上的媒體檔案。
5. 詳細說明請參閱下表。
| Windows 電腦 |
前往 電腦 > 網路,然後按一下 媒體設備 區塊中的媒體伺服器名稱(預設為 型號-share)。
|
|---|---|
| 平板電腦 | • 使用第三方支援 DLNA 的播放器。 |
5.7 NAT 轉發
便攜式路由器的 NAT(網路地址轉換)功能使 LAN 上的設備使用相同的公網 IP 地址在網際網路上進行通訊,這透過隱藏設備的 IP 地址保護了區域網路。但是,這也帶來了外部主機無法主動與區域網路中指定設備進行通訊的問題。
透過轉發功能,便攜式路由器可以穿越 NAT 的隔離,使網際網路上的用戶端可以到達 LAN 上的設備並實現某些特定功能。水星 (Mercusys) 路由器包含四種轉發規則。如果設定了兩條或更多規則,實施優先順序從高到低依次為連接埠轉發、連接埠觸發、UPnP 和 DMZ。
5.7.1 連接埠轉發
當您在區域網路中建立伺服器並希望在網際網路上共用它時,連接埠轉發可以實現該服務並將其提供給網際網路使用者。同時,連接埠轉發可以保持區域網路的安全,因為其他服務對網際網路仍然不可見。
連接埠轉發可用於在區域網路中設定公共服務,如 HTTP、FTP、DNS、POP3/SMTP 和 Telnet。不同的服務使用不同的服務連接埠。HTTP 服務使用連接埠 80,FTP 服務使用連接埠 21,SMTP 服務使用連接埠 25,POP3 服務使用連接埠 110。設定前請確認服務連接埠號碼。
我想:
透過網際網路與我的朋友共用我在區域網路中建立的個人網站。
例如,個人網站已建立在我的家用 PC (192.168.1.100) 上。我希望網際網路上的朋友能以某種方式造訪我的網站。我的 PC 連接到 WAN IP 地址為 218.18.232.154 的便攜式路由器。
1. 將您的 PC 設定為固定 IP 地址,例如 192.168.1.100。
2. 造訪 http://tplinkwifi.net,並使用您的 TP-Link ID 或您為便攜式路由器設定的密碼登入。
3. 前往 進階 > NAT 轉發 > 連接埠轉發。
4. 按一下 新增。
5. 按一下 檢視常用服務 並選擇 HTTP。外部連接埠、內部連接埠 和 協定 將自動填入。
6. 按一下 檢視已連接的設備 並選擇您的家用 PC。設備 IP 地址將自動填入。或者在 設備 IP 地址 欄位中手動輸入 PC 的 IP 地址 192.168.0.100。
7. 按一下 儲存。
提示:
• 如果您不清楚要使用哪個連接埠和協定,建議保持內部連接埠和協定的預設設定。
• 如果您想使用的服務不在常用服務清單中,您可以手動輸入相應的參數。您應該核實服務需要的連接埠號碼。
• 如果您要在便攜式路由器中提供多個服務,可以新增多條連接埠轉發規則。請注意,外部連接埠 不應重疊。
完成!
網際網路上的使用者可以輸入 http:// WAN IP(在本例中為:http:// 218.18.232.154)來造訪您的個人網站。
提示:
• WAN IP 應為公網 IP 地址。由於 WAN IP 是由電信業者動態分配的,建議參考 動態 DNS 為 WAN 申請並註冊一個網域名稱。然後網際網路上的使用者可以使用 http:// 網域名稱 來造訪網站。
• 如果您變更了預設的 外部連接埠,您應該使用 http:// WAN IP:外部連接埠 或 http:// 網域名稱:外部連接埠 來造訪網站。
5.7.2 連接埠觸發
連接埠觸發可以指定一個觸發連接埠及其對應的外部連接埠。當本地網路上的主機發起對觸發連接埠的連接時,所有外部連接埠都將開啟以供後續連接。便攜式路由器可以記錄主機的 IP 地址。當來自網際網路的資料返回到外部連接埠時,便攜式路由器可以將其轉發給相應的主機。連接埠觸發主要套用於線上遊戲、VoIP、視訊播放器和常用套用程式,包括 MSN Gaming Zone、Dialpad 和 Quick Time 4 播放器等。
按照以下步驟設定連接埠觸發規則:
1. 造訪 http://tplinkwifi.net,並使用您的 TP-Link ID 或您為便攜式路由器設定的密碼登入。
2. 前往 進階 > NAT 轉發 > 連接埠觸發 並按一下按鈕。
3. 按一下 檢視常用服務,然後選擇所需的套用程式。觸發連接埠、觸發協定 和 外部連接埠 將自動填入。下圖以套用程式 MSN Gaming Zone 為例。
4. 按一下 儲存。
提示:
• 您可以根據網路需求新增多條連接埠觸發規則。
• 觸發連接埠不能重疊。
• 如果您需要的套用程式未列在「現有套用程式」清單中,請手動輸入參數。您應該先核實套用程式使用的外部連接埠,並根據頁面顯示的格式將其輸入到 外部連接埠 欄位中。
5.7.3 UPnP
UPnP(通用即插即用)協定允許套用程式或主機設備自動尋找前端 NAT 設備並向其發送請求以開啟相應的連接埠。啟用 UPnP 後,本地網路和網際網路上的套用程式或主機設備可以自由通訊,從而實現網路的無縫連接。如果您想將套用程式用於多人遊戲、對等連接、即時通訊(如 VoIP 或電話會議)或遠端協助等,您可能需要啟用 UPnP。
提示:
• 此便攜式路由器預設啟用 UPnP。
• 只有支援 UPnP 協定的套用程式才能使用此功能。
• UPnP 功能需要作業系統的支援(例如 Windows Vista/ Windows 7/ Windows 8 等。部分作業系統需要安裝 UPnP 元件)。
例如,當您將 Xbox 連接到已連接網際網路的便攜式路由器以玩線上遊戲時,UPnP 將向便攜式路由器發送請求以開啟相應的連接埠,允許後續資料穿透 NAT 進行傳輸。因此,您可以毫無障礙地玩 Xbox 線上遊戲。
如有必要,您可以按照步驟變更 UPnP 的狀態。
1. 造訪 http://tplinkwifi.net,並使用您的 TP-Link ID 或您為便攜式路由器設定的密碼登入。
2. 前往 進階 > NAT 轉發 > UPnP 並根據需要切換開啟或關閉。
5.7.4 DMZ
當一台 PC 被設定為本地網路上的 DMZ(非軍事區)主機時,它會完全暴露在網際網路上,這可以實現內部主機和外部主機之間無限制的雙向通訊。DMZ 主機成為開放所有連接埠的虛擬伺服器。當您不清楚某些特殊套用程式(如 IP 攝影機和資料庫軟體)要開啟哪些連接埠時,您可以將 PC 設定為 DMZ 主機。
注意:
啟用 DMZ 時,DMZ 主機完全暴露在網際網路上,這可能會帶來一些潛在的安全隱患。如果不使用 DMZ,請及時停用。
我想:
讓家用 PC 無連接埠限制地加入線上遊戲。
例如,由於某些連接埠限制,在玩線上遊戲時,您可以正常登入但無法與其他玩家組隊。要解決此問題,請將您的 PC 設定為開放所有連接埠的 DMZ 主機。
我該怎麼做?
1. 為您的 PC 分配一個固定 IP 地址,例如 192.168.0.100。
2. 造訪 http://tplinkwifi.net,並使用您的 TP-Link ID 或您為便攜式路由器設定的密碼登入。
3. 前往 進階 > NAT 轉發 > DMZ 並勾選以啟用 DMZ。
4. 按一下 檢視已連接的設備 並選擇您的 PC。設備 IP 地址 將自動填入。或者在 DMZ 主機 IP 地址 欄位中手動輸入 PC 的 IP 地址 192.168.0.100。
5. 按一下 儲存。
完成!
設定完成。您已將 PC 設定為 DMZ 主機,現在您可以組隊與其他玩家一起玩遊戲了。
5.8 安全性
5.8.1 保護網路免受網路攻擊
SPI(狀態封包檢查)防火牆保護便攜式路由器免受網路攻擊,並根據協定驗證通過便攜式路由器的流量。此功能預設啟用。
1. 造訪 http://tplinkwifi.net,並使用您的 TP-Link ID 或您為便攜式路由器設定的密碼登入。
2. 前往 進階 > 安全性 > 防火牆。建議保持預設設定。
5.8.2 存取控制
存取控制用於根據已阻擋設備清單(黑名單)或已允許設備清單(白名單),阻擋或允許特定用戶端設備存取您的網路(透過有線或無線)。
我想:
阻擋或允許特定的用戶端設備存取我的網路(透過有線或無線)。
我該怎麼做?
1. 造訪 http://tplinkwifi.net,並使用您的 TP-Link ID 或您為便攜式路由器設定的密碼登入。
2. 前往 進階 > 安全性 > 存取控制。
3. 切換開關以啟用 存取控制。
4. 按一下 變更模式 以選擇存取模式,以阻擋(推薦)或允許清單中的設備。
阻擋特定設備:
1 ) 選擇 黑名單。
2 ) 按一下 並選擇要阻擋的設備,或手動輸入 MAC 地址,然後按一下 新增。
3 ) 畫面上將出現 操作成功 訊息,表示選定的設備已成功新增至黑名單。
允許特定設備:
1 ) 選擇 白名單 並按一下 變更。
2 ) 您自己的設備預設在白名單中,無法刪除。按一下 將其他設備新增至白名單。
• 新增已連接的設備
1 ) 按一下 從設備清單中選擇。
2 ) 選擇您要允許的設備,然後按一下 新增。
3 ) 畫面上將出現操作成功訊息,表示選定的設備已成功新增至白名單。
• 新增未連接的設備
1 ) 按一下 手動新增。
2 ) 輸入要允許的設備的 設備名稱 和 MAC 地址,然後按一下 新增。
3 ) 畫面上將出現 操作成功 訊息,表示該設備已成功新增至白名單。
完成!
現在您可以透過使用黑名單或白名單來阻擋或允許特定用戶端設備存取您的網路(透過有線或無線)。
5.8.3 IP 與 MAC 綁定
IP 與 MAC 綁定,即 ARP(位址解析協定)綁定,用於將網路設備的 IP 地址與其 MAC 地址綁定。這將透過拒絕綁定清單中具有匹配 IP 地址但 MAC 地址無法識別的設備存取網路,來防止 ARP 欺騙和其他 ARP 攻擊。
我想:
防止 ARP 欺騙和 ARP 攻擊。
我該怎麼做?
1. 造訪 http://tplinkwifi.net,並使用您的 TP-Link ID 或您為便攜式路由器設定的密碼登入。
2. 前往 進階 > 安全性 > IP 與 MAC 綁定。
3. 啟用 IP 與 MAC 綁定。
4. 根據您的需求綁定您的設備。
綁定已連接的設備:
1 ) 找到 ARP 清單 區塊並啟用 綁定,以綁定特定設備的 IP 和 MAC 地址。
新增綁定條目:
1 ) 按一下 綁定清單 區塊中的 。
2 ) 按一下 檢視已連接的設備 並選擇要綁定的設備。MAC 地址 和 IP 地址 欄位將自動填入。
3 ) 按一下 儲存。
完成!
現在您不必擔心 ARP 欺騙和 ARP 攻擊了!
5.8.4 ALG
ALG 允許將自訂的網路地址轉換 (NAT) 穿越過濾器插入到閘道中,以支援某些套用層「控制/資料」協定(如 FTP、TFTP、H323 等)的地址和連接埠轉換。建議保持預設設定。
當您使用語音和視訊套用程式透過便攜式路由器建立和接受通話時,您可能需要停用 SIP ALG,因為某些語音和視訊通訊套用程式在啟用 SIP ALG 時無法正常工作。
造訪 http://tplinkwifi.net,並使用您的 TP-Link ID 或您為便攜式路由器設定的密碼登入。前往 進階 > 安全性 > ALG。
5.9 VPN 伺服器與合併
便攜式路由器提供幾種設定 VPN 連接的方法:
VPN 伺服器 允許遠端設備透過網際網路以安全的方式存取您的家庭網路。便攜式路由器支援四種類型的 VPN 伺服器:
OpenVPN 稍微複雜一些,但安全性更高、穩定性更好,適合校園網和公司內網等受限環境。
PPTP VPN 易於使用電腦和行動裝置內建的 VPN 軟體,但它較為脆弱,可能會被某些電信業者阻擋。
L2TP/IPSec VPN 比 PPTP VPN 更安全但速度較慢,並且在繞過防火牆方面可能會遇到困難。
WireGuard VPN 是一種安全、快速且現代化的 VPN 協定。它基於 UDP 協定,使用現代加密演算法來提高工作效率。VPN 合併允許您的用戶端設備同時存取多個 VPN 伺服器,以滿足您的工作、遊戲和串流視訊需求。
5.9.1 使用 OpenVPN 存取您的家庭網路
OpenVPN 伺服器用於建立 OpenVPN 連接,以供遠端設備存取您的家庭網路。
要使用 VPN 功能,您需要在便攜式路由器上啟用 OpenVPN 伺服器,並在遠端設備上安裝並執行 VPN 合併軟體。請按照以下步驟設定 OpenVPN 連接。
步驟 1. 在便攜式路由器上設定 OpenVPN 伺服器
1. 造訪 http://tplinkwifi.net,並使用您的 TP-Link ID 或您為便攜式路由器設定的密碼登入。
2. 前往 進階 > VPN 伺服器 > OpenVPN,然後勾選 OpenVPN 的啟用方塊。
注意:
• 在啟用 VPN 伺服器之前,我們建議您設定動態 DNS 服務(推薦)或為便攜式路由器的 WAN 連接埠分配固定 IP 地址,並將系統時間與網際網路同步。
• 首次設定 OpenVPN 伺服器時,您可能需要在啟用 VPN 伺服器之前產生憑證。
3. 選擇 OpenVPN 伺服器的 服務類型(通訊協定):UDP、TCP。
4. 輸入 VPN 設備連接的 VPN 服務連接埠,連接埠號碼應在 1024 到 65535 之間。
5. 在 VPN 子網路/網路遮罩 欄位中,輸入 OpenVPN 伺服器可以租用給設備的 IP 地址範圍。
6. 選擇您的 用戶端存取 類型。如果您只想讓遠端設備存取您的家庭網路,請選擇 僅家庭網路;如果您還想讓遠端設備透過 VPN 伺服器存取網際網路,請選擇 網際網路和家庭網路。
7. 按一下 儲存。
8. 按一下 產生 以獲取新憑證。
注意:如果您已經產生了一個憑證,請跳過此步驟,或按一下 產生 以更新憑證。
9. 按一下 匯出 以儲存 OpenVPN 設定檔,遠端設備將使用該檔案來存取您的便攜式路由器。
步驟 2. 在您的遠端設備上設定 OpenVPN 連接
1. 造訪 http://openvpn.net/index.php/download/community-downloads.html 下載 OpenVPN 軟體,並將其安裝在您要執行 OpenVPN 用戶端工具程式的設備上。
注意:您需要在計劃套用 VPN 功能以存取便攜式路由器的每台設備上安裝 OpenVPN 用戶端工具程式。行動裝置應從 Google Play 或 Apple App Store 下載第三方應用程式。
2. 安裝完成後,將從便攜式路由器匯出的檔案複製到 OpenVPN 用戶端工具程式的「config」資料夾中(例如,Windows 上的 C:\Program Files\OpenVPN\config)。路徑取決於 OpenVPN 用戶端工具程式的安裝位置。
3. 執行 OpenVPN 用戶端工具程式並將其連接到 OpenVPN 伺服器。
5.9.2 使用 PPTP VPN 存取您的家庭網路
PPTP VPN 伺服器用於建立 PPTP VPN 連接,以供遠端設備存取您的家庭網路。
要使用 VPN 功能,您需要在便攜式路由器上設定 PPTP VPN 伺服器,並在遠端設備上設定 PPTP 連接。請按照以下步驟設定 PPTP VPN 連接。
步驟 1. 在便攜式路由器上設定 PPTP VPN 伺服器
1. 造訪 http://tplinkwifi.net,並使用您的 TP-Link ID 或您為便攜式路由器設定的密碼登入。
2. 前往 進階 > VPN 伺服器 > PPTP,然後勾選 PPTP 的 啟用 方塊。
注意:在啟用 VPN 伺服器之前,我們建議您設定動態 DNS 服務(推薦)或為便攜式路由器的 WAN 連接埠分配固定 IP 地址,並將系統時間與網際網路同步。
3. 在 用戶端 IP 地址 欄位中,輸入 PPTP VPN 伺服器可以租用給設備的 IP 地址範圍(最多 10 個)。
4. 根據您的需求設定 PPTP 連接權限。
• 選擇 允許存取 Samba(網路芳鄰),以允許您的 VPN 設備存取您的本地 Samba 伺服器。
• 選擇 允許 NetBIOS 穿透,以允許您的 VPN 設備使用 NetBIOS 名稱存取您的 Samba 伺服器。
• 選擇 允許未加密的連接,以允許與您的 VPN 伺服器建立未加密的連接。
5. 按一下 儲存。
6. 為遠端設備設定 PPTP VPN 連接帳戶。您最多可以建立 16 個帳戶。
7. 按一下 新增。
8. 輸入 使用者名稱 和 密碼,以將設備驗證到 PPTP VPN 伺服器。
9. 按一下 新增。
步驟 2. 在您的遠端設備上設定 PPTP VPN 連接
遠端設備可以使用 Windows 內建的 PPTP 軟體或第三方 PPTP 軟體連接到 PPTP 伺服器。這裡我們以 Windows 內建的 PPTP 軟體 為例。
1. 前往 開始 > 控制台 > 網路和網際網路 > 網路和共用中心。
2. 選擇 設定新的連線或網路。
3. 選擇 連線到工作地點,然後按一下 下一步。
4. 選擇 使用我的網際網路連線 (VPN)。
5. 在 網際網路地址 欄位中輸入便攜式路由器的網際網路 IP 地址(例如:218.18.1.73)。按一下 下一步。
6. 輸入您在便攜式路由器上為 PPTP VPN 伺服器設定的 使用者名稱 和 密碼,然後按一下 連線。
7. 當 VPN 連接準備好使用時,按一下 立即連線。
5.9.3 使用 L2TP/IPSec VPN 存取您的家庭網路
L2TP/IPSec VPN 伺服器用於建立 L2TP/IPSec VPN 連接,以供遠端設備存取您的家庭網路。
要使用 VPN 功能,您需要在便攜式路由器上設定 L2TP/IPSec VPN 伺服器,並在遠端設備上設定 L2TP/IPSec 連接。請按照以下步驟設定 L2TP/IPSec VPN 連接。
步驟 1. 在便攜式路由器上設定 L2TP/IPSec VPN 伺服器
1. 造訪 http://tplinkwifi.net,並使用您的 TP-Link ID 或您為便攜式路由器設定的密碼登入。
2. 前往 進階 > VPN 伺服器 > L2TP/IPSec,然後啟用 L2TP/IPSec。
注意:
• 可能需要升級韌體才能支援 L2TP/IPSec VPN 伺服器。
• 在啟用 VPN 伺服器 之前,我們建議您設定動態 DNS 服務(推薦)或為便攜式路由器的 WAN 連接埠分配固定 IP 地址,並將 系統時間 與網際網路同步。
3. 在 用戶端 IP 地址 欄位中,輸入 L2TP/IPSec VPN 伺服器可以租用給設備的 IP 地址範圍(最多 10 個)。
4. 建立一個 IPSec 預共用金鑰。
5. 為遠端設備設定 L2TP/IPSec VPN 連接帳戶。您最多可以建立 16 個帳戶。
1 ) 按一下 新增。
2 ) 輸入 使用者名稱 和 密碼,以將設備驗證到 L2TP/IPSec VPN 伺服器。
3 ) 按一下 新增。
6. 按一下 儲存。
步驟 2. 在您的遠端設備上設定 L2TP/IPSec VPN 連接
遠端設備可以使用 Windows 或 Mac OS 內建的 L2TP/IPSec 軟體或第三方 L2TP/IPSec 軟體連接到 L2TP/IPSec 伺服器。這裡我們以 Windows 內建的 L2TP/IPSec 軟體為例。
1. 前往 開始 > 控制台 > 網路和網際網路 > 網路和共用中心。
2. 選擇 設定新的連線或網路。
3. 選擇 連線到工作地點,然後按一下 下一步。
4. 選擇 使用我的網際網路連線 (VPN)。
5. 在 網際網路地址 欄位中輸入便攜式路由器的網際網路 IP 地址(例如:218.18.1.73),然後選擇核取方塊 現在不連線;僅進行設定以便稍後連線。按一下 下一步。
6. 輸入您在便攜式路由器上為 L2TP/IPSec VPN 伺服器設定的 使用者名稱和密碼,然後按一下 連線。
7. 當 VPN 連接準備好使用時,按一下 關閉 。
8. 前往 網路和共用中心,然後按一下 變更介面卡設定。
9. 找到您建立的 VPN 連接,然後按兩下它。
10. 輸入您在便攜式路由器上為 L2TP/IPSec VPN 伺服器設定的 使用者名稱和密碼,然後按一下 屬性。
11. 切換到 安全性 標籤,選擇 使用 IPsec 的第 2 層通道協定 (L2TP/IPSec),然後按一下 進階設定。
12. 選擇 使用預共用金鑰進行驗證 並輸入您在便攜式路由器上為 L2TP/IPSec VPN 伺服器設定的 IPSec 預共用金鑰。然後按一下 確定。
完成!按一下 連線 開始 VPN 連接。
5.9.4 使用 WireGuard VPN 存取您的家庭網路
WireGuard VPN 伺服器用於建立 WireGuard VPN 連接,以供遠端設備存取您的家庭網路。
步驟 1. 在便攜式路由器上設定 WireGuard VPN 伺服器
1. 造訪 http://tplinkwifi.net,並使用您的 TP-Link ID 或您為便攜式路由器設定的密碼登入。
2. 前往 進階 > VPN 伺服器 > WireGuard,然後勾選 WireGuard 的 啟用 方塊。
3. 設定通道 IP 地址和接聽連接埠。除非必要,否則請勿變更。
4. 選擇您的 用戶端存取 類型。如果您只想讓遠端設備存取您的家庭網路,請選擇 僅家庭網路;如果您還想讓遠端設備透過 VPN 伺服器存取網際網路,請選擇 網際網路和家庭網路 。
5. (選填)按一下 進階設定 以顯示更多設定。如果開啟了 DNS,便攜式路由器將成為與其建立連接的 VPN 用戶端的 DNS 伺服器。變更 持久保活 時間(預設為 25 秒)以定期發送心跳,您還可以按一下 更新金鑰 來更新私鑰和公鑰。
步驟 2. 建立遠端用戶端可用於連接到 VPN 伺服器的帳戶。
1. 找到 帳戶清單 區塊。
2. 按一下 新增 以建立帳戶。
3. 為此帳戶命名。
4. 輸入分配給此帳戶的虛擬介面的地址。除非必要,否則請勿變更。
5. 從 WireGuard VPN 用戶端發送到允許的 IP(用戶端)的流量將透過通道傳輸。預設情況下,來自用戶端的所有網路流量都將透過通道傳輸。除非必要,否則請勿變更。
6. 從 WireGuard VPN 伺服器發送到允許的 IP(伺服器)的流量將透過通道傳輸。除非必要,否則請勿變更。
7. 啟用或停用預共用金鑰。
8. 按一下 儲存。
注意:一個帳戶同時只能由一個 WireGuard VPN 用戶端用於連接到 WireGuard VPN 伺服器。
9. 連接到 WireGuard 伺服器。
• 對於手機,從 Google Play 或 Apple Store 下載 WireGuard 應用程式,然後使用該應用程式掃描二維碼以連接到此伺服器。
• 對於其他設備(例如 TP-Link WireGuard VPN 用戶端),按一下 匯出 以儲存 WireGuard VPN 設定檔,遠端設備將使用該檔案來存取您的便攜式路由器。
10. 在帳戶清單上,您可以按一下按鈕以修改 VPN 伺服器設定、連接到伺服器或刪除帳戶。
5.9.5 使用 VPN 合併存取遠端 VPN 伺服器
VPN 合併允許您的用戶端設備同時存取多個 VPN 伺服器,以滿足您的工作、遊戲和串流視訊需求。
要使用 VPN 合併功能,只需在便攜式路由器上新增遠端 VPN 伺服器並將 VPN 伺服器分配給您的用戶端設備。請按照以下步驟操作:
1. 造訪 http://tplinkwifi.net,並使用您的 TP-Link ID 或您為便攜式路由器設定的密碼登入。
2. 前往 進階 > VPN 合併, 然後啟用 VPN 合併。
注意:可能需要升級韌體才能支援 VPN 合併。
3. 新增 VPN 伺服器,並啟用您需要的伺服器。
1 ) 在 伺服器清單 區塊中,按一下 新增。
2 ) 指定 VPN 的描述,並選擇 VPN 類型。
• VPN Kill Switch: 啟用後,如果 VPN 連接斷開,您設備的網際網路存取將被阻擋,從而保護您的資料安全。
3 ) 輸入您的 VPN 提供商提供的 VPN 資訊。
• OpenVPN: 如果您的 VPN 提供商要求,請輸入 VPN 使用者名稱和密碼,否則直接留空。然後匯入您的 VPN 提供商提供的設定檔。
注意:您也可以勾選 手動匯入 CA 檔案或編輯 .ovpn 檔案 的核取方塊,然後上傳 CA 檔案或手動設定設定。
• PPTP: 輸入您的 VPN 提供商提供的 VPN 伺服器地址(例如:218.18.1.73)以及 VPN 使用者名稱和密碼。
• L2TP/IPSec VPN: 輸入您的 VPN 提供商提供的 VPN 伺服器地址(例如:218.18.1.73)、VPN 使用者名稱和密碼,以及 IPSec 預共用金鑰。
• WireGuard VPN: 提供描述,然後按一下「瀏覽」以匯入 WireGuard VPN 伺服器設定。接著您將看到詳細的參數。除非必要,否則請勿變更參數。
4 ) 儲存設定。
5 ) 在伺服器清單中,啟用您需要的伺服器。
4. 新增並管理將使用 VPN 功能的設備。您可以按一下 變更模式 在不同模式之間切換。
1 ) 在 用戶端清單 區塊中,按一下 新增設備。
2 ) 選擇並新增將存取您已設定的 VPN 伺服器的設備。
5. 儲存設定。
完成!現在您指定的設備可以存取您啟用的 VPN 伺服器了。
5.10 IPv6
5.10.1 設定 IPv6 網際網路連線
此功能允許您使用電信業者 (ISP) 提供的資訊設定 IPv6 網際網路連線。
注意:某些型號可能不支援此功能。圖片可能與實際產品有所不同。
1. 造訪 http://tplinkwifi.net,並使用您的 TP-Link ID 或您為便攜式路由器設定的密碼登入。
2. 前往 進階 > IPv6。
3. 啟用 IPv6 並選擇您的電信業者提供的網際網路連線類型。
注意:如果您不知道您的網際網路連線類型是什麼,請聯繫您的電信業者。
4. 填寫不同連線類型所需的資訊。
• 固定 IP: 填寫空白處並儲存設定。
• 動態 IP (SLAAC/DHCPv6): 如果您的電信業者需要,請按一下 進階設定 以輸入更多資訊。儲存設定並按一下 重新取得。
• PPPoE: 預設情況下,便攜式路由器使用 IPv4 帳戶連接到 IPv6 伺服器。如果您的電信業者需要,請按一下 進階設定 以輸入更多資訊。儲存設定並按一下 連線。
注意:如果您的電信業者為 IPv4 和 IPv6 連線提供兩個單獨的帳戶,請手動輸入 IPv6 連線的使用者名稱和密碼。
• 6to4 通道: IPv4 網際網路連線類型是此連線類型的先決條件。請先手動設定您的網際網路連線。如果您的電信業者需要,請按一下 進階設定 以輸入更多資訊。儲存設定並按一下 連線。
• 穿透(橋接): 儲存設定。不需要進行設定。
5. 設定 LAN 連接埠。建議 Windows 使用者從 DHCPv6 和 SLAAC+無狀態 DHCP 中進行選擇。
注意:如果網際網路連線類型為 穿透(橋接),則不需要設定 IPv6 LAN。
6. 在 MAC 複製區塊中,設定您便攜式路由器的 MAC 地址。除非您的電信業者僅允許來自特定 MAC 地址的網際網路存取,否則請使用預設地址。
5.11 系統
5.11.1 韌體升級
TP-Link 旨在為使用者提供更好的網路體驗。如果有適用於您便攜式路由器的韌體更新可用,我們將透過網頁管理頁面通知您。此外,最新的韌體將在 TP-Link 官方網站 www.tp-link.com 發布,您可以從「支援」頁面免費下載。
注意:
• 韌體升級前請備份您的便攜式路由器設定。
• 韌體升級期間請勿關閉便攜式路由器。
自動更新
啟用 自動更新 並設定更新時間。當有新版本可用時,便攜式路由器將在指定時間自動更新韌體。
線上升級
1. 造訪 http://tplinkwifi.net,並使用您的 TP-Link ID 或您為便攜式路由器設定的密碼登入。
2. 當有適用於您便攜式路由器的最新韌體可用時,頁面右上角將顯示升級圖示。按一下圖示 前往 韌體升級 頁面。或者,您可以前往 進階 > 系統 > 韌體升級,然後按一下 檢查更新 以查看最新的韌體是否已發布。
3. 如果有新韌體,按一下 升級。
4. 等待幾分鐘讓升級和重新啟動完成。
提示:如果您的便攜式路由器有新的且重要的韌體更新,只要開啟網頁瀏覽器,您就會在電腦上看到提示通知。按一下 升級,然後使用您為便攜式路由器設定的使用者名稱和密碼登入網頁管理頁面。您將看到 韌體升級 頁面。
本地升級
1. 從 www.tp-link.com 下載適用於該便攜式路由器的最新韌體檔案。
2. 造訪 http://tplinkwifi.net,並使用您的 TP-Link ID 或您為便攜式路由器設定的密碼登入。
3. 前往 進階 > 系統 > 韌體升級。
4. 聚焦於 本地升級 區塊。按一下 瀏覽 尋找下載的新韌體檔案,然後按一下 升級。
5. 等待幾分鐘讓升級和重新啟動完成。
注意:如果您無法升級便攜式路由器的韌體,請聯繫我們的技術支援。
5.11.2 備份與還原設定
設定儲存為便攜式路由器中的設定檔。您可以將設定檔備份到電腦以備將來使用,並在需要時從備份檔案將便攜式路由器還原至之前的設定。此外,如有必要,您可以擦除當前設定並將便攜式路由器重設為原廠預設設定。
1. 造訪 http://tplinkwifi.net,並使用您的 TP-Link ID 或您為便攜式路由器設定的密碼登入。
2. 前往 進階 > 系統 > 備份與還原。
• 備份設定:
按一下 備份 將當前設定的副本儲存到本地電腦。當前設定的「.bin」檔案將儲存到您的電腦中。
• 還原設定:
1. 按一下 上傳 尋找儲存在您電腦上的備份設定檔,然後按一下 還原。
2. 等待幾分鐘進行還原和重新啟動。
注意:在還原過程中,請勿關閉或重設便攜式路由器。
• 重設便攜式路由器(登入密碼和 TP-Link ID 除外):
1. 在 恢復原廠預設值 區塊中,按一下 還原。
2. 等待幾分鐘進行重設和重新啟動。
注意:
• 在重設過程中,請勿關閉便攜式路由器。
• 重設後,您仍可以使用當前的登入密碼或 TP-Link ID 登入網頁管理頁面。
• 將便攜式路由器重設為原廠預設設定:
1. 按一下 恢復原廠設定 以重設便攜式路由器。
2. 等待幾分鐘進行重設和重新啟動。
注意:
• 在重設過程中,請勿關閉或重設便攜式路由器。
• 我們強烈建議您在重設便攜式路由器之前備份當前的設定。
5.11.3 變更登入密碼
帳戶管理功能允許您變更網頁管理頁面的登入密碼。
注意:如果您使用 TP-Link ID 登入網頁管理頁面,帳戶管理功能將被停用。要管理 TP-Link ID,請前往「進階 > TP-Link ID」。
1. 造訪 http://tplinkwifi.net,並使用您的 TP-Link ID 或您為便攜式路由器設定的密碼登入。
2. 前往 進階 > 系統 > 權限管理 並聚焦於 變更密碼 區塊。
3. 輸入舊密碼,然後輸入兩次新密碼(均區分大小寫)。按一下 儲存。
4. 以後的登入請使用新密碼。
5.11.4 密碼找回
此功能允許您在忘記密碼時找回為便攜式路由器設定的登入密碼。
注意:如果您使用 TP-Link ID 登入網頁管理頁面,密碼找回功能將被停用。要管理 TP-Link ID,請前往 進階 > TP-Link ID。
1. 造訪 http://tplinkwifi.net,並使用您為便攜式路由器設定的密碼登入。
2. 前往 進階 > 系統 > 權限管理 並聚焦於 管理員密碼找回 區塊。
3. 按一下 安全問題設定 來設定安全問題。
4. 勾選 密碼找回 的 啟用 方塊。
5. 指定用於發送找回郵件的 信箱(寄件者) 並輸入其 SMTP 伺服器 地址。指定用於接收找回郵件的 信箱(收件者)。如果發送找回郵件的信箱(寄件者)需要加密,請勾選 驗證 的 啟用 方塊並輸入其使用者名稱和密碼。
提示:
• 大多數 Web 郵件系統中的使用者都可以使用 SMTP 伺服器。例如,Gmail 的 SMTP 伺服器地址是 smtp.gmail.com。
• 通常,如果信箱登入需要使用者名稱和密碼,則應啟用驗證。
6. 按一下 儲存。
要找回登入密碼,請造訪 http://tplinkwifi.net,按一下登入頁面上的 忘記密碼? 並按照說明設定新密碼。
5.11.5 本地管理
此功能允許您透過使用基於 MAC 地址的驗證,限制 LAN 上存取便攜式路由器的用戶端設備數量。
1. 造訪 http://tplinkwifi.net,並使用您的 TP-Link ID 或您為便攜式路由器設定的密碼登入。
2. 前往 進階 > 系統 > 權限管理,並根據需要在 本地管理 區塊中完成設定。
• 透過 HTTPS 和 HTTP 存取便攜式路由器:
勾選 透過 HTTPS 進行本地管理 的 啟用 方塊以透過 HTTPS 和 HTTP 存取便攜式路由器,或保持其停用以僅透過 HTTP 存取便攜式路由器。
• 允許所有連接 LAN 的設備管理便攜式路由器:
為本地管理者選擇 所有設備 。
• 允許特定設備管理便攜式路由器:
1. 為本地管理者選擇 指定設備,然後按一下 儲存。
2. 按一下 新增設備。
3. 按一下 檢視已連接的設備 並從已連接的設備清單中選擇要管理便攜式路由器的設備,或手動輸入設備的 MAC 地址。
4. 為此條目指定一個 描述。
5. 按一下 儲存。
5.11.6 遠端管理
此功能允許您控制遠端設備管理便攜式路由器的權限。
1. 造訪 http://tplinkwifi.net,並使用您的 TP-Link ID 或您為便攜式路由器設定的密碼登入。
2. 前往 進階 > 系統 > 權限管理,並根據需要在 遠端管理 區塊中完成設定。
• 禁止所有設備遠端管理便攜式路由器:
請勿勾選 遠端管理 的 啟用 核取方塊。
• 允許所有設備遠端管理便攜式路由器:
1. 勾選 遠端管理 的 啟用 核取方塊。
2. 保持 HTTPS 連接埠為預設設定(推薦),或輸入 1024 到 65535 之間的值。
3. 為 遠端管理者 選擇 所有設備。
4. 按一下 儲存。網際網路上的設備可以登入 https://便攜式路由器的 WAN IP 地址:連接埠號碼(例如 https://113.116.60.229:1024)來管理便攜式路由器。
提示:
• 您可以在 網路地圖 > 網際網路 上找到便攜式路由器的 WAN IP 地址。
• 便攜式路由器的 WAN IP 通常是動態 IP。如果您想透過網域名稱登入便攜式路由器,請參閱 動態 DNS。
• 允許特定設備遠端管理便攜式路由器:
1. 勾選 遠端管理 的 啟用 核取方塊。
2. 保持 HTTPS 連接埠為預設設定(推薦),或輸入 1024 到 65535 之間的值。
3. 為遠端管理者選擇 指定設備。
4. 在 僅此 IP 地址 欄位中,輸入用於管理便攜式路由器的遠端設備的 IP 地址。
5. 按一下 儲存。
使用此 WAN IP 的設備可以透過登入 https://便攜式路由器的 WAN IP:連接埠號碼(例如 https://113.116.60.229:1024)來管理便攜式路由器。
提示:便攜式路由器的 WAN IP 通常是動態 IP。如果您想透過網域名稱登入便攜式路由器,請參閱 動態 DNS。
5.11.7 系統記錄
當便攜式路由器無法正常工作時,您可以儲存系統記錄並將其發送給技術支援以進行疑難排解。
• 在本地儲存系統記錄:
1. 造訪 http://tplinkwifi.net,並使用您的 TP-Link ID 或您為便攜式路由器設定的密碼登入。
2. 前往 進階 > 系統 > 系統記錄。
3. 根據需要選擇系統記錄的類型和等級。
4. 在 儲存記錄 區塊中,按一下 儲存到本地 將系統記錄儲存到本地磁碟。
• 定時將系統記錄發送到信箱:
例如,我想每天在固定時間檢查我便攜式路由器的工作狀態,但是每次想去檢查都要登入網頁管理頁面太麻煩了。如果每天早上 8 點能把系統記錄發送到我的信箱就太好了。
1. 造訪 http://tplinkwifi.net,並使用您的 TP-Link ID 或您為便攜式路由器設定的密碼登入。
2. 前往 進階 > 系統 > 系統記錄。
3. 在 儲存記錄 區塊中,按一下 郵寄記錄。
4. 輸入所需的資訊:
• 寄件者電子郵件: 輸入用於發送系統記錄的電子郵件地址。
• 選擇 需要密碼。
提示:通常,如果信箱登入需要使用者名稱和密碼,則應選擇「需要密碼」。
• 使用者名稱: 輸入用於發送系統記錄的電子郵件地址。
• 電子郵件密碼: 輸入登入發件人電子郵件地址的密碼。
• SMTP 伺服器: 輸入 SMTP 伺服器地址。
提示:大多數 Web 郵件系統中的使用者都可以使用 SMTP 伺服器。例如,Hotmail 的 SMTP 伺服器地址是 smtp-mail.outlook.com。
• 收件者電子郵件: 輸入收件者的電子郵件地址,可以與發件人的電子郵件地址相同或不同。
• 選擇 自動郵寄記錄。
提示:如果啟用此選項,便攜式路由器將把系統記錄發送到指定的電子郵件地址。
• 頻率: 這決定了收件者接收系統記錄的頻率。
5. 按一下 儲存。
5.11.8 測試網路連線
診斷用於測試便攜式路由器與主機或其他網路設備之間的連線。
1. 造訪 http://tplinkwifi.net,並使用您的 TP-Link ID 或您為便攜式路由器設定的密碼登入。
2. 前往 進階 > 系統 > 診斷工具。
3. 輸入資訊:
1 ) 選擇 Ping 或 Traceroute 作為診斷工具來測試連線;
• Ping 用於測試便攜式路由器與被測主機之間的連線,並測量往返時間。
• Traceroute 用於顯示您的便攜式路由器到達被測主機所經過的路由(路徑),並測量封包跨網際網路協定網路的傳輸延遲。
2 ) 輸入被測主機的 IP 地址 或 網域名稱 。
3 ) 修改 Ping 次數 數字和 Ping 封包大小。建議保持預設值。
4 ) 如果您選擇了 Traceroute,您可以修改 Traceroute 最大 TTL。建議保持預設值。
4. 按一下 開始 開始診斷。
下圖顯示透過 Ping 測試的便攜式路由器與 Yahoo 伺服器 (www.Yahoo.com) 之間的正常連接。
下圖顯示透過 Traceroute 測試的便攜式路由器與 Yahoo 伺服器 (www.Yahoo.com) 之間的正常連接。
5.11.9 設定系統時間
系統時間是便攜式路由器執行時顯示的時間。您在此處設定的系統時間將用於其他基於時間的功能(如家長監護)。您可以根據需要選擇獲取系統時間的方式。
1. 造訪 http://tplinkwifi.net,並使用您的 TP-Link ID 或您為便攜式路由器設定的密碼登入。
2. 前往 進階 > 系統 > 時間設定。
• 從網際網路獲取時間:
1. 如果您希望時間以 24 小時制顯示,請啟用 24 小時制時間 。
2. 在 設定時間 欄位中,選擇 從網際網路獲取。
3. 從下拉式清單中選擇您當地的 時區。
4. 在 NTP 伺服器 I 欄位中,輸入您想要的 NTP 伺服期的 IP 地址或網域名稱。
5. (選填)在 NTP 伺服器 II 欄位中,輸入第二個 NTP 伺服器的 IP 地址或網域名稱。
6. 按一下 儲存。
• 從您的電腦獲取時間:
1. 在設定時間欄位中,選擇從管理設備獲取。
2. 隨後將顯示您電腦的時間,按一下儲存。
• 手動設定日期和時間:
1. 在 設定時間 欄位中,選擇 手動。
2. 設定當前 日期 (格式為 月/日/年)。
3. 設定當前 時間 (格式為 時/分/秒)。
4. 按一下 儲存。
• 設定日光節約時間(夏令時間):
1. 勾選日光節約時間的 啟用 方塊。
2. 選擇您當地時區日光節約時間開始的正確 開始 日期和時間。
3. 選擇您當地時區日光節約時間結束的正確 結束 日期和時間。
4. 按一下 儲存。
5.11.10 設定便攜式路由器定期重新啟動
定期重新啟動功能可清除快取以提高便攜式路由器的執行效能。
1. 造訪 http://tplinkwifi.net,並使用您的 TP-Link ID 或您為便攜式路由器設定的密碼登入。
2. 前往 進階 > 系統 > 重新啟動。
3. 勾選重新啟動排程的 啟用 方塊。
4. 指定便攜式路由器重新啟動的 重新啟動時間,並指定 重複 以決定重新啟動的頻率。
5. 按一下 儲存。
5.11.11 控制 LED 燈
便攜式路由器的 LED 燈指示其活動和狀態。您可以啟用夜間模式功能來指定關閉 LED 燈的時間段。
1. 造訪 http://tplinkwifi.net,並使用您的 TP-Link ID 或您為便攜式路由器設定的密碼登入。
2. 前往 進階 > 系統 > LED 控制。
3. 啟用 夜間模式。
4. 指定 LED 關閉 時間,每天在此期間 LED 燈將關閉。
5. 按一下 儲存。
5.11.12 自訂按鍵 (Action Switch)
可自訂的實體切換按鍵為您提供控制各種功能(包括 Wi-Fi、LED 和 VPN 合併)的實體快捷方式。
1. 造訪 http://tplinkwifi.net,並使用您的 TP-Link ID 或您為便攜式路由器設定的密碼登入。
2. 前往 進階 > 系統 > 自訂按鍵。
3. 選擇一個快速控制選項,然後按一下 儲存。
5.11.13 ECO 節能模式
ECO 模式開關用於變更便攜式路由器的省電模式。要變更 ECO 模式,請將設備上的模式開關切換到您想要的模式。
1. 造訪 http://tplinkwifi.net,並使用您的 TP-Link ID 或您為便攜式路由器設定的密碼登入。
2. 前往 進階 > 系統 > ECO 模式。
3. 選擇偏好模式,然後按一下 儲存。
• 效能模式: 有利於無線涵蓋範圍和傳輸速度,但可能會增加能源消耗並提高設備溫度。
• 平衡模式: 在考量能源消耗和設備溫度的同時,自動平衡無線涵蓋範圍和傳輸速度。
• ECO 模式: 透過降低設備的無線涵蓋範圍和傳輸速度來節省能源並降低設備溫度。
5.11.14 授權第三方服務
將您用戶端的資訊分享給第三方服務,以更好地識別您的用戶端。我們不會儲存您的私有資訊。
1. 造訪 http://tplinkwifi.net,並使用您的 TP-Link ID 或您為便攜式路由器設定的密碼登入。
2. 前往 進階 > 系統 > 授權第三方服務。
3. 啟用 用戶端識別。
章節 6. 基地台模式
本章介紹如何設定便攜式路由器工作在基地台模式下的各項功能。
*網頁管理頁面上可用的功能可能因型號和軟體版本而異。
6.1 運作模式
如果便攜式路由器當前工作在路由器/USB 網路分享/USB 網卡/熱點模式,請按照以下步驟將運作模式切換為基地台模式。
1. 造訪 http://tplinkwifi.net,並使用您的 TP-Link ID 或您為便攜式路由器設定的密碼登入。
2. 前往 進階 > 系統 > 運作模式。
3. 選擇 AP/RE/用戶端模式 並按一下 儲存。
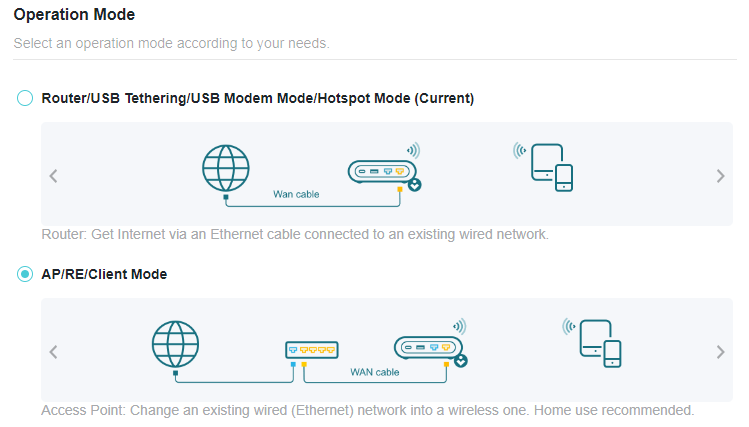
4. 選擇 基地台 並按一下 重新啟動。 設定將在便攜式路由器重新啟動後生效。網際網路存取將暫時中斷。
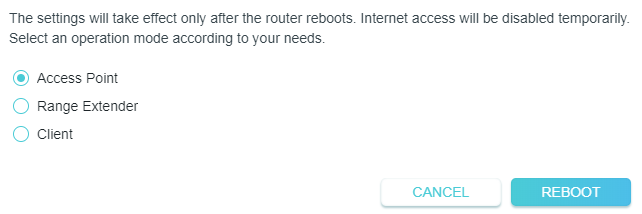
5. 等待重新啟動完成,並按照指示完成設定。
如果便攜式路由器當前工作在訊號延伸器/用戶端模式,請按照以下步驟將運作模式切換為基地台模式。
1. 造訪 http://tplinkwifi.net,並使用您為便攜式路由器設定的使用者名稱和密碼登入。
2. 前往 進階 > 網路設定 > 網路模式。
3. 選擇所需的網路模式,然後按一下 儲存。
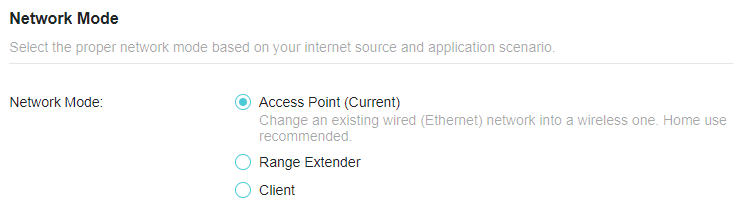
4. 前往 快速設定 並選擇 基地台,然後按照指示完成設定。
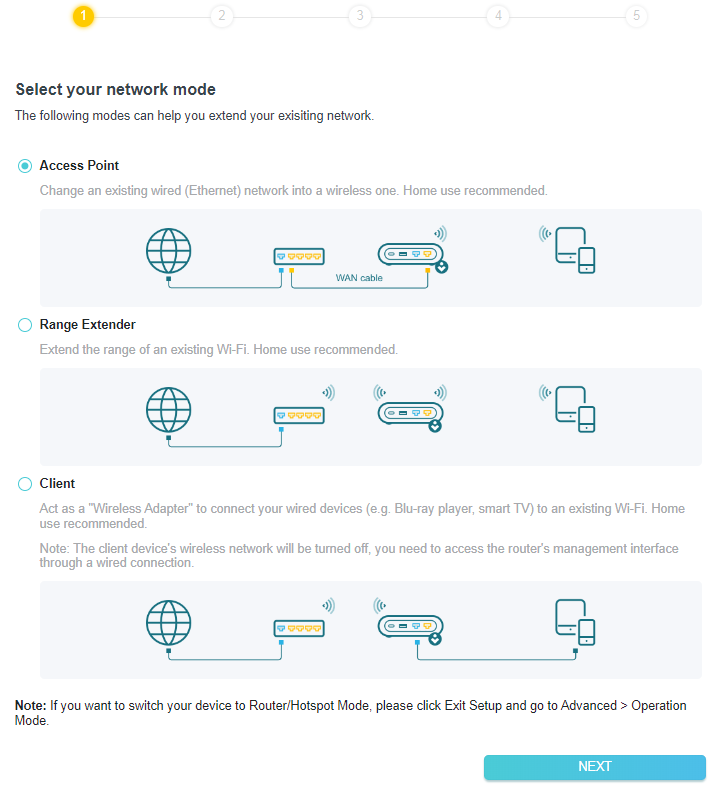
6.2 網路地圖
網路地圖直觀地概述了您網路的設備連線情況,並協助您管理網路的一般設定。
1. 造訪 http://tplinkwifi.net,並使用您的 TP-Link ID 或您為便攜式路由器設定的密碼登入。
2. 前往 網路地圖。
3. 按一下每個網路設備圖示以檢查和管理一般網路設定。
• 按一下 網際網路 以檢查網際網路狀態。
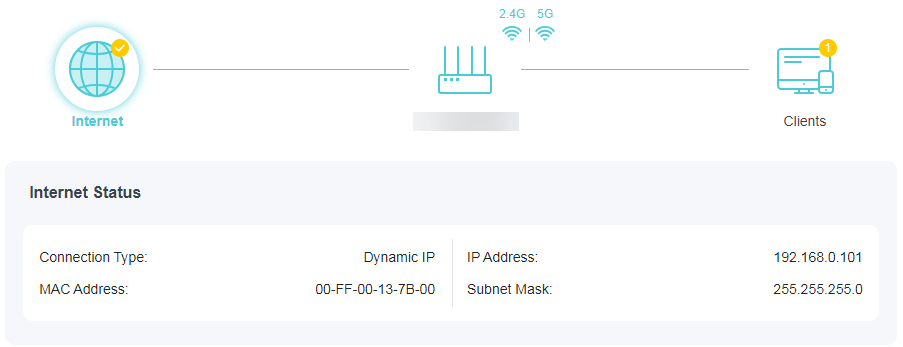
• 按一下便攜式路由器以檢查設備狀態和網路設定。您可以按一下編輯來變更相關設定。
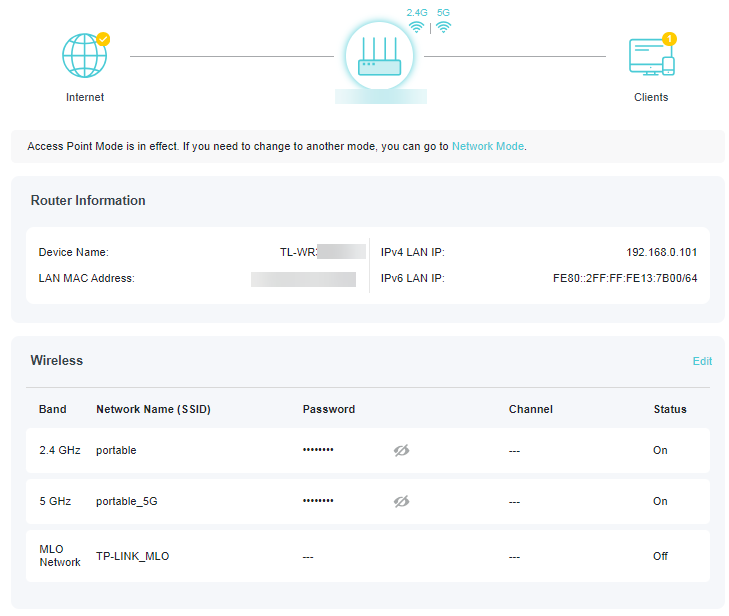
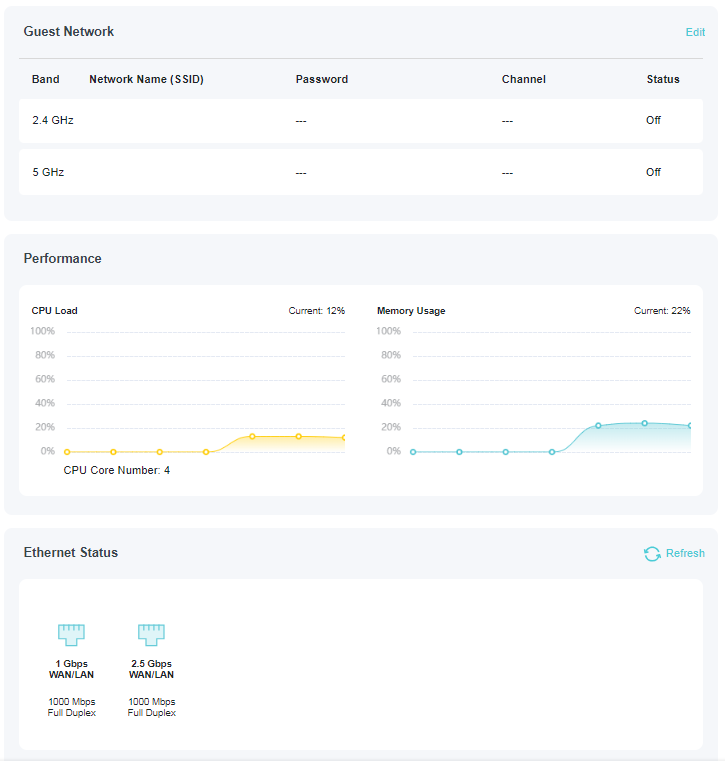
• 按一下 用戶端 以檢視您網路中的用戶端設備。
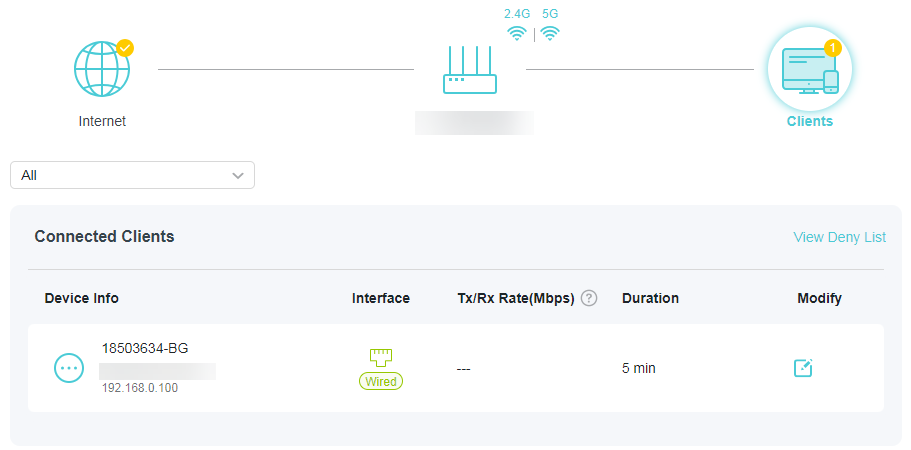
6.3 無線網路
6.3.1 無線設定
1. 造訪 http://tplinkwifi.net,並使用您的 TP-Link ID 或您為便攜式路由器設定的密碼登入。
2. 前往 無線網路 > 無線設定。
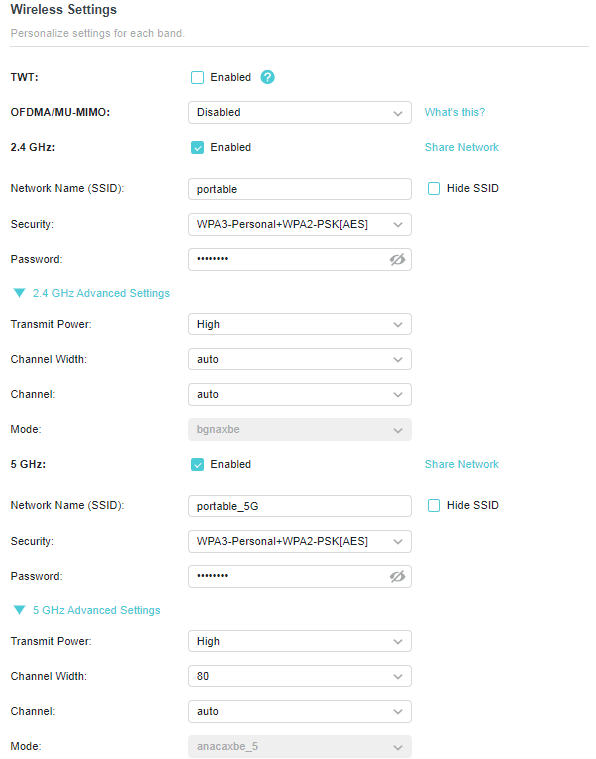
• TWT - 目標喚醒時間允許 802.11ax 路由器和用戶端協商其傳輸和接收資料封包的週期。用戶端僅在 TWT 工作階段喚醒,其餘時間保持休眠模式,從而顯著延長其電池壽命。
• OFDMA/MU-MIMO - 此功能使多個使用者能夠同時傳輸資料,從而大大提高速度和效率。請注意,只有當您的用戶端也支援 OFDMA 時,才能充分發揮優勢。
• 2.4GHz/5GHz - 選擇此核取方塊以啟用 2.4GHz/5GHz 無線網路。
• 分享網路- 按一下以儲存 Wi-Fi 設定以供分享。
• 網路名稱 (SSID) - 輸入最多 32 個字元的值。必須為您網路中的所有無線設備分配相同的名稱 (SSID)。
• 隱藏 SSID - 如果您想從 Wi-Fi 網路清單中隱藏網路名稱 (SSID),請選擇此核取方塊。在這種情況下,您需要手動加入網路。
• 安全性 - 從安全性下拉式選單中選擇一個選項。除非必要,否則建議您不要變更預設設定。
• 密碼 - 為無線網路設定密碼。該值區分大小寫。
• 傳輸功率 - 選擇 高、中 或 低 以指定資料傳輸功率。預設且建議的設定為高。
• 頻道寬度 - 為無線網路選擇頻道寬度(頻寬)。
• 頻道 - 為無線網路選擇工作頻道。對於 2.4 GHz 和 5GHz 頻段,如果您沒有遇到無線連線不穩定的問題,建議將頻道保持為 自動。
• 模式 - 您可以選擇適當的「混合」模式。
3. 設定無線網路的無線設定,然後按一下 儲存。
6.3.2 MLO 網路
MLO(多鏈路營運)網路使連接的 Wi-Fi 7 用戶端能夠跨不同頻段同時發送和接收資料,從而大大提高了傳輸速率和可靠性。
注意:某些型號可能沒有 MLO 網路。圖片可能與實際產品有所不同。
1. 前往 無線網路 > 無線設定。
2. 找到 MLO 網路 區塊並啟用 MLO 網路。
3. 在網路名稱 (SSID) 中指定 SSID。
4. 選擇安全性類型。如果您選擇的安全性類型需要密碼,請指定密碼。該值區分大小寫。
5. 您還可以按一下 分享網路 以與您的訪客分享 SSID 和密碼。
6. 如果選擇 隱藏 SSID,則在無線設備上掃描本地無線網路時不會顯示您的 SSID,您需要手動加入 MLO 網路。
7. 按一下 儲存 以儲存您的設定。
6.3.3 訪客網路
訪客網路允許您為訪客提供 Wi-Fi 存取權限,而無需透露您的主網路。當您的房屋、公寓或工作場所中有客人時,您可以為他們建立一個訪客網路。此外,您可以自訂訪客網路設定以確保網路安全和隱私。
• 建立訪客網路
1. 造訪 http://tplinkwifi.net,並使用您的 TP-Link ID 或您為便攜式路由器設定的密碼登入。
2. 前往 進階 > 無線網路 > 訪客網路。
3. 根據您的需要啟用 2.4GHz/5GHz 訪客網路。
4. 自訂 SSID。除非您希望訪客手動輸入 SSID 以存取訪客網路,否則請勿選擇隱藏 SSID。
5. 選擇 安全性 類型並自訂您自己的密碼。如果選擇了 無安全性,則存取您的訪客網路不需要密碼。
6. 按一下 儲存。現在您的訪客可以使用您設定的 SSID 和密碼存取您的訪客網路了!
• 自訂訪客網路選項
1. 造訪 http://tplinkwifi.net,並使用您的 TP-Link ID 或您為便攜式路由器設定的密碼登入。
2. 前往 進階 > 無線網路 > 訪客網路。找到 訪客權限 區塊。
3. 根據您的需求自訂訪客網路選項。

• 允許訪客相互查看
如果您希望允許訪客網路上的無線用戶端透過網路芳鄰和 Ping 等方式互相通訊,請勾選此核取方塊。
4. 按一下 儲存。現在您可以確保網路安全與隱私了!
6.3.4 無線排程
當您不需要無線功能時,無線功能可以在指定時間自動關閉。
1. 造訪 http://tplinkwifi.net,並使用您的 TP-Link ID 或您為便攜式路由器設定的密碼登入。
2. 前往 進階 > 無線網路 > 無線排程。
3. 啟用 無線排程 功能。
4. 按一下 新增 指定需要自動關閉無線網路的時間段,然後按一下 儲存。
注意:
• 生效的無線排程以便攜式路由器的時間為準。您可以前往 進階 > 系統 > 時間設定 來修改時間。
• 無線網路將在您設定的時間段結束後自動開啟。
6.3.5 WPS
WPS(Wi-Fi 保護設定)可以協助您快速安全地連接到網路。本節將指引您透過 WPS 快速將新的無線設備新增至便攜式路由器的網路中。
注意:
• 如果便攜式路由器的無線功能已停用,則無法設定 WPS 功能。設定前請確保無線功能已啟用。
1. 造訪 http://tplinkwifi.net,並使用您的 TP-Link ID 或您為便攜式路由器設定的密碼登入。
2. 前往 進階 > 無線網路 > WPS。
3. 按照以下方法之一將您的用戶端設備連接到便攜式路由器的 Wi-Fi 網路。
方法 1:使用 PIN 碼
• 透過用戶端的 PIN 碼連接
1. 保持 WPS 狀態為 已啟用 並選擇 用戶端的 PIN 碼。
2. 輸入您設備的 PIN 碼,然後按一下 連接。接著您的設備將連接到便攜式路由器。
• 透過路由器的 PIN 碼連接
1. 保持 WPS 狀態為 已啟用 並選擇 路由器的 PIN 碼。
2. 在您的個人設備上輸入便攜式路由器的 PIN 碼。您也可以產生一個新的 PIN 碼。
注意:PIN(個人識別碼)是每台便攜式路由器預設的 8 位數識別碼。支援 WPS 的設備可以透過 PIN 碼連接到您的便攜式路由器。
方法 2:使用網頁畫面上的 WPS 按鈕
按一下畫面上的 開始。在兩分鐘內,於您的個人設備上啟用 WPS。
畫面上應出現 設備-(XX-XX-XX-XX-XX-XX) 已連接 的訊息,指示 WPS 連接成功。
注意:XX-XX-XX-XX-XX-XX 是您設備的 MAC 地址。
方法 3:使用便攜式路由器上的 WPS 按鈕
按下便攜式路由器上的 WPS 按鈕。在兩分鐘內,於您的個人設備上啟用 WPS。
6.3.6 其他設定
1. 造訪 http://tplinkwifi.net,並使用您的 TP-Link ID 或您為便攜式路由器設定的密碼登入。
2. 前往 進階 > 無線網路 > 其他設定。
3. 設定無線網路的進階設定,然後按一下 儲存。
注意:如果您不熟悉此頁面上的設定項目,強烈建議保持提供的預設值;否則可能會導致無線網路效能降低。
• WMM - WMM 功能可以保證帶有高優先順序訊息的封包被優先傳輸。
• Short GI - 此功能可縮短資料封包之間的時間,從而潛在提高無線網路的吞吐量。
• AP 隔離 - 此功能隔離所有連接的無線站點,使無線站點無法透過 WLAN 互相存取。
• 訊號輕重公平分配 - 此功能可以透過犧牲慢速設備的一點網路時間來提高整體網路效能。
• 信標間隔 - 此處輸入 40-1000 毫秒之間的信標間隔值。信標間隔值決定信標的時間間隔。信標是便攜式路由器發送的用於同步無線網路的封包。預設值為 100。
• RTS 門檻 - 此處您可以指定 RTS(請求發送)門檻。如果封包大於指定的 RTS 門檻大小,便攜式路由器將向特定接收站發送 RTS 訊框並協商發送資料訊框。預設值為 2346。
• DTIM 間隔 - 此值決定交付流量指示訊息 (DTIM) 的間隔。DTIM 欄位是一個倒數欄位,用於告知用戶端下一個收聽廣播和多播訊息的時間視窗。當便攜式路由器為相關用戶端快取了廣播或多播訊息時,它會發送帶有 DTIM 間隔值的下一個 DTIM。您可以指定 1-255 個信標間隔之間的值。預設值為 1,表示 DTIM 間隔與信標間隔相同。
• 群組金鑰更新週期 - 輸入秒數(最少 30 秒)以控制加密金鑰自動更新的時間間隔。預設值為 0,表示不更新金鑰。
6.4 網路設定
6.4.1 狀態
1. 造訪 http://tplinkwifi.net,並使用您為便攜式路由器設定的使用者名稱和密碼登入。
2. 前往 進階 > 網路設定 > 狀態。您可以檢視便攜式路由器當前的狀態資訊。
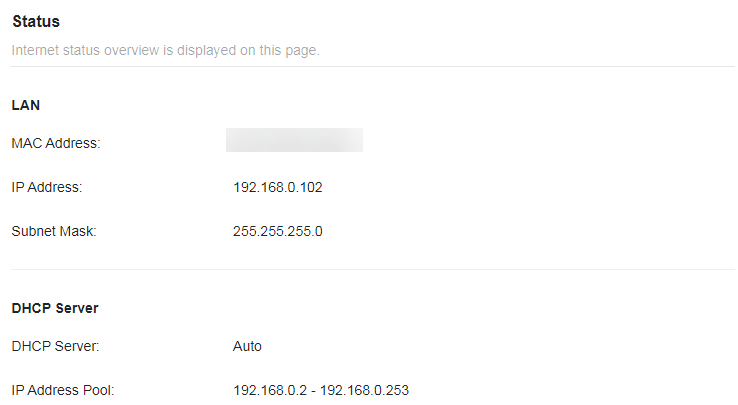
• LAN - 此欄位顯示 LAN 的當前設定,您可以在「網路設定 > LAN」頁面上對其進行設定。
• MAC 地址 - 便攜式路由器的實體地址。
• IP 地址 - 便攜式路由器的 LAN IP 地址。
• 子網路遮罩 - 與 LAN IP 地址關聯的子網路遮罩。
• DHCP 伺服器 - 指示 DHCP 伺服器已啟用還是已停用。預設情況下已啟用,便攜式路由器充當 DHCP 伺服器。
• IP 地址池 - DHCP 伺服器分配 IP 地址的 IP 地址範圍。
6.4.2 網路模式
在基地台模式下,您可以一鍵快速切換到訊號延伸器模式或用戶端模式。
1. 造訪 http://tplinkwifi.net,並使用您為便攜式路由器設定的使用者名稱和密碼登入。
2. 前往 進階 > 網路設定 > 網路模式。
3. 選擇所需的網路模式,然後按一下 儲存。
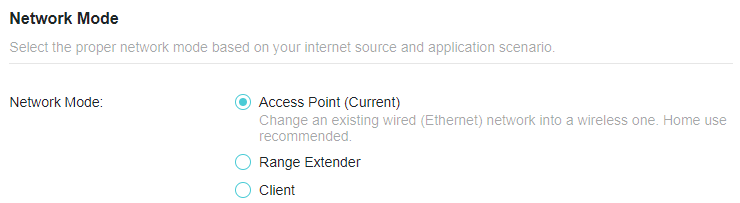
6.4.3 LAN
在基地台模式下,此便攜式路由器預設為動態 IP,允許其從主路由器/AP 動態獲取 IP 地址和閘道。建議您保持預設的 LAN 設定,以避免與主路由器/AP 或本地網路上的其他設備發生 IP 衝突。
如果您想為基地台設定固定 IP 地址,請按照以下步驟操作:
1. 造訪 http://tplinkwifi.net,並使用您為便攜式路由器設定的使用者名稱和密碼登入。
2. 前往 進階 > 網路設定 > LAN。
3. 在 IP 類型中,選擇 固定 IP。
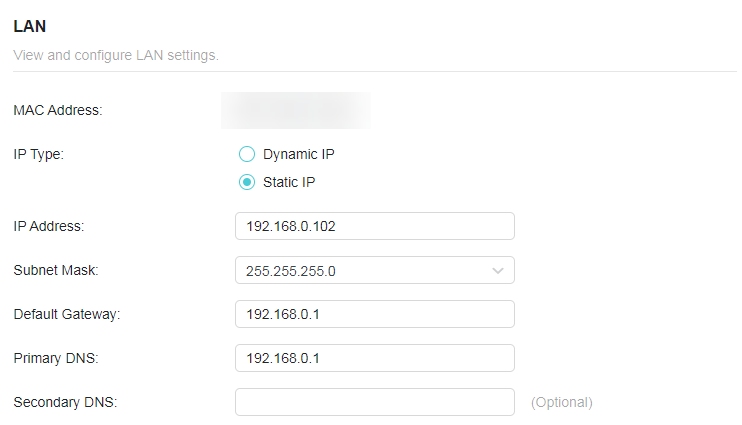
4. 保持其他參數為預設設定。
5. 按一下 儲存。
注意:設定固定 IP 地址後,除了 http://tplinkwifi.net 之外,您還可以使用新的 IP 地址登入網頁管理頁面。
6.4.4 流量控制器
啟用後,當設備過載時,它將發送 PAUSE 訊框以通知對等設備在指定時間內停止發送資料,從而避免由壅塞引起的封包遺失。
1. 造訪 http://tplinkwifi.net,並使用您為便攜式路由器設定的使用者名稱和密碼登入。
2. 前往 進階 > 網路設定 > 網際網路連接埠。找到 流量控制器 區塊。
3. 選擇所需的選項,然後按一下 儲存。
6.4.5 DHCP 伺服器
預設情況下,DHCP(動態主機設定協定)伺服器已啟用,便攜式路由器充當 DHCP 伺服器;它從 IP 地址池動態向用戶端設備分配 TCP/IP 參數。如有必要,您可以變更 DHCP 伺服器的設定,並且可以為指定的用戶端設備保留 LAN IP 地址。
注意:如果您停用 DHCP 伺服器且 LAN 內沒有其他 DHCP 伺服器,則必須手動為每個用戶端設定 IP 地址。
• 指定便攜式路由器分配的 IP 地址:
1. 造訪 http://tplinkwifi.net,並使用您的 TP-Link ID 或您為便攜式路由器設定的密碼登入。
2. 前往 進階 > 網路設定 > DHCP 伺服器 並找到 DHCP 伺服器 區塊。
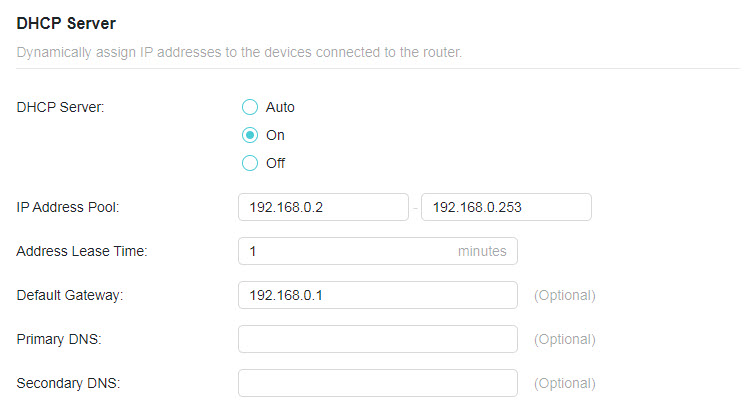
1. 開啟 DHCP 伺服器。
2. 在 IP 地址池 中輸入起始和結束 IP 地址。
3. 如果電信業者提供,請輸入其他參數。預設閘道 會自動填入,且與便攜式路由器的 LAN IP 地址相同。
4. 按一下 儲存。
注意:要使用便攜式路由器的 DHCP 伺服器功能,必須將 LAN 上的所有電腦設定為「自動獲取 IP 地址」。
• 為指定的用戶端設備保留 IP 地址:
便攜式路由器的 DHCP 伺服器在開啟時,或者在主路由器/AP 的 DHCP 伺服器停用的自動模式下運作。當它工作時,您可以檢視 DHCP 用戶端並為其保留 IP 地址。
1. 造訪 http://tplinkwifi.net,並使用您為便攜式路由器設定的使用者名稱和密碼登入。
2. 前往 進階 > 網路設定 > DHCP 伺服器 並找到 地址保留 區塊。
3. 按一下地址保留區塊中的 新增。
4. 按一下 檢視已連接的設備 並選擇要為其保留 IP 的設備。然後 MAC 和 IP 地址將自動填入。您也可以手動輸入用戶端設備的 MAC 和 IP 地址。
• 檢查 DHCP 用戶端清單:
1. 造訪 http://tplinkwifi.net,並使用您的 TP-Link ID 或您為便攜式路由器設定的密碼登入。
2. 前往 進階 > 網路設定 > DHCP 伺服器 並找到 DHCP 用戶端清單 區塊。您可以查看清單的設備資訊。
3. 按一下 重新整理 以查看當前連接的設備。
6.5 USB 儲存設備
將您的 USB 儲存設備插入便攜式路由器的 USB 連接埠,然後在本地或遠端存取儲存在其中的檔案。
提示:
• 如果您使用 USB 集線器,請確保連接到便攜式路由器的設備不超過 4 個。
• 如果 USB 儲存設備需要使用隨附的外接電源,請確保外接電源已連接。
• 如果您使用 USB 硬碟,請確保其檔案系統為 FAT32、exFat、NTFS 或 HFS+。
• 在從便攜式路由器實體斷開 USB 設備之前,請安全移除它以避免資料損壞:前往 進階 > USB > 儲存設備,然後按一下 移除。
6.5.1 在本地存取 USB 設備
將您的 USB 儲存設備插入便攜式路由器的 USB 連接埠,然後參考下表存取儲存在 USB 儲存設備上的檔案。
| Windows 電腦 |
• 方法 1:
• 方法 2:
|
|---|---|
| Mac |
1 ) 選擇 前往 > 連接伺服器。
4 ) 出現提示時,選擇 訪客 單選框。(如果您設定了使用者名稱和密碼以拒絕匿名存取 USB 磁碟,則應選擇 註冊使用者 單選框。要了解如何設定存取帳戶,請參閱 設定資料安全的驗證。) |
| 平板電腦 | 使用第三方應用程式進行網路檔案管理。 |
提示:
您也可以使用網路/媒體伺服器名稱作為伺服器地址來存取您的 USB 儲存設備。欲了解更多資訊,請參閱自訂 USB 儲存設備的地址。
6.5.2 自訂存取設定
預設情況下,所有網路用戶端都可以存取您 USB 磁碟上的所有資料夾。您可以在便攜式路由器的網頁管理頁面上透過設定共用帳戶、共用特定內容和設定新的共用地址來自訂共用設定。
1. 造訪 http://tplinkwifi.net,並使用您的 TP-Link ID 或您為便攜式路由器設定的密碼登入。
2. 前往 進階 > USB > 儲存設備。
• 自訂 USB 儲存設備的地址
您可以自訂伺服器名稱,並使用該名稱存取您的 USB 儲存設備。
1. 在 存取方式 區塊中,確保已啟用 Windows Samba / macOS/Linux Samba,並根據您的喜好輸入 網路/媒體伺服器名稱(例如 MyShare),然後按一下 儲存。
2. 現在您可以透過造訪 \\MyShare(適用於 Windows)或 smb://MyShare (適用於 Mac)來存取 USB 儲存設備。
• 僅共用特定內容
聚焦於 檔案共用 區塊。指定您想要共用的共用資料夾,然後按一下 儲存。
• 設定資料安全的驗證
您可以為 USB 儲存設備設定驗證,以便網路用戶端在存取 USB 儲存設備時需要輸入使用者名稱和密碼。
1. 在 檔案共用 區塊中,啟用 安全共用。
2. 按一下 修改存取帳戶,並注意預設的使用者名稱和密碼。作為管理員存取可以讀取和修改共用資料夾,而訪客只能讀取共用資料夾。
注意:
1. 對於 Windows 使用者,請勿將共用使用者名稱設定為與 Windows 使用者名稱相同。否則,Windows 憑證機制可能會導致以下問題:
• 如果共用密碼也與 Windows 密碼相同,則驗證將不起作用,因為 Windows 將自動使用其帳戶資訊進行 USB 存取。
• 如果共用密碼與 Windows 密碼不同,Windows 將無法記住您的憑證,您將始終需要輸入共用密碼進行 USB 存取。
2. 由於 Windows 憑證機制,變更驗證設定後您可能無法存取 USB 磁碟。請從 Windows 登出並嘗試重新存取。或者您可以參考 自訂 USB 儲存設備的地址 來變更 USB 磁碟的地址。
6.5.3 媒體共用
媒體共用功能允許您直接從支援 DLNA 的設備(例如電腦、平板電腦和 PS2/3/4)檢視儲存在 USB 儲存設備上的相片、播放音樂和觀看電影。
注意:某些型號可能不支援此功能。圖片可能與實際產品有所不同。
1. 造訪 http://tplinkwifi.net,並使用您的 TP-Link ID 或您為便攜式路由器設定的密碼登入。
2. 前往 進階 > USB > 儲存設備。
3. 啟用 媒體共用。
4. 當您的 USB 儲存設備插入便攜式路由器時,連接到便攜式路由器的支援 DLNA 的設備(如您的電腦和平板)可以檢測並播放 USB 儲存設備上的媒體檔案。
5. 詳細說明請參閱下表。
| Windows 電腦 |
前往 電腦 > 網路,然後按一下 媒體設備 區塊中的媒體伺服器名稱(預設為 型號-share)。
|
|---|---|
| 平板電腦 | • 使用第三方支援 DLNA 的播放器。 |
6.6 存取控制
存取控制用於根據已阻擋設備清單(黑名單)或已允許設備清單(白名單),阻擋或允許特定用戶端設備存取您的網路(透過有線或無線)。
我想:
阻擋或允許特定的用戶端設備存取我的網路(透過有線或無線)。
我該怎麼做?
1. 造訪 http://tplinkwifi.net,並使用您的 TP-Link ID 或您為便攜式路由器設定的密碼登入。
2. 前往 進階 > 安全性 > 存取控制。
3. 切換開關以啟用 存取控制。
4. 按一下 變更模式 以選擇存取模式,以阻擋(推薦)或允許清單中的設備。
阻擋特定設備:
1 ) 選擇 黑名單。
2 ) 按一下 並選擇要阻擋的設備,或手動輸入 MAC 地址,然後按一下 新增。
3 ) 畫面上將出現 操作成功 訊息,表示選定的設備已成功新增至黑名單。
允許特定設備:
1 ) 選擇 白名單 並按一下 變更。
2 ) 您自己的設備預設在白名單中,無法刪除。按一下 將其他設備新增至白名單。
• 新增已連接的設備
1 ) 按一下 從設備清單中選擇。
2 ) 選擇您要允許的設備,然後按一下 新增。
3 ) 畫面上將出現操作成功訊息,表示選定的設備已成功新增至白名單。
• 新增未連接的設備
1 ) 按一下 手動新增。
2 ) 輸入要允許的設備的 設備名稱 和 MAC 地址,然後按一下 新增。
3 ) 畫面上將出現 操作成功 訊息,表示該設備已成功新增至白名單。
完成!
現在您可以透過使用黑名單或白名單來阻擋或允許特定用戶端設備存取您的網路(透過有線或無線)。
6.7 韌體升級
TP-Link 旨在為使用者提供更好的網路體驗。如果有適用於您便攜式路由器的韌體更新可用,我們將透過網頁管理頁面通知您。此外,最新的韌體將在 TP-Link 官方網站 www.tp-link.com 發布,您可以從「支援」頁面免費下載。
注意:
• 韌體升級前請備份您的便攜式路由器設定。
• 韌體升級期間請勿關閉便攜式路由器。
自動更新
啟用 自動更新 並設定更新時間。當有新版本可用時,便攜式路由器將在指定時間自動更新韌體。
線上升級
1. 造訪 http://tplinkwifi.net,並使用您的 TP-Link ID 或您為便攜式路由器設定的密碼登入。
2. 當有適用於您便攜式路由器的最新韌體可用時,頁面右上角將顯示升級圖示。按一下圖示 前往 韌體升級 頁面。或者,您可以前往 進階 > 系統 > 韌體升級,然後按一下 檢查更新 以查看最新的韌體是否已發布。
3. 如果有新韌體,按一下 升級。
4. 等待幾分鐘讓升級和重新啟動完成。
提示:如果您的便攜式路由器有新的且重要的韌體更新,只要開啟網頁瀏覽器,您就會在電腦上看到提示通知。按一下 升級,然後使用您為便攜式路由器設定的使用者名稱和密碼登入網頁管理頁面。您將看到 韌體升級 頁面。
本地升級
1. 從 www.tp-link.com 下載適用於該便攜式路由器的最新韌體檔案。
2. 造訪 http://tplinkwifi.net,並使用您的 TP-Link ID 或您為便攜式路由器設定的密碼登入。
3. 前往 進階 > 系統 > 韌體升級。
4. 聚焦於 本地升級 區塊。按一下 瀏覽 尋找下載的新韌體檔案,然後按一下 升級。
5. 等待幾分鐘讓升級和重新啟動完成。
注意:如果您無法升級便攜式路由器的韌體,請聯繫我們的技術支援。
6.8 備份與還原設定
設定儲存為便攜式路由器中的設定檔。您可以將設定檔備份到電腦以備將來使用,並在需要時從備份檔案將便攜式路由器還原至之前的設定。此外,如有必要,您可以擦除當前設定並將便攜式路由器重設為原廠預設設定。
1. 造訪 http://tplinkwifi.net,並使用您的 TP-Link ID 或您為便攜式路由器設定的密碼登入。
2. 前往 進階 > 系統 > 備份與還原。
• 備份設定:
按一下 備份 將當前設定的副本儲存到本地電腦。當前設定的「.bin」檔案將儲存到您的電腦中。
• 還原設定:
1. 按一下 上傳 尋找儲存在您電腦上的備份設定檔,然後按一下 還原。
2. 等待幾分鐘進行還原和重新啟動。
注意:在還原過程中,請勿關閉或重設便攜式路由器。
• 重設便攜式路由器(登入密碼和 TP-Link ID 除外):
1. 在 恢復原廠預設值 區塊中,按一下 還原。
2. 等待幾分鐘進行重設和重新啟動。
注意:
• 在重設過程中,請勿關閉便攜式路由器。
• 重設後,您仍可以使用當前的登入密碼或 TP-Link ID 登入網頁管理頁面。
• 將便攜式路由器重設為原廠預設設定:
1. 按一下 恢復原廠設定 以重設便攜式路由器。
2. 等待幾分鐘進行重設和重新啟動。
注意:
• 在重設過程中,請勿關閉或重設便攜式路由器。
• 我們強烈建議您在重設便攜式路由器之前備份當前的設定。
6.9 TP-Link 雲端服務
TP-Link 雲端服務提供了一種更好的方式來管理您的雲端設備。使用 TP-Link ID 登入便攜式路由器,無論身在何處,都可以透過 Tether 應用程式輕鬆監控和管理您的家庭網路。為了確保您的便攜式路由器保持最新狀態並隨時間推移變得更好,TP-Link 雲端將在有重要的韌體升級可用時通知您。當然,您也可以使用單個 TP-Link ID 管理多個 TP-Link 雲端設備。
本節介紹如何註冊新的 TP-Link ID、綁定或解綁 TP-Link ID 以管理便攜式路由器,以及無論您身在何處都可以使用它管理家庭網路的 Tether 應用程式。
6.9.1 註冊 TP-Link ID
如果您在快速設定過程中跳過了註冊,您可以:
1. 造訪 http://tplinkwifi.net,並使用您為便攜式路由器設定的密碼登入。
2. 前往 進階 > TP-Link ID 或按一下頁面最頂部的 TP-Link ID。
3. 按一下 註冊 並按照說明註冊 TP-Link ID。
4. 啟用 TP-Link ID 後,返回 TP-Link ID 頁面進行登入。首次用於登入便攜式路由器的 TP-Link ID 將自動綁定為 管理員。
注意:
• 要了解有關 管理員 和 使用者 TP-Link ID 的更多資訊,請參閱 管理使用者 TP-Link ID。
• 在網頁管理頁面上註冊 TP-Link ID 後,只能透過 Tether 應用程式註冊另一個 TP-Link ID。請參閱 透過 Tether 登入 安裝應用程式。
• 如果您想從便攜式路由器解綁管理員 TP-Link ID,請前往 進階 > TP-Link ID,然後按一下設備資訊區塊中的解綁。
6.9.2 變更您的 TP-Link ID 資訊
按照以下步驟根據需要變更 TP-Link ID 的電子郵件地址和密碼。
1. 造訪 http://tplinkwifi.net,並使用您的 TP-Link ID 登入。
2. 前往 進階 > TP-Link ID,並聚焦於 TP-Link ID 區塊。
• 變更您的電子郵件地址:
1. 按一下電子郵件後面的 。
2. 輸入您 TP-Link ID 的密碼,然後輸入新的電子郵件地址。然後按一下 儲存。
• 變更您的密碼:
1. 按一下密碼後面的 。
2. 輸入當前密碼,然後輸入兩次新密碼。然後按一下 儲存。
6.9.3 管理使用者 TP-Link ID
首次用於登入便攜式路由器的 TP-Link ID 將自動綁定為 擁有者 帳戶。擁有者帳戶可以在同一台便攜式路由器中添加或刪除其他 TP-Link ID。所有帳戶都可以在本地或遠端監控和管理便攜式路由器,但只有擁有者帳戶可以:
• 在網頁管理頁面或 Tether 應用程式中將便攜式路由器重設為原廠預設設定。
• 向便攜式路由器添加/從中刪除其他 TP-Link ID。
添加 TP-Link ID 以管理便攜式路由器
1. 造訪 http://tplinkwifi.net,並使用您的 TP-Link ID 登入。
2. 前往 進階 > TP-Link ID,並聚焦於 已綁定的 TP-Link ID 區塊。
3. 按一下 ,根據需要輸入另一個 TP-Link ID,然後按一下 儲存。
注意:如果您需要另一個 TP-Link ID,請透過 Tether 應用程式註冊一個新 ID。請參閱 透過 TP-Link Tether 應用程式管理便攜式路由器 安裝應用程式並註冊新的 TP-Link ID。
4. 新的 TP-Link ID 將顯示在 已綁定的 TP-Link ID 表格中。
取消 TP-Link ID 對便攜式路由器的管理權限
1. 造訪 http://tplinkwifi.net,並使用您的 TP-Link ID 登入。
2. 前往 進階 > TP-Link ID,並聚焦於 已綁定的 TP-Link ID 區塊。
3. 勾選要刪除的 TP-Link ID 的 解綁。
6.9.4 透過 TP-Link Tether 應用程式管理便攜式路由器
Tether 應用程式在 iOS 和 Android 設備(例如智慧型手機和平板電腦)上執行。
1. 啟動 Apple App Store 或 Google Play 商店,搜尋「TP-Link Tether」或直接掃描二維碼下載並安裝應用程式。
2. 啟動 Tether 應用程式並使用您的 TP-Link ID 登入。如果您沒有 TP-Link ID,請先建立一個。
3. 將您的設備連接到便攜式路由器的無線網路。
4. 返回 Tether 應用程式,選擇您便攜式路由器的型號,然後使用您為便攜式路由器設定的密碼登入。
5. 根據需要管理您的便攜式路由器。
注意:如果您需要從智慧型設備遠端存取便攜式路由器,您需要:
• 使用您的 TP-Link ID 登入。如果您沒有,請參閱 註冊 TP-Link ID。
• 確保您的智慧型手機和平板電腦可以透過行動數據或 Wi-Fi 網路存取網際網路。
6.10 變更登入密碼
帳戶管理功能允許您變更網頁管理頁面的登入密碼。
注意:如果您使用 TP-Link ID 登入網頁管理頁面,帳戶管理功能將被停用。要管理 TP-Link ID,請前往「進階 > TP-Link ID」。
1. 造訪 http://tplinkwifi.net,並使用您的 TP-Link ID 或您為便攜式路由器設定的密碼登入。
2. 前往 進階 > 系統 > 權限管理 並聚焦於 變更密碼 區塊。
3. 輸入舊密碼,然後輸入兩次新密碼(均區分大小寫)。按一下 儲存。
4. 以後的登入請使用新密碼。
6.11 密碼找回
此功能允許您在忘記密碼時找回為便攜式路由器設定的登入密碼。
注意:如果您使用 TP-Link ID 登入網頁管理頁面,密碼找回功能將被停用。要管理 TP-Link ID,請前往 進階 > TP-Link ID。
1. 造訪 http://tplinkwifi.net,並使用您為便攜式路由器設定的密碼登入。
2. 前往 進階 > 系統 > 權限管理 並聚焦於 管理員密碼找回 區塊。
3. 按一下 安全問題設定 來設定安全問題。
4. 勾選 密碼找回 的 啟用 方塊。
5. 指定用於發送找回郵件的 信箱(寄件者) 並輸入其 SMTP 伺服器 地址。指定用於接收找回郵件的 信箱(收件者)。如果發送找回郵件的信箱(寄件者)需要加密,請勾選 驗證 的 啟用 方塊並輸入其使用者名稱和密碼。
提示:
• 大多數 Web 郵件系統中的使用者都可以使用 SMTP 伺服器。例如,Gmail 的 SMTP 伺服器地址是 smtp.gmail.com。
• 通常,如果信箱登入需要使用者名稱和密碼,則應啟用驗證。
6. 按一下 儲存。
要找回登入密碼,請造訪 http://tplinkwifi.net,按一下登入頁面上的 忘記密碼? 並按照說明設定新密碼。
6.12 本地管理
此功能允許您透過使用基於 MAC 地址的驗證,限制 LAN 上存取便攜式路由器的用戶端設備數量。
1. 造訪 http://tplinkwifi.net,並使用您的 TP-Link ID 或您為便攜式路由器設定的密碼登入。
2. 前往 進階 > 系統 > 權限管理,並根據需要在 本地管理 區塊中完成設定。
• 透過 HTTPS 和 HTTP 存取便攜式路由器:
勾選 透過 HTTPS 進行本地管理 的 啟用 方塊以透過 HTTPS 和 HTTP 存取便攜式路由器,或保持其停用以僅透過 HTTP 存取便攜式路由器。
• 允許所有連接 LAN 的設備管理便攜式路由器:
為本地管理者選擇 所有設備 。
• 允許特定設備管理便攜式路由器:
1. 為本地管理者選擇 指定設備,然後按一下 儲存。
2. 按一下 新增設備。
3. 按一下 檢視已連接的設備 並從已連接的設備清單中選擇要管理便攜式路由器的設備,或手動輸入設備的 MAC 地址。
4. 為此條目指定一個 描述。
5. 按一下 儲存。
6.13 系統記錄
當便攜式路由器無法正常工作時,您可以儲存系統記錄並將其發送給技術支援以進行疑難排解。
• 在本地儲存系統記錄:
1. 造訪 http://tplinkwifi.net,並使用您的 TP-Link ID 或您為便攜式路由器設定的密碼登入。
2. 前往 進階 > 系統 > 系統記錄。
3. 根據需要選擇系統記錄的類型和等級。
4. 在 儲存記錄 區塊中,按一下 儲存到本地 將系統記錄儲存到本地磁碟。
• 定時將系統記錄發送到信箱:
例如,我想每天在固定時間檢查我便攜式路由器的工作狀態,但是每次想去檢查都要登入網頁管理頁面太麻煩了。如果每天早上 8 點能把系統記錄發送到我的信箱就太好了。
1. 造訪 http://tplinkwifi.net,並使用您的 TP-Link ID 或您為便攜式路由器設定的密碼登入。
2. 前往 進階 > 系統 > 系統記錄。
3. 在 儲存記錄 區塊中,按一下 郵寄記錄。
4. 輸入所需的資訊:
• 寄件者電子郵件: 輸入用於發送系統記錄的電子郵件地址。
• 選擇 需要密碼。
提示:通常,如果信箱登入需要使用者名稱和密碼,則應選擇「需要密碼」。
• 使用者名稱: 輸入用於發送系統記錄的電子郵件地址。
• 電子郵件密碼: 輸入登入發件人電子郵件地址的密碼。
• SMTP 伺服器: 輸入 SMTP 伺服器地址。
提示:大多數 Web 郵件系統中的使用者都可以使用 SMTP 伺服器。例如,Hotmail 的 SMTP 伺服器地址是 smtp-mail.outlook.com。
• 收件者電子郵件: 輸入收件者的電子郵件地址,可以與發件人的電子郵件地址相同或不同。
• 選擇 自動郵寄記錄。
提示:如果啟用此選項,便攜式路由器將把系統記錄發送到指定的電子郵件地址。
• 頻率: 這決定了收件者接收系統記錄的頻率。
5. 按一下 儲存。
6.14 測試網路連線
診斷用於測試便攜式路由器與主機或其他網路設備之間的連線。
1. 造訪 http://tplinkwifi.net,並使用您的 TP-Link ID 或您為便攜式路由器設定的密碼登入。
2. 前往 進階 > 系統 > 診斷工具。
3. 輸入資訊:
1 ) 選擇 Ping 或 Traceroute 作為診斷工具來測試連線;
• Ping 用於測試便攜式路由器與被測主機之間的連線,並測量往返時間。
• Traceroute 用於顯示您的便攜式路由器到達被測主機所經過的路由(路徑),並測量封包跨網際網路協定網路的傳輸延遲。
2 ) 輸入被測主機的 IP 地址 或 網域名稱 。
3 ) 修改 Ping 次數 數字和 Ping 封包大小。建議保持預設值。
4 ) 如果您選擇了 Traceroute,您可以修改 Traceroute 最大 TTL。建議保持預設值。
4. 按一下 開始 開始診斷。
下圖顯示透過 Ping 測試的便攜式路由器與 Yahoo 伺服器 (www.Yahoo.com) 之間的正常連接。
下圖顯示透過 Traceroute 測試的便攜式路由器與 Yahoo 伺服器 (www.Yahoo.com) 之間的正常連接。
6.15 設定系統時間
系統時間是便攜式路由器執行時顯示的時間。您在此處設定的系統時間將用於其他基於時間的功能(如家長監護)。您可以根據需要選擇獲取系統時間的方式。
1. 造訪 http://tplinkwifi.net,並使用您的 TP-Link ID 或您為便攜式路由器設定的密碼登入。
2. 前往 進階 > 系統 > 時間設定。
• 從網際網路獲取時間:
1. 如果您希望時間以 24 小時制顯示,請啟用 24 小時制時間 。
2. 在 設定時間 欄位中,選擇 從網際網路獲取。
3. 從下拉式清單中選擇您當地的 時區。
4. 在 NTP 伺服器 I 欄位中,輸入您想要的 NTP 伺服器的 IP 地址或網域名稱。
5. (選填)在 NTP 伺服器 II 欄位中,輸入第二個 NTP 伺服器的 IP 地址或網域名稱。
6. 按一下 儲存。
• 從您的電腦獲取時間:
1. 在設定時間欄位中,選擇從管理設備獲取。
2. 隨後將顯示您電腦的時間,按一下儲存。
• 手動設定日期和時間:
1. 在 設定時間 欄位中,選擇 手動。
2. 設定當前 日期 (格式為 月/日/年)。
3. 設定當前 時間 (格式為 時/分/秒)。
4. 按一下 儲存。
• 設定日光節約時間(夏令時間):
1. 勾選日光節約時間的 啟用 方塊。
2. 選擇您當地時區日光節約時間開始的正確 開始 日期和時間。
3. 選擇您當地時區日光節約時間結束的正確 結束 日期和時間。
4. 按一下 儲存。
6.16 設定便攜式路由器定期重新啟動
定期重新啟動功能可清除快取以提高便攜式路由器的執行效能。
1. 造訪 http://tplinkwifi.net,並使用您的 TP-Link ID 或您為便攜式路由器設定的密碼登入。
2. 前往 進階 > 系統 > 重新啟動。
3. 勾選重新啟動排程的 啟用 方塊。
4. 指定便攜式路由器重新啟動的 重新啟動時間,並指定 重複 以決定重新啟動的頻率。
5. 按一下 儲存。
6.17 控制 LED 燈
便攜式路由器的 LED 燈指示其活動和狀態。您可以啟用夜間模式功能來指定關閉 LED 燈的時間段。
1. 造訪 http://tplinkwifi.net,並使用您的 TP-Link ID 或您為便攜式路由器設定的密碼登入。
2. 前往 進階 > 系統 > LED 控制。
3. 啟用 夜間模式。
4. 指定 LED 關閉 時間,每天在此期間 LED 燈將關閉。
5. 按一下 儲存。
6.18 自訂按鍵 (Action Switch)
可自訂的實體切換按鍵為您提供控制各種功能(包括 Wi-Fi、LED 和 VPN 合併)的實體快捷方式。
1. 造訪 http://tplinkwifi.net,並使用您的 TP-Link ID 或您為便攜式路由器設定的密碼登入。
2. 前往 進階 > 系統 > 自訂按鍵。
3. 選擇一個快速控制選項,然後按一下 儲存。
6.19 ECO 節能模式
ECO 模式開關用於變更便攜式路由器的省電模式。要變更 ECO 模式,請將設備上的模式開關切換到您想要的模式。
1. 造訪 http://tplinkwifi.net,並使用您的 TP-Link ID 或您為便攜式路由器設定的密碼登入。
2. 前往 進階 > 系統 > ECO 模式。
3. 選擇偏好模式,然後按一下 儲存。
• 效能模式: 有利於無線涵蓋範圍和傳輸速度,但可能會增加能源消耗並提高設備溫度。
• 平衡模式: 在考量能源消耗和設備溫度的同時,自動平衡無線涵蓋範圍和傳輸速度。
• ECO 模式: 透過降低設備的無線涵蓋範圍和傳輸速度來節省能源並降低設備溫度。
Chapter 6. Configure the Router in Cellular Internet Mode
This chapter presents how to configure the various features of the router working in Cellular Internet mode.
*Features available on the web management page may vary by model and software version.
6.1 Operation Mode
1. Visit http://tplinkwifi.net, and log in with your TP-Link ID or the password you set for the router.
2. Go to Internet.
3. Locate the Connection Settings section. The router’s current operation mode is highlighted.
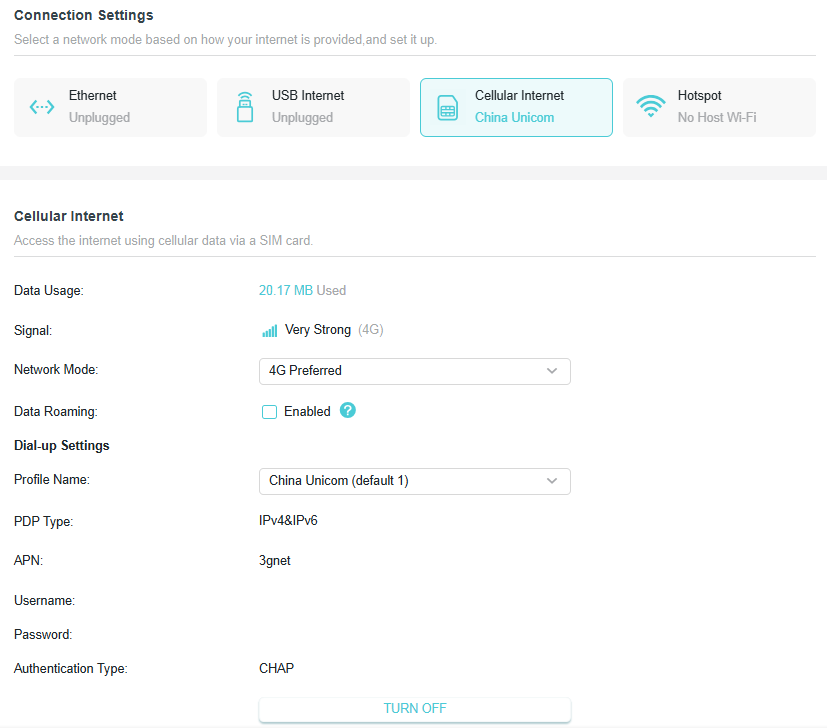
• To set up the router’s network mode:
Select your desired network mode, configure the parameters , and click SAVE.
• Data Usage - The total amount of cellular data consumed. It helps you monitor your data limits so you don't overspend.
• Signal - Displays the strength and generation of your cellular connection.
• Network Mode - Please select your preferred cellular technology network type. 4G Prefered, 4G Only, and 3G Only are allowed.
• Data Roaming - Enable if you allow your device to connect to other carriers' mobile networks when you are outside your provider’s coverage area (such as traveling internationally). Leaving it disabled prevents unexpected roaming fees.
• Profile Name - The name assigned to this specific network configuration profile.
• PDP Type - Packet Data Protocol Type. This specifies the internet protocol version your cellular network uses to assign addresses.
• APN - Access Point Name. This is the structural identifier or gateway name that your device uses to establish a data connection between your carrier's cellular network and the public internet.
• Username/Password - Enter the username and password provided by your ISP if any.
• Authentication Type - The security protocol used to verify your device credentials when connecting to the network.
• To change the router’s operation mode (to AP/RE/Client mode):
1. Go to Advanced > System > Operation Mode.
2. Select your desired operation mode and click SAVE.
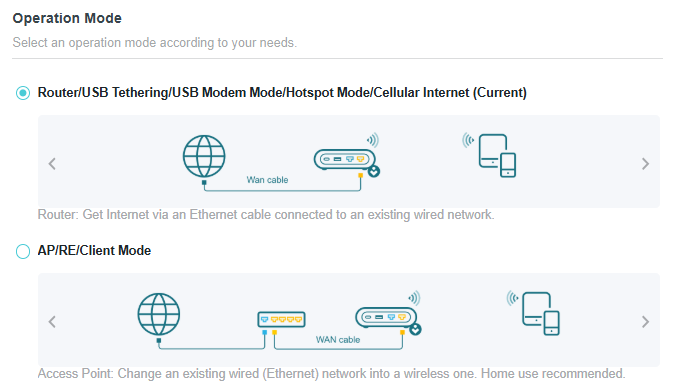
6.2 Network Map
Network Map outlines device connectivity of your network visually and helps you manage general settings of the network.
1. Visit http://tplinkwifi.net, and log in with your TP-Link ID or the password you set for the router..
2. Go to Network Map.
3. Click each network device icon to check and manage general network settings
• Click Internet to check internet status.
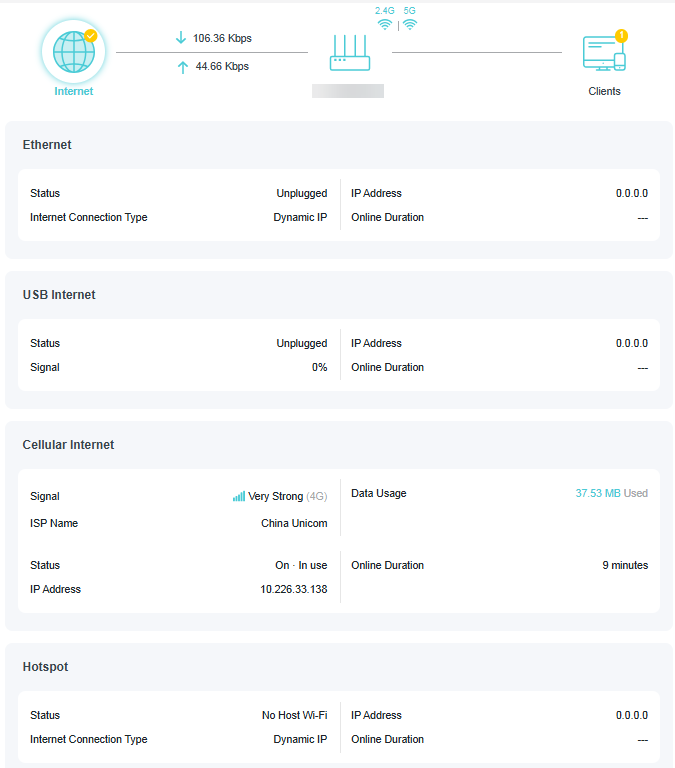
• Click the router to check device status and network settings. You can click Edit to change related settings.
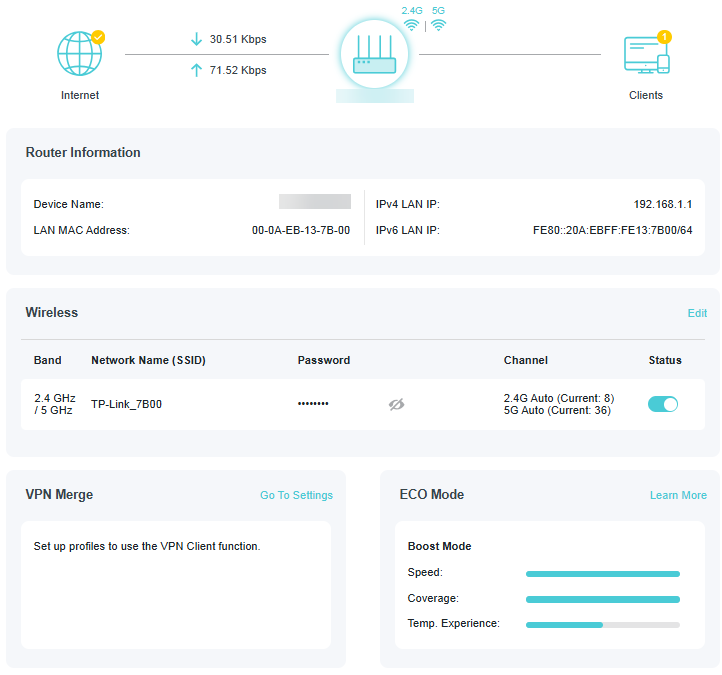
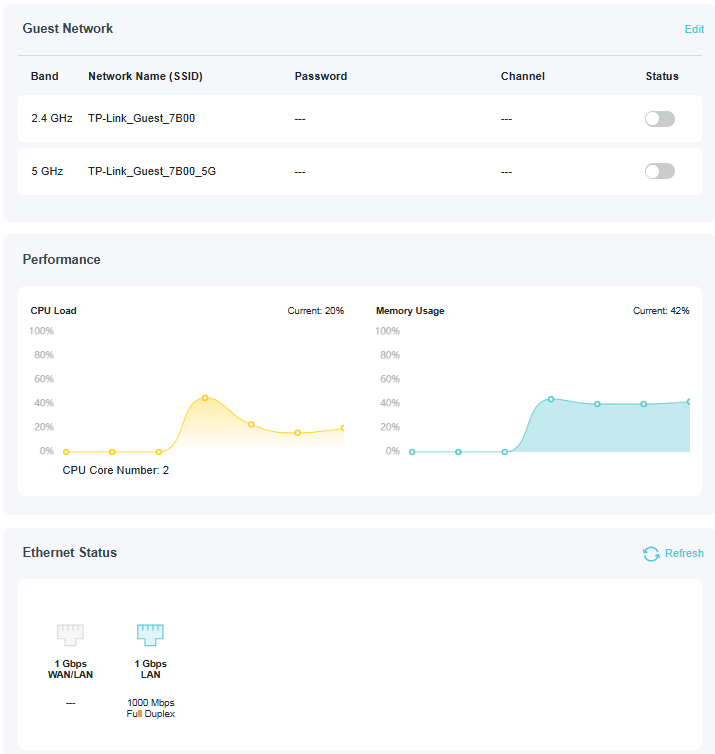
• Click Clients to view the client devices in your network. You can block devices so they cannot access your network.
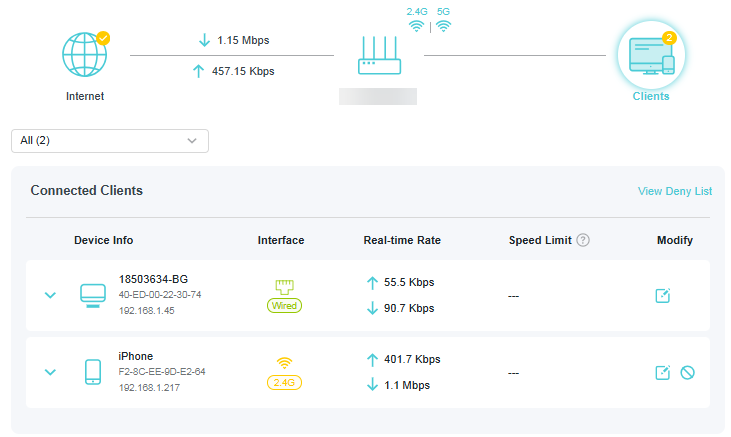
6.3 Network
6.3.1 Status
1. Visit http://tplinkwifi.net, and log in with your TP-Link ID or the password you set for the router.
2. Go to Advanced > Network > Status. You can view the current status information of the router.
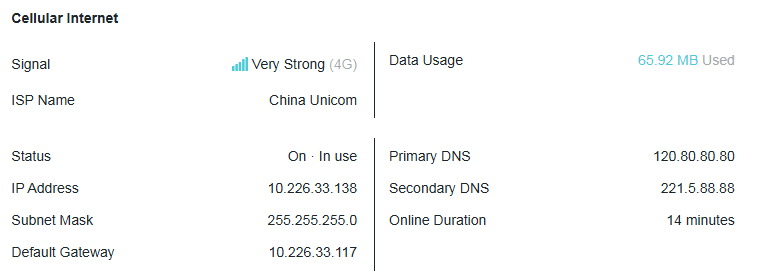
• Signal - Displays the strength and generation of your cellular connection.
• ISP Name - Indicates the mobile network operator providing your cellular data.
• Data Usage- The total amount of cellular data consumed. It helps you monitor your data limits so you don't overspend.
• Status - Indicates whether your cellular internet is currently active.
• IP Address - The Internet IP (WAN IP) address of the router.
• Subnet Mask - The subnet mask associated with the Internet IP (WAN IP) address.
• Default Gateway - The Gateway currently used is shown here.
• Primary & Secondary DNS - The IP addresses of DNS (Domain Name System) server.
• Online Duration - Displays how long the router has been connected to the cellular network.
• LAN - This field displays the current settings of the LAN, and you can configure them on the Network > LAN page.
• MAC Address - The physical address of the router.
• IP Address - The LAN IP address of the router.
• Subnet Mask - The subnet mask associated with the LAN IP address.
• DHCP Server - This field displays the current settings of DHCP (Dynamic Host Configuration Protocol) Server, and you can configure them on the Network > DHCP Server page.
• DHCP Server - Indicates whether the DHCP server is enabled or disabled. It is enabled by default and the router acts as a DHCP server.
• IP Address Pool - The IP address range for the DHCP server to assign IP addresses.
• Dynamic DNS - This field displays the current settings of the Dynamic DNS (Domain Name System), and you can configure them on the Advanced > Network > Dynamic DNS page.
• Service Provider - The Dynamic DNS service provider you have signed up for.
6.3.2 Internet Port
1. Visit http://tplinkwifi.net, and log in with your TP-Link ID or the password you set for the router.
2. Go to Advanced > Network > Internet Port.
3. Select a port for internet service. Make sure the cable is securely connected to this port on your router.
Note: Some models may not support this feature. Images may differ from actual products.
• Turn All Ports to LAN - Enable it and all the Ethernet ports will be used for LAN ports.

6.3.3 Internet Port Negotiation Speed Setting
Note: 3G/4G USB Modem mode and USB Tethering mode don’t have this function.
1. Visit http://tplinkwifi.net, and log in with your TP-Link ID or the password you set for the router.
2. Go to Advanced > Network > Internet Port and locate the Internet Port Negotiation Speed Setting section.
3. Select the duplex type from the drop-down list and click SAVE.
6.3.4 Flow Controller
When enabled, when a device gets overloaded it will send a PAUSE frame to notify the peer device to stop sending data for a specified period of time, thus avoiding the packet loss caused by congestion.
1. Visit http://tplinkwifi.net, and log in with your TP-Link ID or the password you set for the router.
2. Go to Advanced > Network > Internet Port. Locate the Flow Controller section.
3. Select the desired option and click SAVE.
6.3.5 Internet Settings for Router Mode
1. Visit http://tplinkwifi.net, and log in with your TP-Link ID or the password you set for the router.
2. Go to Advanced > Network > Internet.
3. Locate the Network Connection Priority section. Select your internet connection type and tap the Settings icon , then enter the settings provided by your ISP.
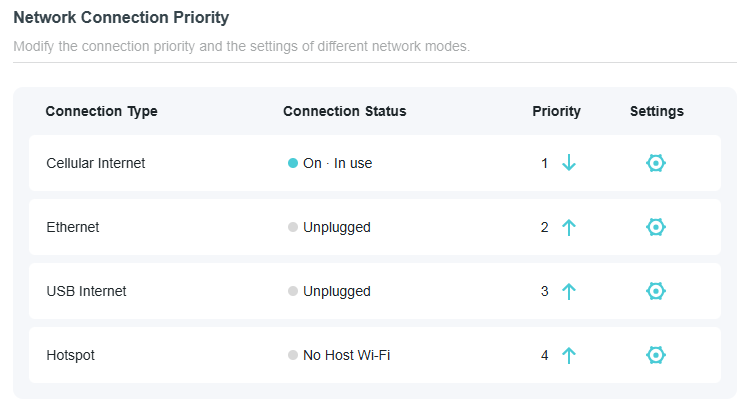
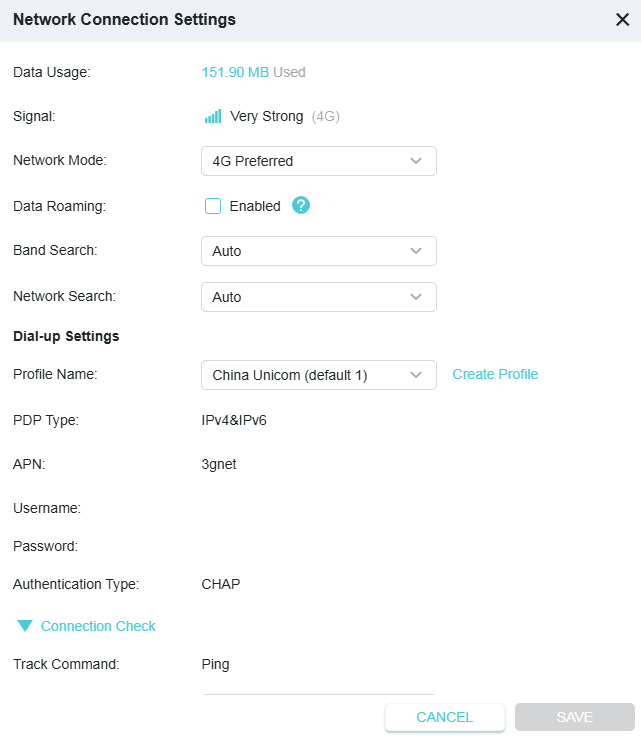
• Data Usage - The total amount of cellular data consumed.
• Signal - Displays the strength and generation of your cellular connection.
• Network Mode - Please select your preferred cellular technology network type. 4G Prefered, 4G Only, and 3G Only are allowed.
• Data Roaming - Enable if you allow your device to connect to other carriers' mobile networks when you are outside your provider’s coverage area (such as traveling internationally). Leaving it disabled prevents unexpected roaming fees.
• Band Search - Determines how the device searches for specific cellular frequency bands. Auto allows the device to dynamically switch to the frequency band that offers the best signal and performance.
• Network Search - Determines how the device selects its mobile operator. Auto allows the device to seamlessly search for and connect to your home network operator without manual intervention.
• Profile Name - The name assigned to this specific network configuration profile.
• PDP Type - Packet Data Protocol Type. This specifies the internet protocol version your cellular network uses to assign addresses.
• APN - Access Point Name. This is the structural identifier or gateway name that your device uses to establish a data connection between your carrier's cellular network and the public internet.
• Username/Password - Enter the username and password provided by your ISP if any.
• Authentication Type - The security protocol used to verify your device credentials when connecting to the network.
• Connection Check - The router uses Ping to check the connection status of the Ethernet/Hotspot/USB/Cellular Internet connection type periodically to check whether the internet is available.
6.3.6 NAT
Note: 3G/4G/5G USB Modem mode and USB Tethering mode don’t have this function.
The router’s NAT (Network Address Translation) feature makes devices on the LAN use the same public IP address to communicate with devices on the internet, which protects the local network by hiding IP addresses of the devices.
1. Visit http://tplinkwifi.net, and log in with your TP-Link ID or the password you set for the router.
2. Go to Advanced > Network > Internet and locate the NAT section.
3. Enable NAT, then click SAVE.
4. NAT is enable by dafault and it’s highly recommended. If you disable it, you may have no access to the internet and NAT Forwarding will not take effect.
6.3.7 DoT/DoH
Encrypting DNS queries by TLS/HTTPS, DoT/DoH can provide you with a more secure and private internet connection.
1. Visit http://tplinkwifi.net, and log in with your TP-Link ID or the password you set for the router.
2. Go to Advanced > Network > Internet and locate the DoT/DoH section.
3. Select a DNS Privacy: DoT/DoH.
4. Select a DNS Mode.
• Default Mode: In this mode, the router will prioritize the secure DNS server you selected. If the server is unavailable, the default DNS server will take effect.
• Ultra Secure Mode: In this mode, the router only uses the secure DNS server you selected. If the server is unavailable, the internet connectivity will be affected.
5. Enter the DNS Server. You can detect whether the selected DNS servers are available or not. When you save the settings, DoH/DoT will be applied to these DNS servers, and the Primary & Secondary DNS servers you’ve set won’t take effect.
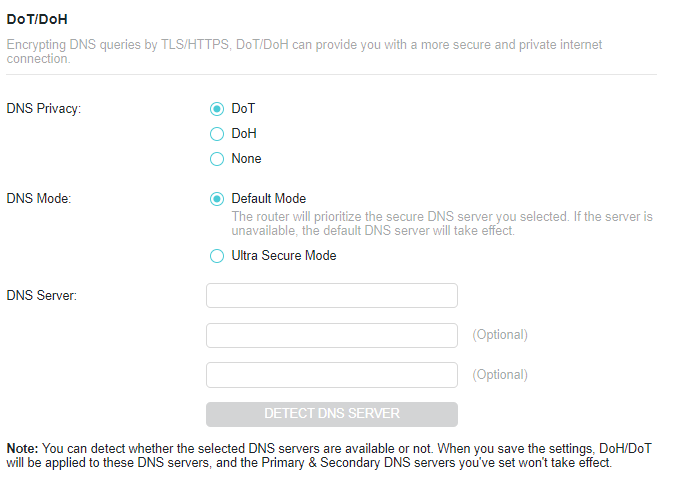
6.3.8 Multi-WAN Backup
Multi-WAN is supported in the Router/USB Internet/Hotspot mode. When the preferred mode fails, the backup mode will take over network data transmission, ensuring network continuity and reliability.
Note: USB Internet includes the 3G/4G USB Modem mode and USB Tethering mode.
1. Visit http://tplinkwifi.net, and log in with your TP-Link ID or the password you set for the router.
2. Go to Advanced > Network > Internet >Multi-WAN.
3. Choose a backup mode and configure the settings.
• For Backup Mode, you can modify the connection priority and the settings of each mode in Network Connection Priority. To set Multi-WAN Backup priority, click  /
/  at each mode. The mode with the 1st priority will be set as the preferred mode, and the mode with the 2nd priority will be set as the backup mode. when the preferred mode fails, the backup mode will take over network data transmission.
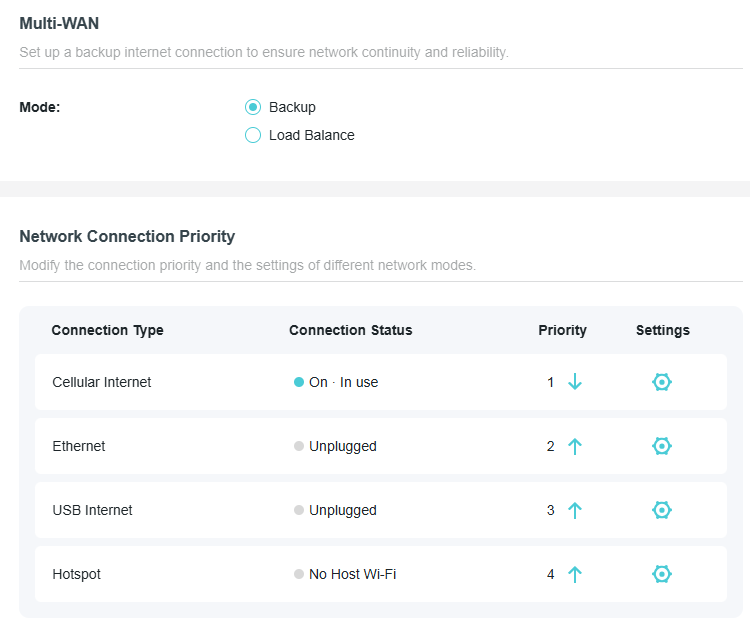
• For Load Balance Mode, you can set the traffic allocation priority in Network Connection.
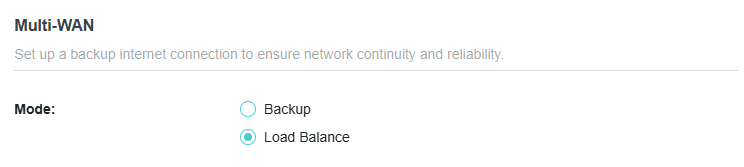
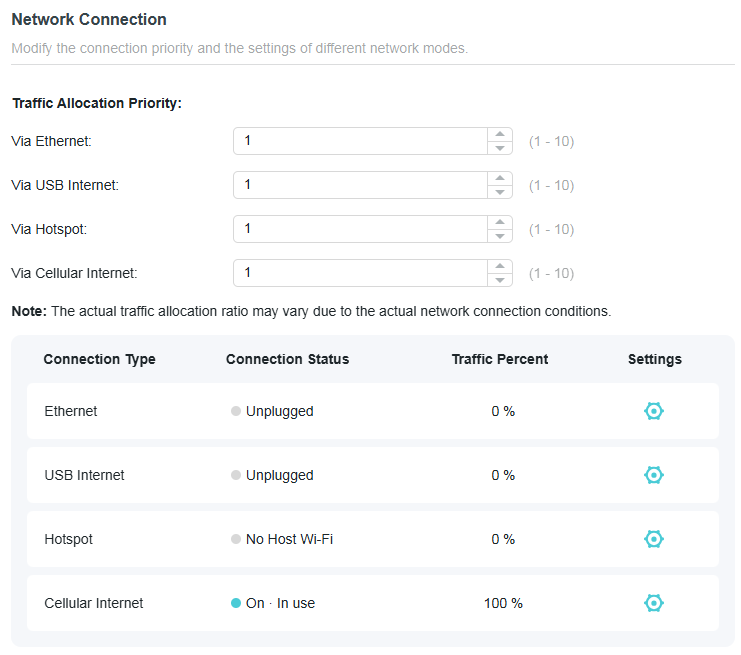
6.3.9 LAN
1. Visit http://tplinkwifi.net, and log in with your TP-Link ID or the password you set for the router.
2. Go to Advanced > Network > LAN.
3. Configure the IP parameters of the LAN and click SAVE.
• MAC Address - The physical address of the LAN ports. The value can not be changed.
• IP Address - Enter the IP address in dotted-decimal notation of your router (the default one is 192.168.0.1).
• Subnet Mask - An address code that determines the size of the network. Normally 255.255.255.0 is used as the subnet mask.
Note:
• If you have changed the IP address, you must use the new IP address to log in.
• If the new IP address you set is not in the same subnet as the old one, the IP address pool in the DHCP Server will be configured automatically, but the Virtual Server and DMZ Host will not take effect until they are re-configured.
6.3.10 IGMP
IGMP (Internet Group Management Protocol) helps the router to identify which clients are subscribed to specific multicast groups within a local network. This allows for efficient transmission of multicast data packets, avoiding unnecessary traffic waste and improving network performance.
IGMP can be used to manage multicast transmission in IPTV. If you want to set up IPTV to enable Internet/IPTV/Phone service provided by your internet service provider (ISP), follow the steps:
Before you start, make sure your ISP provides the networking service based on IGMP technology, e.g., British Telecom(BT) and Talk Talk in UK:
1. Visit http://tplinkwifi.net, and log in with your TP-Link ID or the password you set for the router.
2. Go to Advanced > Network > IGMP.
1 ) Tick the IGMP Proxy and IGMP Snooping checkbox, then select the IGMP Version, either V2 or V3, as required by your ISP.
2 ) Click SAVE.
3 ) After configuring IGMP proxy, IPTV can work behind your router now. You can connect your set-top box to any of the router’s Ethernet port.
6.3.11 DHCP Server
By default, the DHCP (Dynamic Host Configuration Protocol) Server is enabled and the router acts as a DHCP server; it dynamically assigns TCP/IP parameters to client devices from the IP Address Pool. You can change the settings of DHCP Server if necessary, and you can reserve LAN IP addresses for specified client devices.
• To specify the IP address that the router assigns:
1. Visit http://tplinkwifi.net, and log in with your TP-Link ID or the password you set for the router.
2. Go to Advanced > Network > DHCP Server and locate the DHCP Server section.
1. Tick the Enable checkbox.
2. Enter the starting and ending IP addresses in the IP Address Pool.
3. Enter other parameters if the ISP offers. The Default Gateway is automatically filled in and is the same as the LAN IP address of the router.
4. Click SAVE.
Note: To use the DHCP server function of the router, you must configure all computers on the LAN as Obtain an IP Address automatically.
• To reserve an IP address for a specified client device:
1. Visit http://tplinkwifi.net, and log in with your TP-Link ID or the password you set for the router.
2. Go to Advanced > Network > DHCP Server and locate the Address Reservation section.
3. Click Add in the Address Reservation section.
4. Click VIEW CONNECTED DEVICES and select the you device you want to reserve an IP for. Then the MAC and IP Address will be automatically filled in. You can also enter the MAC and IP address of the client device.
• To check the DHCP client list:
1. Visit http://tplinkwifi.net, and log in with your TP-Link ID or the password you set for the router.
2. Go to Advanced > Network > DHCP Server and locate the DHCP Client List section. You can see the device information of the list.
3. Click Refresh to see the current attached devices.
6.3.12 Dynamic DNS
The router offers the DDNS (Dynamic Domain Name System) feature, which allows the hosting of a website, FTP server, or e-mail server with a fixed domain name (named by yourself) and a dynamic IP address. Thus your friends can connect to your server by entering your domain name no matter what your IP address is.
Before using this feature, you need to sign up for DDNS service providers such as www.comexe.cn, www.dyndns.org, or www.noip.com. The Dynamic DNS client service provider will give you a password or key.
1. Visit http://tplinkwifi.net, and log in with your TP-Link ID or the password you set for the router.
2. Go to Advanced > Network > Dynamic DNS.
3. Select the DDNS Service Provider: TP-Link, NO-IP or DynDNS. It is recommended to select TP-Link so that you can enjoy TP-Link’s superior DDNS service. Otherwise, please select NO-IP or DynDNS. If you don’t have a DDNS account, you have to register first by clicking Register Now.
Note: To enjoy TP-Link’s DDNS service, you have to log in with a TP-Link ID. If you have not logged in with one, click log in.
4. Click Register in the Domain Name List if you have selected TP-Link, and enter the Domain Name as needed.
If you have selected NO-IP or DynDNS, enter the username, password and domain name of your account.
5. Click LOG IN AND SAVE.
Note: If you want to use a new DDNS account, please click LOGOUT first, and then log in with a new account.
6.3.13 Static Routing
Static Routing is a form of routing that is configured manually by a network administrator or a user by adding entries into a routing table. The manually-configured routing information guides the router in forwarding data packets to the specific destination.
I want to:
Visit multiple networks and servers at the same time.
For example, in a small office, my PC can surf the internet through Router A, but I also want to visit my company’s network. Now I have a switch and Router B. I connect the devices as shown in the following figure so that the physical connection between my PC and my company’s server is established. To surf the internet and visit my company’s network at the same time, I need to configure the static routing.
*Image may differ from your actual product.
How can I do that?
1. Change the routers’ LAN IP addresses to two different IP addresses on the same subnet. Disable Router B’s DHCP function.
2. Visit http://tplinkwifi.net, and log in with your TP-Link ID or the password you set for Router A.
3. Go to Advanced > Network > Routing and locate the Static Routing section.
4. Click Add and finish the settings according to the following explanations:
• Network Destination - The destination IP address that you want to assign to a static route, such as 192.168.0.100/24. This IP address cannot be on the same subnet with the WAN IP or LAN IP of Router A.
• Default Gateway - The IP address of the gateway device to which the data packets will be sent. This IP address must be on the same subnet with the router’s IP which sends out data. In the example, the data packets will be sent to the LAN port of Router B and then to the Server, so the default gateway should be 192.168.1.2.
• Interface - Determined by the port (WAN/LAN) that sends out data packets. In the example, the data are sent to the gateway through the LAN port of Router A, so LAN/WLAN should be selected.
• Description - Enter a description for this static routing entry.
5. Click SAVE.
6. Check the Routing Table below. If you can find the entry you’ve set, the static routing is set successfully.
6.4 Cellular Settings
6.4.1 PIN Management
PIN (Personal Identification Number) is used to protect the SIM card from embezzlement. PIN Management allows you to easily change the PIN settings of your SIM card as needed. Follow the steps below to change your PIN settings.
1. Visit http://tplinkwifi.net, and log in with your TP-Link ID or the password you set for the router.
2. Go to Advanced > Cellular Settings > SIM > PIN Management.
3. Configure the following settings for your SIM card and save.
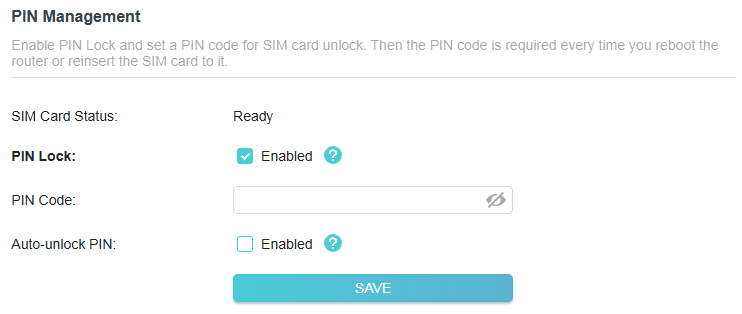
• SIM Card Status - Displays the status of your SIM card.
• PIN Lock - Toggle on to enable PIN Lock. Once it is enabled, every time you start the router with this SIM card inserted, you need to enter the PIN.
• PIN Code - Enter the PIN to unlock the SIM card. It consists of 4-8 digits.
• Auto-unlock PIN - When the PIN is required upon router restarting or inserting a SIM card, it will be validated automatically, saving you the trouble to enter the PIN each time you start the router or insert a SIM card. If validation failed, you need to enter the PIN on this page.
6.4.2 Cellular Data Usage
Cellular Data Usage is used to monitor the data usage of your router in real-time. You can limit your data usage according to your monthly allowance or total allowance and you will receive a warning if your data usage reaches the specified level.
1. Visit http://tplinkwifi.net, and log in with your TP-Link ID or the password you set for the router.
2. Go to Advanced > Cellular Settings > SIM > Cellular Data Usage.
3. Configure and save the following settings.
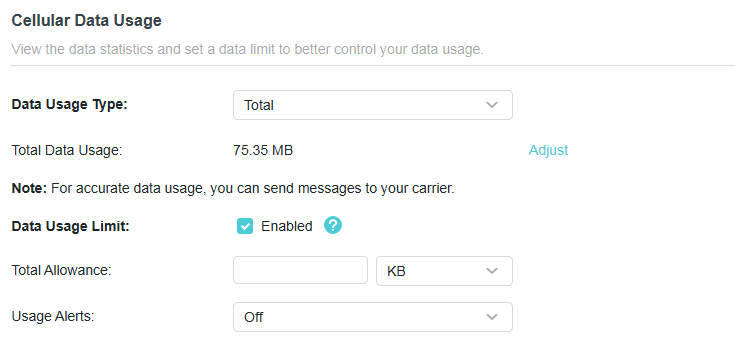
• Data Usage Type - Set the data usage type as Monthly or Total.
• Total Data Usage - Displays the exact amount of cellular data your device has consumed. Click Adjust to correct the total/monthly used data manually if the data is inaccurate.
• Data Usage Limit - Enable it to set total/monthly data allowance and usage alert to prevent data overuse.
• Total Allowance - Enter the allowed amount of total/monthly data. When data usage exceeds the allowed level, the router will disconnect from the internet.
• Usage Alerts - Choose a notification method if you want to receive a warning when data usage reaches the allowed level.
6.4.3 ISP Upgrade
You can upgrade your ISP information to ensure a smooth experience.
1. Visit http://tplinkwifi.net, and log in with your TP-Link ID or the password you set for the router.
2. Go to Advanced > Cellular Settings > SIM > ISP Upgrade. You can see the current ISP version.
3. You can upload a new ISP file or upgrade the current one.
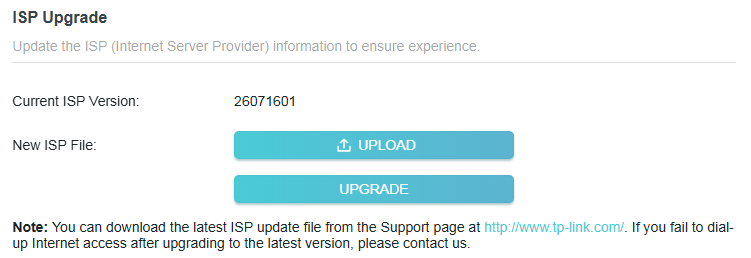
6.4.4 SMS
Use the SMS functions to view and write messages, keep drafts and specify the message center number. You can easily monitor your data usage by sending a message to your carrier.
• To check your inbox/outbox messages
1. Visit http://tplinkwifi.net, and log in with your TP-Link ID or the password you set for the router.
2. Go to Advanced > Cellular Settings > SMS. Then you can see your recived messages in Inbox and your sent messages in Outbox.
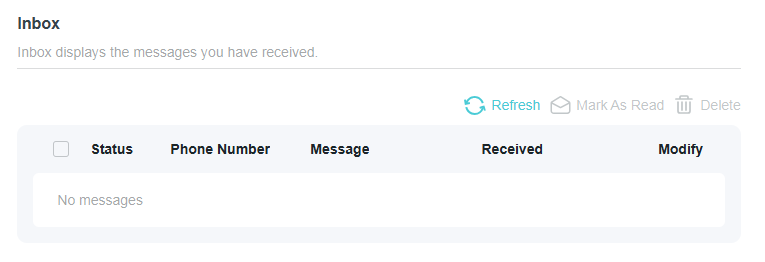
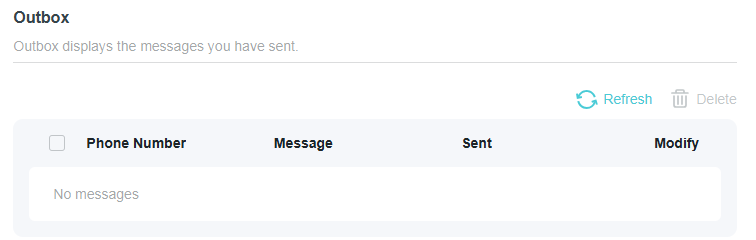
• To send a new message
1. Visit http://tplinkwifi.net, and log in with your TP-Link ID or the password you set for the router.
2. Go to Advanced > Cellular Settings > SMS.
3. On the New Message section, enter the receiver’s phone number and you message, then click SEND.
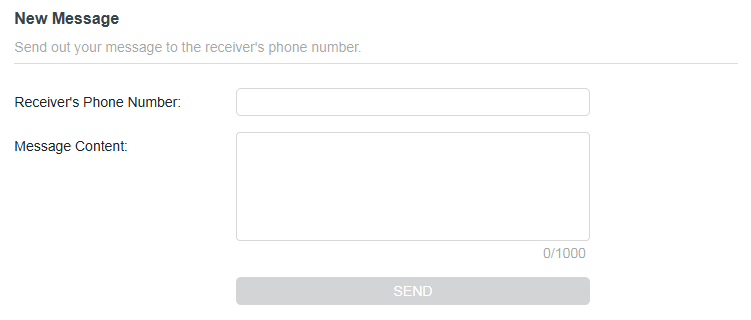
• To configure SMS setings
Message Center Number is the specific gateway phone number used to route all incoming and outgoing text messages for your carrier account. You can change the Message Center Number if you want. It is not recommended to change it for a wrong message center number will affect the SMS function of the router. When set to Auto, the device automatically pulls the correct routing configuration directly from your SIM card. When set to Manually, you can type in a custom routing number yourself (currently selected).
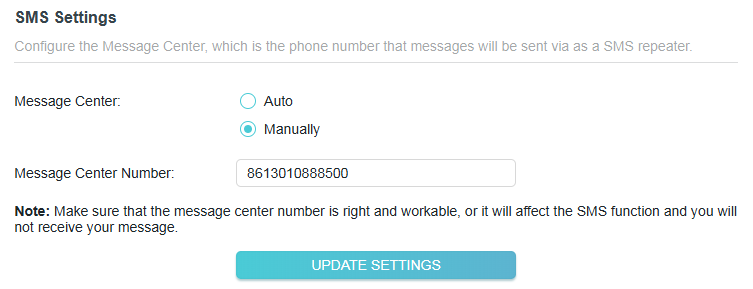
6.5 TP-Link Cloud Service
TP-Link Cloud service provides a better way to manage your cloud devices. Log in to your router with a TP-Link ID, and you can easily monitor and manage your home network when you are out and about via the Tether app. To ensure that your router stays new and gets better over time, the TP-Link Cloud will notify you when an important firmware upgrade is available. Surely you can also manage multiple TP-Link Cloud devices with a single TP-Link ID.
This section introduces how to register a new TP-Link ID, bind or unbind TP-Link IDs to manage your router, and the Tether app with which you can manage your home network no matter where you may find yourself.
6.5.1 Register a TP-Link ID
If you have skipped the registration during the Quick Setup process, you can:
1. Visit http://tplinkwifi.net, and log in with the password you set for the router.
2. Go to Advanced > TP-Link ID or click TP-Link ID on the very top of the page.
3. Click Sign Up and follow the instructions to register a TP-Link ID.
4. After activating your TP-Link ID, come back to the TP-Link ID page to log in. The TP-Link ID used to log in to the router for the first time will be automatically bound as an Admin.
Note:
• To learn more about the Admin and User TP-Link ID, refer to Manage the User TP-Link IDs.
• Once you have registered a TP-Link ID on the web management page, you can only register another TPLink ID via the Tether APP. Please refer to Log In via Tether to install the app.
• If you want to unbind the admin TP-Link ID from your router, please go to Advanced > TP-Link ID, an click Unbind in the Device Information section.
6.5.2 Change Your TP-Link ID Information
Follow the steps below to change your email address and password of your TP-Link ID as needed.
1. Visit http://tplinkwifi.net, and log in with your TP-Link ID.
2. Go to Advanced > TP-Link ID, and focus on the TP-Link ID section.
• To change your email address:
1. Click behind the Email.
2. Enter the password of your TP-Link ID, then a new email address. And click SAVE.
• To change your password:
1. Click behind the Password.
2. Enter the current password, then a new password twice. And click SAVE.
6.5.3 Manage the User TP-Link IDs
The TP-Link ID used to log in to the router for the first time will be automatically bound as the Owner account. The Owner account can add or remove other TP-Link IDs to or from the same router. All accounts can monitor and manage the router locally or remotely, but only the owner account can:
• Reset the router to its factory default settings either on the web management page or in the Tether app.
• Add/remove other TP-Link IDs to/from the router.
Add TP-Link ID to Manage the Router
1. Visit http://tplinkwifi.net, and log in with your TP-Link ID.
2. Go to Advanced > TP-Link ID, and focus on the Bound TP-Link IDs section.
3. Click , enter another TP-Link ID as needed and click SAVE.
Note: If you need another TP-Link ID, please register a new one via the Tether app. Refer to Manage the Router via the TP-Link Tether App to install the app and register a new TP-Link ID.
4. The new TP-Link ID will be displayed in the Bound TP-Link IDs table.
Remove TP-Link ID(s) from Managing the Router
1. Visit http://tplinkwifi.net, and log in with your TP-Link ID.
2. Go to Advanced > TP-Link ID, and focus on the Bound TP-Link IDs section.
3. Tick Unbind of the TP-Link ID(s) you want to remove.
6.5.4 Manage the Router via the TP-Link Tether App
The Tether app runs on iOS and Android devices, such as smartphones and tablets.
1. Launch the Apple App Store or Google Play store and search “TP-Link Tether” or simply scan the QR code to download and install the app.
2. Launch the Tether app and log in with your TP-Link ID. If you don’t have a TP-Link ID, create one first.
3. Connect your device to the router’s wireless network.
4. Go back to the Tether app, select the model of your router and log in with the password you set for the router.
5. Manage your router as needed.
Note: If you need to remotely access your router from your smart devices, you need to:
• Log in with your TP-Link ID. If you don’t have one, refer to Register a TP-Link ID.
• Make sure your smartphone or tablet can access the internet with cellular data or a Wi-Fi network.
6.6 Wireless
6.6.1 Wireless Settings
1. Visit http://tplinkwifi.net, and log in with your TP-Link ID or the password you set for the router.
2. Go to Advanced > Wireless > Wireless Settings.
3. Configure the wireless settings for the wireless network and click SAVE.
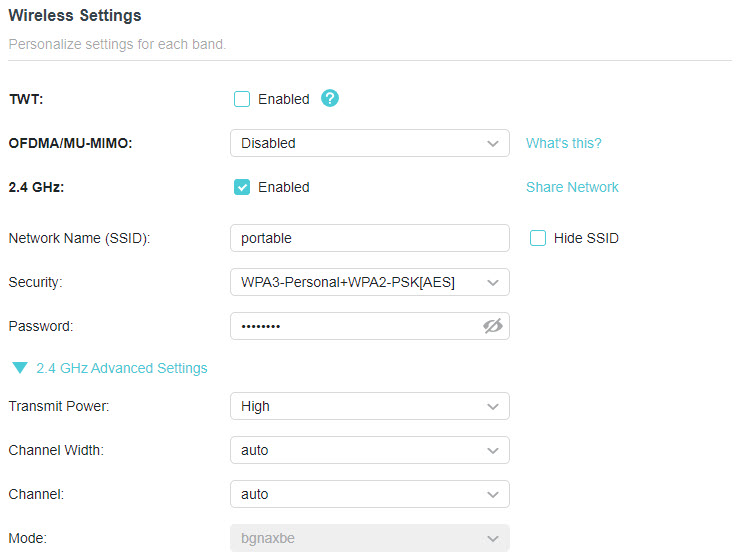
![a TP-Link router "5 GHz" Wireless Settings configuration page. The network is enabled with the SSID "portable_5G" and security set to WPA3-Personal+WPA2-PSK[AES]. Advanced settings show Transmit Power as High, Channel Width as 80, and Channel and Mode both set to auto.](https://static.tp-link.com/upload/resource-section/Wireless_Settings-2_20251230061914u.jpg)
• TWT - Target Wake Time allows 802.11ax routers and clients to negotiate their periods to transmit and receive data packets. Clients only wake up at TWT sessions and remain in sleep mode for the rest of the time, which significantly extend their battery life.
• OFDMA/MU-MIMO - This feature enables multiple users to transmit data simultaneously, and thus greatly improves speed and efficiency. Noted that only when your clients also support OFDMA, can you fully enjoy the benefits.
• 2.4GHz/5GHz - Select this checkbox to enable the 2.4GHz/5GHz wireless network.
• Share Network- Click to save the Wi-Fi settings for sharing.
• Network Name (SSID) - Enter a value of up to 32 characters. The same Name (SSID) must be assigned to all wireless devices in your network.
• Hide SSID - Select this checkbox if you want to hide the network name (SSID) from the Wi-Fi network list. In this case, you need to manually join the network.
• Security - Select an option from the Security drop-down list. We recommend you don’t change the default settings unless necessary.
• Password - Set a password for the wireless network. The value is case-sensitive.
• Transmit Power - Select High, Middle or Low to specify the data transmit power. The default and recommended setting is High.
• Channel Width - Select a channel width (bandwidth) for the wireless network.
• Channel - Select an operating channel for the wireless network. For the 2.4 GHz and 5GHz bands, it is recommended to leave the channel to Auto, if you are not experiencing the intermittent wireless connection issue.
• Mode - You can choose the appropriate “Mixed” mode.
6.6.2 MLO Network
MLO (Multi-Link Operation) network enables the connected Wi-Fi 7 clients to simultaneously send and receive data across different frequency bands, greatly improving the transmission rate and reliability.
Note: Some models may not have the MLO network. Images may differ from actual products.
1. Go to Advanced > Wireless > Wireless Settings.
2. Locate the MLO Network section and enable MLO Network.
3. Specify an SSID in Network Name (SSID).
4. Select the Security type. Specify a password if the security type you selected requires it. This value is case-sensitive.
5. You can also click Share Network to share the SSID and password with your guests.
6. If you select Hide SSID, your SSID won’t display when you scan for local wireless networks on your wireless device and you need to manually join the MLO network.
7. Click SAVE to save your settings.
6.6.3 Guest Network
Guest Network allows you to provide Wi-Fi access for guests without disclosing your host network. When you have guests in your house, apartment, or workplace, you can create a guest network for them. In addition, you can customize guest network settings to ensure network security and privacy.
• Create a Guest Network
1. Visit http://tplinkwifi.net, and log in with your TP-Link ID or the password you set for the router.
2. Go to Advanced > Wireless > Guest Network.
3. Enable the 2.4GHz/5GHz guest network according to your needs.
4. Customize the SSID. Don‘t select Hide SSID unless you want your guests to manually input the SSID for guest network access.
5. Select the Security type and customize your own password. If No security is selected, no password is needed to access your guest network.
6. Click SAVE. Now you guests can access your guest network using the SSID and password you set!
• Customize Guest Network Options
1. Visit http://tplinkwifi.net, and log in with your TP-Link ID or the password you set for the router.
2. Go to Advanced > Wireless > Guest Network. Locate the Guest Permissions section.
3. Customize guest network options according to your needs.
• Allow guests to see each other
Tick this checkbox if you want to allow the wireless clients on your guest network to communicate with each other via methods such as network neighbors and Ping.
• Allow guests to access my local network
Tick this checkbox if you want to allow the wireless clients on your guest network to communicate with the devices connected to your router’s LAN ports or main network via methods such as network neighbors and Ping.
4. Click SAVE. Now you can ensure network security and privacy!
6.6.4 Wireless Schedule
The wireless function can be automatically off at a specific time when you do not need the wireless function.
1. Visit http://tplinkwifi.net, and log in with your TP-Link ID or the password you set for the router.
2. Go to Advanced > Wireless > Wireless Schedule.
3. Enable the Wireless Schedule function.
4. Click Add to specify a wireless off period during which you need the wireless off automatically, and click SAVE.
Note:
• The effective wireless schedule is based on the time of the router. You can go to Advanced > System > Time to modify the time.
• The wireless network will be automatically turned on after the time period you set.
6.6.5 WPS
WPS (Wi-Fi Protected Setup) can help you to quickly and securely connect to a network. This section will guide you to add a new wireless device to your router’s network quickly via WPS.
Note:
• The WPS function cannot be configured if the wireless function of the router is disabled. Please make sure the wireless function is enabled before configuration.
1. Visit http://tplinkwifi.net, and log in with your TP-Link ID or the password you set for the router.
2. Go to Advanced > Wireless > WPS.
3. Follow one of the following methods to connect your client device to the router’s Wi-Fi network.
Method 1: Using a PIN
• Connects via the Client’s PIN
1. Keep the WPS Status as Enabled and select Client’s PIN.
2. Enter the PIN of your device and click CONNECT. Then your device will get connected to the router.
• Connects via the Router’s PIN
1. Keep the WPS Status as Enabled and select Router’s PIN.
2. Enter the router’s PIN on your personal device. You can also generate a new one.
Note: PIN (Personal Identification Number) is an eight-character identification number preset to each router. WPS supported devices can connect to your router with the PIN.
Method 2: Using the WPS Button on the Web Screen
Click Start on the screen. Within two minutes, enable WPS on your personal device.
A Device-(XX-XX-XX-XX-XX-XX) Connected message should appear on the screen, indicating successful WPS connection.
Note: XX-XX-XX-XX-XX-XX is the MAC address of your device.
Method 3: Using the WPS Button on the Router
Press the router’s WPS button. Within two minutes, enable WPS on your personal device.
6.6.6 Additional Settings
1. Visit http://tplinkwifi.net, and log in with your TP-Link ID or the password you set for the router.
2. Go to Advanced > Wireless > Additional Settings.
3. Configure the advanced settings of your wireless network and click SAVE.
Note: If you are not familiar with the setting items on this page, it’s strongly recommended to keep the provided default values; otherwise it may result in lower wireless network performance.
• WMM - WMM function can guarantee the packets with high-priority messages being transmitted preferentially.
• Short GI - This function reduces the time between data packets to potentially increase the throughput of wireless network.
• AP Isolation - This function isolates all connected wireless stations so that wireless stations cannot access each other through WLAN.
• Airtime Fairness - This function can improve the overall network performance by sacrificing a little bit of network time on your slow devices.
• Beacon Interval - Enter a value between 40-1000 milliseconds for Beacon Interval here. Beacon Interval value determines the time interval of the beacons. The beacons are the packets sent by the router to synchronize a wireless network. The default value is 100.
• RTS Threshold - Here you can specify the RTS (Request to Send) Threshold. If the packet is larger than the specified RTS Threshold size, the router will send RTS frames to a particular receiving station and negotiate the sending of a data frame. The default value is 2346.
• DTIM Interval - This value determines the interval of the Delivery Traffic Indication Message (DTIM). A DTIM field is a countdown field informing clients of the next window for listening to broadcast and multicast messages. When the router has buffered broadcast or multicast messages for associated clients, it sends the next DTIM with a DTIM Interval value. You can specify the value between 1-255 Beacon Intervals. The default value is 1, which indicates the DTIM Interval is the same as Beacon Interval.
• Group Key Update Period - Enter a number of seconds (minimum 30) to control the time interval for the encryption key automatic renewal. The default value is 0, meaning no key renewal.
6.7 USB Storage Device
Insert your USB storage device into the router’s USB port and then access files stored there locally or remotely.
Tips:
• If you use USB hubs, make sure no more than 4 devices are connected to the router.
• If the USB storage device requires using bundled external power, make sure the external power has been connected.
• If you use a USB hard drive, make sure its file system is FAT32, exFat, NTFS or HFS+.
• Before you physically disconnect a USB device from the router, safely remove it to avoid data damage: Go to Advanced > USB > Storage Device and click Remove.
6.7.1 Access the USB Device Locally
Insert your USB storage device into the router’s USB port and then refer to the following table to access files stored on your USB storage device.
| Windows computer |
• Method 1:
• Method 2:
|
|---|---|
| Mac |
1 ) Select Go > Connect to Server.
4 ) When prompted, select the Guest radio box. (If you have set up a username and a password to deny anonymous access to the USB disks, you should select the Registered User radio box. To learn how to set up an account for the access, refer to To Set Up Authentication for Data Security.) |
| Tablet | Use a third-party app for network files management. |
Tips:
You can also access your USB storage device by using your Network/Media Server Name as the server address. Refer to To Customize the Address of the USB Storage Device to learn more.
6.7.2 Access the USB Device Remotely
You can access your USB disk outside the local area network. For example, you can:
• Share photos and other large files with your friends without logging in to (and paying for) a photo-sharing site or email system.
• Get a safe backup for the materials for a presentation.
• Remove the files on your camera’s memory card from time to time during the journey.
Note: If your ISP assigns a private WAN IP address (such as 192.168.x.x or 10.x.x.x), you cannot use this feature because private addresses are not routed on the internet.
Follow the steps below to configure remote access settings.
1. Visit http://tplinkwifi.net, and log in with your TP-Link ID or the password you set for the router.
2. Go to Advanced > USB > Storage Device.
3. Tick the Internet FTP checkbox, and then click SAVE.
4. Refer to the following table to access your USB disk remotely.
| Computer |
1 ) Open the Windows Explorer (or go to Computer, only for Windows users) or open a web browser.
3 ) Press Enter on the keyboard. |
|---|---|
| Tablet | Use a third-party app for network files management. |
Tips: Click Dynamic DNS to learn how to set up a domain name for you router.
6.7.3 Customize the Access Settings
By default, all the network clients can access all folders on your USB disk. You can customize your sharing settings by setting a sharing account, sharing specific contents and setting a new sharing address on the router’s web management page.
1. Visit http://tplinkwifi.net, and log in with your TP-Link ID or the password you set for the router.
2. Go to Advanced > USB > Storage Device.
• To Customize the Address of the USB Storage Device
You can customize the server name and use the name to access your USB storage device.
1. In the Access Method session, make sure Samba for Windows Samba for macOS/ Linux is enabled, and enter a Network/Media Server Name as you like, such as MyShare, then click SAVE.
2. Now you can access the USB storage device by visiting \\MyShare (for Windows) or smb://MyShare (for Mac).
• To Only Share Specific Content
Focus on the File Sharing section. Specify sharing folders that you want to share and click SAVE.
• To Set Up Authentication for Data Security
You can set up authentication for your USB storage device so that network clients will be required to enter username and password when accessing the USB storage device.
1. In the File Sharing section, enable Secure Sharing.
2. Click to modify the access account, and pay attention to the default username and password. Accessing as an administrator can read and modify the shared folders while visitors can only read the shared folders.
Note:
1. For Windows users, do not set the sharing username the same as the Windows username. Otherwise, Windows credential mechanism may cause the following problems:
• If the sharing password is also the same as the Windows password, authentication will not work since the Windows will automatically use its account information for USB access.
• If the sharing password is different from the Windows password, the Windows will be unable to remember your credentials and you will always be required to enter the sharing password for USB access.
2. Due to Windows credential mechanism, you might be unable to access the USB disk after changing Authentication settings. Please log out from the Windows and try to access again. Or you can change the address of the USB disk by referring to To Customize the Address of the USB Storage Device.
6.7.4 Media Sharing
The feature of Media Sharing allows you to view photos, play music and watch movies stored on the USB storage device directly from DLNA-supported devices, such as your computer, tablet and PS2/3/4.
Note: Some models may not support this feature. Images may differ from actual products.
1. Visit http://tplinkwifi.net, and log in with your TP-Link ID or the password you set for the router.
2. Go to Advanced > USB > Storage Device.
3. Enable Media Sharing.
4. When your USB storage device is inserted into the router, your DLNA-supported devices (such as your computer and pad) connected to the router can detect and play the media files on the USB storage devices.
5. Refer to the following table for detailed instructions.
| Windows Computer |
Go to Computer > Network, then click the Media Server Name (Model number-share by default) in the Media Devices section.
|
|---|---|
| Tablet | • Use a third-party DLNA-supported player. |
6.8 NAT Forwarding
The router’s NAT (Network Address Translation) feature makes the devices on the LAN use the same public IP address to communicate on the internet, which protects the local network by hiding IP addresses of the devices. However, it also brings about the problem that external hosts cannot initiatively communicate with the specified devices in the local network.
With the forwarding feature, the router can traverse the isolation of NAT so that clients on the internet can reach devices on the LAN and realize some specific functions. The Mercusys router includes four forwarding rules. If two or more rules are set, the priority of implementation from high to low is Port Forwarding, Port Triggering, UPNP and DMZ.
6.8.1 Port Forwarding
When you build up a server in the local network and want to share it on the internet, Port Forwarding can realize the service and provide it to internet users. At the same time Port Forwarding can keep the local network safe as other services are still invisible from the internet.
Port Forwarding can be used to set up public services in your local network, such as HTTP, FTP, DNS, POP3/SMTP and Telnet. Different service uses different service port. Port 80 is used in HTTP service, port 21 in FTP service, port 25 in SMTP service and port 110 in POP3 service. Please verify the service port number before the configuration.
I want to:
Share my personal website I’ve built in local network with my friends through the internet.
For example, the personal website has been built in my home PC (192.168.1.100). I hope that my friends on the internet can visit my website in some way. My PC is connected to the router with the WAN IP address 218.18.232.154.
1. Set your PC to a static IP address, for example 192.168.1.100.
2. Visit http://tplinkwifi.net, and log in with your TP-Link ID or the password you set for the router.
3. Go to Advanced > NAT Forwarding > Port Forwarding.
4. Click Add.
5. Click VIEW COMMON SERVICES and select HTTP. The External Port, Internal Port and Protocol will be automatically filled in.
6. Click VIEW CONNECTED DEVICES and select your home PC. The Device IP Address will be automatically filled in. Or enter the PC’s IP address 192.168.0.100 manually in the Device IP Address field.
7. Click SAVE.
Tips:
• It is recommended to keep the default settings of Internal Port and Protocol if you are not clear about which port and protocol to use.
• If the service you want to use is not in the common services list, you can enter the corresponding parameters manually. You should verify the port number that the service needs.
• You can add multiple port forwarding rules if you want to provide several services in a router. Please note that the External Port should not be overlapped.
Done!
Users on the internet can enter http:// WAN IP (in this example: http:// 218.18.232.154) to visit your personal website.
Tips:
• The WAN IP should be a public IP address. For the WAN IP is assigned dynamically by the ISP, it is recommended to apply and register a domain name for the WAN referring to Dynamic DNS. Then users on the internet can use http:// domain name to visit the website.
• If you have changed the default External Port, you should use http:// WAN IP: External Port or http:// domain name: External Port to visit the website.
6.8.2 Port Triggering
Port Triggering can specify a triggering port and its corresponding external ports. When a host on the local network initiates a connection to the triggering port, all the external ports will be opened for subsequent connections. The router can record the IP address of the host. When the data from the internet return to the external ports, the router can forward them to the corresponding host. Port Triggering is mainly applied to online games, VoIPs, video players and common applications including MSN Gaming Zone, Dialpad and Quick Time 4 players, etc.
Follow the steps below to configure the Port Triggering rules:
1. Visit http://tplinkwifi.net, and log in with your TP-Link ID or the password you set for the router.
2. Go to Advanced > NAT Forwarding > Port Triggering and click .
3. Click VIEW COMMON SERVICES, and select the desired application. The Triggering Port, Triggering Protocol and External Port will be automatically filled in. The following picture takes application MSN Gaming Zone as an example.
4. Click SAVE.
Tips:
• You can add multiple port triggering rules according to your network need.
• The triggering ports can not be overlapped.
• If the application you need is not listed in the Existing Applications list, please enter the parameters manually. You should verify the external ports the application uses first and enter them into External Port field according to the format the page displays.
6.8.3 UPnP
The UPnP (Universal Plug and Play) protocol allows applications or host devices to automatically find the front-end NAT device and send request to it to open the corresponding ports. With UPnP enabled, the applications or host devices on the local network and the internet can freely communicate with each other thus realizing the seamless connection of the network. You may need to enable the UPnP if you want to use applications for multiplayer gaming, peer-to-peer connections, real-time communication (such as VoIP or telephone conference) or remote assistance, etc.
Tips:
• UPnP is enabled by default in this router.
• Only the application supporting UPnP protocol can use this feature.
• UPnP feature needs the support of operating system (e.g. Windows Vista/ Windows 7/ Windows 8, etc. Some of operating system need to install the UPnP components).
For example, when you connect your Xbox to the router which has connected to the internet to play online games, UPnP will send request to the router to open the corresponding ports allowing the following data penetrating the NAT to transmit. Therefore, you can play Xbox online games without a hitch.
If necessary, you can follow the steps to change the status of UPnP.
1. Visit http://tplinkwifi.net, and log in with your TP-Link ID or the password you set for the router.
2. Go to Advanced > NAT Forwarding > UPnP and toggle on or off according to your needs.
6.8.4 DMZ
When a PC is set to be a DMZ (Demilitarized Zone) host on the local network, it is totally exposed to the internet, which can realize the unlimited bidirectional communication between internal hosts and external hosts. The DMZ host becomes a virtual server with all ports opened. When you are not clear about which ports to open in some special applications, such as IP camera and database software, you can set the PC to be a DMZ host.
Note:
When DMZ is enabled, the DMZ host is totally exposed to the internet, which may bring some potential safety hazards. If DMZ is not in use, please disable it in time.
I want to:
Make the home PC join the internet online game without port restriction.
For example, due to some port restriction, when playing the online games, you can log in normally but cannot join a team with other players. To solve this problem, set your PC as a DMZ host with all ports open.
How can I do that?
1. Assign a static IP address to your PC, for example 192.168.0.100.
2. Visit http://tplinkwifi.net, and log in with your TP-Link ID or the password you set for the router.
3. Go to Advanced > NAT Forwarding > DMZ and tick to enable DMZ.
4. Click VIEW CONNECTED DEVICES and select your PC. The Device IP Address will be automatically filled in. Or enter the PC’s IP address 192.168.0.100 manually in the DMZ Host IP Address field.
5. Click SAVE.
Done!
The configuration is completed. You’ve set your PC to a DMZ host and now you can make a team to game with other players.
6.9 Security
6.9.1 Protect the Network from Cyber Attacks
The SPI (Stateful Packet Inspection) Firewall protects the router from cyber attacks and validate the traffic that is passing through the router based on the protocol. This function is enabled by default.
1. Visit http://tplinkwifi.net, and log in with your TP-Link ID or the password you set for the router.
2. Go to Advanced > Security > Firewall. It’s recommended to keep the default settings.
6.9.2 Access Control
Access Control is used to block or allow specific client devices to access your network (via wired or wireless) based on a list of blocked devices (Deny List) or a list of allowed devices (Allow List).
I want to:
Block or allow specific client devices to access my network (via wired or wireless).
How can I do that?
1. Visit http://tplinkwifi.net, and log in with your TP-Link ID or the password you set for the router.
2. Go to Advanced > Security > Access Control.
3. Toggle on to enable Access Control.
4. Click Change Mode to select the access mode to either block (recommended) or allow the device(s) in the list.
To block specific device(s):
1 ) Select Deny List.
2 ) Click and select devices you want to be blocked, or enter the MAC address manually, and click ADD.
3 ) The Operation Succeeded message will appear on the screen, which means the selected devices have been successfully added to the Deny List.
To allow specific device(s):
1 ) Select Allow List and click CHANGE.
2 ) Your own device is in the Allow List by default and cannot be deleted. Click to add other devices to the Allow List.
• Add connected devices
1 ) Click Select From Device List.
2 ) Select the devices you want to be allowed and click ADD.
3 ) The Operation Succeeded message will appear on the screen, which means the selected devices have been successfully added to the Allow List.
• Add unconnected devices
1 ) Click Add Manually.
2 ) Enter the Device Name and MAC Address of the device you want to be allowed and click ADD.
3 ) The Operation Succeeded message will appear on the screen, which means the device has been successfully added to the Allow List.
Done!
Now you can block or allow specific client devices to access your network (via wired or wireless) using the Deny List or Allow List.
6.9.3 IP & MAC Binding
IP & MAC Binding, namely, ARP (Address Resolution Protocol) Binding, is used to bind network device’s IP address to its MAC address. This will prevent ARP Spoofing and other ARP attacks by denying network access to an device with matching IP address in the Binding list, but unrecognized MAC address.
I want to:
Prevent ARP spoofing and ARP attacks.
How can I do that?
1. Visit http://tplinkwifi.net, and log in with your TP-Link ID or the password you set for the router.
2. Go to Advanced > Security > IP & MAC Binding.
3. Enable IP & MAC Binding.
4. Bind your device(s) according to your need.
To bind the connected device(s):
1 ) Locate the ARP List section and enable Bind to bind the IP and MAC addresses of a specific device.
To add a binding entry:
1 ) Click in the Binding List section.
2 ) Click VIEW CONNECTED DEVICES and select the device you want to bind. The MAC Address and IP Address fields will be automatically filled in.
3 ) Click SAVE.
Done!
Now you don’t need to worry about ARP spoofing and ARP attacks!
6.9.4 ALG
ALG allows customized Network Address Translation (NAT) traversal filters to be plugged into the gateway to support address and port translation for certain application layer “control/data” protocols such as FTP, TFTP, H323 etc. It is recommended to keep the default settings.
You may need to disable SIP ALG when you are using voice and video applications to create and accept a call through the router, since some voice and video communication applications do not work well with SIP ALG.
Visit http://tplinkwifi.net, and log in with your TP-Link ID or the password you set for the router. Go to Advanced > Security > ALG.
6.10 VPN Server&Client
The router offers several ways to set up VPN connections:
VPN Server allows remote devices to access your home network in a secured way through the internet. The router supports four types of VPN Server:
OpenVPN is somewhat complex but with higher security and more stability, suitable for restricted environments such as campus network and company intranet.
PPTP VPN is easy to use with the built-in VPN software of computers and mobile devices, but it is vulnerable and may be blocked by some ISPs.
L2TP/IPSec VPN is more secure but slower than PPTP VPN, and may have trouble getting around firewalls.
WireGuard VPN is a secure, fast and modern VPN protocol. It is based on the UDP protocol and uses modern encryption algorithms to improve work efficiency. VPN Merge allows your client devices to simultaneously access multiple VPN servers to satisfy your work, gaming, and video streaming needs.
6.10.1 Use OpenVPN to Access Your Home Network
OpenVPN Server is used to create an OpenVPN connection for remote devices to access your home network.
To use the VPN feature, you need to enable OpenVPN Server on your router, and install and run VPN Merge software on remote devices. Please follow the steps below to set up an OpenVPN connection.
Step1. Set up OpenVPN Server on Your Router
1. Visit http://tplinkwifi.net, and log in with your TP-Link ID or the password you set for the router.
2. Go to Advanced > VPN Server > OpenVPN, and tick the Enable box of OpenVPN.
Note:
• Before you enable VPN Server, we recommend you configure Dynamic DNS Service (recommended) or assign a static IP address for router’s WAN port and synchronize your System Time with internet.
• The first time you configure the OpenVPN Server, you may need to generate a certificate before you enable the VPN Server.
3. Select the Service Type (communication protocol) for OpenVPN Server: UDP, TCP.
4. Enter a VPN Service Port to which a VPN device connects, and the port number should be between 1024 and 65535.
5. In the VPN Subnet/Netmask fields, enter the range of IP addresses that can be leased to the device by the OpenVPN server.
6. Select your Client Access type. Select Home Network Only if you only want the remote device to access your home network; select Internet and Home Network if you also want the remote device to access internet through the VPN Server.
7. Click SAVE.
8. Click GENERATE to get a new certificate.
Note: If you have already generated one, please skip this step, or click GENERATE to update the certificate.
9. Click EXPORT to save the OpenVPN configuration file which will be used by the remote device to access your router.
Step 2. Configure OpenVPN Connection on Your Remote Device
1. Visit http://openvpn.net/index.php/download/community-downloads.html to download the OpenVPN software, and install it on your device where you want to run the OpenVPN client utility.
Note: You need to install the OpenVPN client utility on each device that you plan to apply the VPN function to access your router. Mobile devices should download a third-party app from Google Play or Apple App Store.
2. After the installation, copy the file exported from your router to the OpenVPN client utility’s “config” folder (for example, C:\Program Files\OpenVPN\config on Windows). The path depends on where the OpenVPN client utility is installed.
3. Run the OpenVPN client utility and connect it to OpenVPN Server.
6.10.2 Use PPTP VPN to Access Your Home Network
PPTP VPN Server is used to create a PPTP VPN connection for remote devices to access your home network.
To use the VPN feature, you need to set up PPTP VPN Server on your router, and configure the PPTP connection on remote devices. Please follow the steps below to set up a PPTP VPN connection.
Step 1. Set up PPTP VPN Server on Your Router
1. Visit http://tplinkwifi.net, and log in with your TP-Link ID or the password you set for the router.
2. Go to Advanced > VPN Server > PPTP, and tick the Enable box of PPTP.
Note: Before you enable VPN Server, we recommend you configure Dynamic DNS Service (recommended) or assign a static IP address for router’s WAN port and synchronize your System Time with internet.
3. In the Client IP Address field, enter the range of IP addresses (up to 10) that can be leased to the devices by the PPTP VPN server.
4. Set the PPTP connection permission according to your needs.
• Select Allow Samba (Network Place) access to allow your VPN device to access your local Samba server.
• Select Allow NetBIOS passthrough to allow your VPN device to access your Samba server using NetBIOS name.
• Select Allow Unencrypted connections to allow unencrypted connections to your VPN server.
5. Click SAVE.
6. Configure the PPTP VPN connection account for the remote device. You can create up to 16 accounts.
7. Click Add.
8. Enter the Username and Password to authenticate devices to the PPTP VPN Server.
9. Click ADD.
Step 2. Configure PPTP VPN Connection on Your Remote Device
The remote device can use the Windows built-in PPTP software or a third-party PPTP software to connect to PPTP Server. Here we use the Windows built-in PPTP software as an example.
1. Go to Start > Control Panel > Network and Internet > Network and Sharing Center.
2. Select Set up a new connection or network.
3. Select Connect to a workplace and click Next.
4. Select Use my Internet connection (VPN).
5. Enter the internet IP address of the router (for example: 218.18.1.73) in the Internet address field. Click Next.
6. Enter the User name and Password you have set for the PPTP VPN server on your router, and click Connect.
7. Click Connect Now when the VPN connection is ready to use.
6.10.3 Use L2TP/IPSec VPN to Access Your Home Network
L2TP/IPSec VPN Server is used to create a L2TP/IPSec VPN connection for remote devices to access your home network.
To use the VPN feature, you need to set up L2TP/IPSec VPN Server on your router, and configure the L2TP/IPSec connection on remote devices. Please follow the steps below to set up the L2TP/IPSec VPN connection.
Step 1. Set up L2TP/IPSec VPN Server on Your Router
1. Visit http://tplinkwifi.net, and log in with your TP-Link ID or the password you set for the router.
2. Go to Advanced > VPN Server > L2TP/IPSec, and enable L2TP/IPSec.
Note:
• Firmware update may be required to support L2TP/IPSec VPN Server.
• Before you enable VPN Server, we recommend you configure Dynamic DNS Service (recommended) or assign a static IP address for router’s WAN port and synchronize your System Time with internet.
3. In the Client IP Address field, enter the range of IP addresses (up to 10) that can be leased to the devices by the L2TP/IPSec VPN server.
4. Create an IPSec Pre-Shared Key.
5. Configure the L2TP/IPSec VPN connection account for the remote device. You can create up to 16 accounts.
1 ) Click Add.
2 ) Enter the Username and Password to authenticate devices to the L2TP/IPSec VPN Server.
3 ) Click ADD.
6. Click SAVE.
Step 2. Configure L2TP/IPSec VPN Connection on Your Remote Device
The remote device can use the Windows or Mac OS built-in L2TP/IPSec software or a third-party L2TP/IPSec software to connect to L2TP/IPSec Server. Here we use the Windows built-in L2TP/IPSec software as an example.
1. Go to Start > Control Panel > Network and Internet > Network and Sharing Center.
2. Select Set up a new connection or network.
3. Select Connect to a workplace and click Next.
4. Select Use my Internet connection (VPN).
5. Enter the internet IP address of the router (for example: 218.18.1.73) in the Internet address field, and select the checkbox Don’t connect now; just set it up so I can connect later. Click Next.
6. Enter the User name and Password you have set for the L2TP/IPSec VPN server on your router, and click Connect.
7. Click Close when the VPN connection is ready to use.
8. Go to Network and Sharing Center and click Change adapter settings.
9. Find the VPN connection you created, then double-click it.
10. Enter the User name and Password you have set for the L2TP/IPSec VPN server on your router, and click Properties.
11. Switch to the Security tab, select Layer 2 Tunneling Protocol with IPsec (L2TP/ IPSec) and click Advanced settings.
12. Select Use preshared key for authentication and enter the IPSec Pre-Shared Key you have set for the L2TP/IPSec VPN server on your router. Then click OK.
Done! Click Connect to start VPN connection.
6.10.4 Use WireGuard VPN to Access Your Home Network
WireGuard VPN Server is used to create a Wire Guard VPN connection for remote devices to access your home network.
Step 1. Set up WireGuard VPN Server on Your Router
1. Visit http://tplinkwifi.net, and log in with your TP-Link ID or the password you set for the router.
2. Go to Advanced > VPN Server > WireGuard, and tick the Enable box of WireGuard.
3. Set the tunnel IP address and listen port. Do NOT change it unless necessary.
4. Select your Client Access type. Select Home Network Only if you only want the remote device to access your home network; select Internet and Home Network if you also want the remote device to access internet through the VPN Server.
5. (Optional) Click Advanced Settings to display more settings. If DNS is turned on, the router will become the DNS server of the VPN client that establishes a connection with it. Change the Persistent Keepalive time (25 seconds by default) to send out heartbeat regularly, you can also click RENEW KEY to update the private key and public key.
Step 2. Create accounts that can be used by remote clients to connect to the VPN server.
1. Locate the Account List section.
2. Click Add to create an account.
3. Give a name to this account.
4. Enter the address of the virtual interface assigned to this account. Do NOT change it unless necessary.
5. Traffic sent from the WireGard VPN client to the allowed IPs (client) will be transmitted through the tunnel. By default, all network traffic from clients will be transmitted through the tunnel. Do NOT change it unless necessary.
6. Traffic sent from the WireGard VPN server to the allowed IPs (server) will be transmitted through the tunnel. Do NOT change it unless necessary.
7. Enable or disable pre-shared key.
8. Click SAVE.
Note: One account can only be used by one WireGuard VPN client at the same time to connect to the WireGuard VPN server.
9. Connect to the WireGuard server.
• For mobile phones, download WireGuard App from Google Play or Apple Store, then use the App to scan the QR Code to connect to this server.
• For other devices (e.g. TP-Link WireGuard VPN client), Click EXPORT to save the WireGuard VPN configuration file which will be used by the remote device to access your router.
10. On the account list, you can click the button to modify the VPN server settings, connect to the server, or delete the account.
6.10.5 Use VPN Merge to Access a Remote VPN Server
VPN Merge allows your client devices to simultaneously access multiple VPN servers to satisfy your work, gaming, and video streaming needs.
To use the VPN Merge feature, simply add remote VPN servers on your router and assign the VPN servers to your client devices. Please follow the steps below:
1. Visit http://tplinkwifi.net, and log in with your TP-Link ID or the password you set for the router.
2. Go to Advanced > VPN Merge, and enable VPN Merge.
Note: Firmware update may be required to support VPN Merge.
3. Add VPN servers, and enable the one you need.
1 ) In the Server List section, click Add.
2 ) Specify a description for the VPN, and choose the VPN type.
• VPN Kill Switch: When enabled, your device’s internet access will be blocked if the VPN connection drops, keeping your data safe.
3 ) Enter the VPN information provided by your VPN provider.
• OpenVPN: Enter the VPN username and password if required by your VPN provider, otherwise simply leave them empty. Then import the configuration file provided by your VPN provider.
Note: You can also check the box of Import the CA file or edit the . ovpn file manually, then upload the CA file or manually configure the settings.
• PPTP: Enter the VPN server address (for example: 218.18.1.73) and the VPN username and password provided by your VPN provider.
• L2TP/IPSec VPN: Enter the VPN server address (for example: 218.18.1.73), VPN username and password, and IPSec pre-shared key provided by your VPN provider.
• WireGuard VPN: Give a description, and click BROWSE to import the WireGuard VPN server configuration. Then you will see the detailed parameters. Do NOT change the parameters unless necessary.
4 ) Save the settings.
5 ) In the server list, enable the one you need.
4. Add and manage the devices that will use the VPN function. You can click Change Mode to switch between different modes.
1 ) In the Client List section, click Add Devices.
2 ) Choose and add the devices that will access the VPN server you have configured.
5. Save the settings.
Done! Now the devices you specified can access the VPN server you enabled.
6.11 IPv6
6.11.1 Set up an IPv6 Internet Connection
This function allows you to set up an IPv6 internet connection using the information provided by your ISP (internet service provider).
Note: Some models may not support this feature. Images may differ from actual products.
1. Visit http://tplinkwifi.net, and log in with your TP-Link ID or the password you set for the router.
2. Go to Advanced > IPv6.
3. Enable IPv6 and select the internet connection type provided by your ISP.
Note: If you do not know what your internet connection type is, contact your ISP.
4. Fill in information as required by different connection types.
• Static IP: Fill in blanks and save the settings.
• Dynamic IP(SLAAC/DHCPv6): Click Advanced Settings to input further information if your ISP requires. Save the settings and click RENEW.
• PPPoE: By default, the router uses the IPv4 account to connect to the IPv6 server. Click Advanced Settings to input further information if your ISP requires. Save the settings and click CONNECT.
Note: If your ISP provides two separate accounts for the IPv4 and IPv6 connections, manually enter the username and password for the IPv6 connection.
• 6to4 Tunnel: An IPv4 internet connection type is a prerequisite for this connection type. Please manually set up your internet connection first. Click Advanced Settings to input further information if your ISP requires. Save the settings and click CONNECT.
• Pass-Through (Bridge): Save the settings. No configuration is required.
5. Configure LAN ports. Windows users are recommended to choose from DHCPv6 and SLAAC+Stateless DHCP.
Note: You don’t need to configure IPv6 LAN if the Internet Connection Type is Pass-Through (Bridge).
6. In MAC Clone section, set the MAC address of your router. Use the default address unless your ISP allows internet access from only a specific MAC address.
6.12 System
6.12.1 Firmware Upgrade
TP-Link aims at providing better network experience for users. We will inform you through the web management page if there’s any update firmware available for your router. Also, the latest firmware will be released at the TP-Link official website www.tp-link.com, and you can download it from the Support page for free.
Note:
• Backup your router configuration before firmware upgrade.
• Do NOT turn off the router during the firmware upgrade.
Auto Update
Enable Auto Update and set the update time. The router will update firmware automatically at the specified time when new version is available.
Online Upgrade
1. Visit http://tplinkwifi.net, and log in with your TP-Link ID or the password you set for the router.
2. When the latest firmware is available for your router, the upgrade icon will display in the top-right corner of the page. Click the icon to go to the Firmware Upgrade page. Alternatively, you can go to Advanced > System > Firmware Upgrade, and click CHECK FOR UPGRADES to see whether the latest firmware is released.
3. Click UPGRADE if there is new firmware.
4. Wait a few minutes for the upgrade and reboot to complete.
Tips: If there’s a new and important firmware update for your router, you will see the prompt notification on your computer as long as a web browser is opened. Click UPGRADE, and log in to the web management page with the username and password you set for the router. You will see the Firmware Upgrade page.
Local Upgrade
1. Download the latest firmware file for the router from www.tp-link.com.
2. Visit http://tplinkwifi.net, and log in with your TP-Link ID or the password you set for the router.
3. Go to Advanced > System > Firmware Upgrade.
4. Focus on the Local Upgrade section. Click BROWSE to locate the downloaded new firmware file, and click UPGRADE.
5. Wait a few minutes for the upgrade and reboot to complete.
Note: If you fail to upgrade the firmware for the router, please contact our Technical Support.
6.12.2 Backup and Restore Configuration Settings
The configuration settings are stored as a configuration file in the router. You can backup the configuration file to your computer for future use and restore the router to a previous settings from the backup file when needed. Moreover, if necessary you can erase the current settings and reset the router to the default factory settings.
1. Visit http://tplinkwifi.net, and log in with your TP-Link ID or the password you set for the router.
2. Go to Advanced > System > Backup & Restore.
• To backup configuration settings:
Click BACK UP to save a copy of the current settings to your local computer. A ‘.bin’ file of the current settings will be stored to your computer.
• To restore configuration settings:
1. Click UPLOAD to locate the backup configuration file stored on your computer, and click RESTORE.
2. Wait a few minutes for the restoring and rebooting.
Note: During the restoring process, do not turn off or reset the router.
• To reset the router except your login password and TP-Link ID:
1. In the Factory Default Restore section, click RESTORE.
2. Wait a few minutes for the resetting and rebooting.
Note:
• During the resetting process, do not turn off the router.
• After reset, you can still use the current login password or the TP-Link ID to log in to the web management page.
• To reset the router to factory default settings:
1. Click FACTORY RESTORE to reset the router.
2. Wait a few minutes for the resetting and rebooting.
Note:
• During the resetting process, do not turn off or reset the router.
• We strongly recommend you backup the current configuration settings before resetting the router.
6.12.3 Change the Login Password
The account management feature allows you to change your login password of the web management page.
Note: If you are using a TP-Link ID to log in to the web management page, the account management feature will be disabled. To manage the TP-Link ID, go to Advanced > TP-Link ID.
1. Visit http://tplinkwifi.net, and log in with your TP-Link ID or the password you set for the router.
2. Go to Advanced > System > Administration and focus on the Change Password section.
3. Enter the old password, then a new password twice (both case-sensitive). Click SAVE.
4. Use the new password for future logins.
6.12.4 Admin Password Recovery
This feature allows you to recover the login password you set for you router in case you forget it.
Note: If you are using a TP-Link ID to log in to the web management page, the Password Recovery feature will be disabled. To manage the TP-Link ID, go to Advanced > TP-Link ID.
1. Visit http://tplinkwifi.net, and log in with the password you set for the router.
2. Go to Advanced > System > Administration and focus on the Admin Password Recovery section.
3. Click Question Settings to set security question settings.
4. Tick the Enable box of Password Recovery.
5. Specify a mailbox (From) for sending the recovery letter and enter its SMTP Server address. Specify a mailbox (To) for receiving the recovery letter. If the mailbox (From) to send the recovery letter requires encryption, Tick the Enable box of Authentication and enter its username and password.
Tips:
• SMTP server is available for users in most webmail systems. For example, the SMTP server address of Gmail is smtp.gmail.com.
• Generally, Authentication should be enabled if the login of the mailbox requires username and password.
6. Click SAVE.
To recover the login password, please visit http://tplinkwifi.net, click Forgot Password? on the login page and follow the instructions to set a new password.
6.12.5 Local Management
This feature allows you to limit the number of client devices on your LAN from accessing the router by using the MAC address-based authentication.
1. Visit http://tplinkwifi.net, and log in with your TP-Link ID or the password you set for the router.
2. Go to Advanced > System > Administration and complete the settings In Local Management section as needed.
• Access the router via HTTPS and HTTP:
Tick the Enable box of Local Management via HTTPS to access the router via HTTPS and HTTP, or keep it disabled to access the router only via HTTP.
• Allow all LAN connected devices to manage the router:
Select All Devices for Local Managers.
• Allow specific devices to manage the router:
1. Select Specified Devices for Local Managers and click SAVE.
2. Click Add Device.
3. Click VIEW CONNECTED DEVICES and select the device to manage the router from the Connected Devices list, or enter the MAC address of the device manually.
4. Specify a Description for this entry.
5. Click SAVE.
6.12.6 Remote Management
This feature allows you to control remote devices’ authority to manage the router.
1. Visit http://tplinkwifi.net, and log in with your TP-Link ID or the password you set for the router.
2. Go to Advanced > System > Administration and complete the settings in Remote Management section as needed.
• Forbid all devices to manage the router remotely:
Do not tick the Enable checkbox of Remote Management.
• Allow all devices to manage the router remotely:
1. Tick the Enable checkbox of Remote Management.
2. Keep the HTTPS port as default settings (recommended) or enter a value between 1024 and 65535.
3. Select All Devices for Remote Managers.
4. Click SAVE. Devices on the internet can log in to https://Router’s WAN IP address:port number (such as https://113.116.60.229:1024) to manage the router.
Tips:
• You can find the WAN IP address of the router on Network Map > Internet.
• The router’s WAN IP is usually a dynamic IP. Please refer to Dynamic DNS if you want to log in to the router through a domain name.
• Allow a specific device to manage the router remotely:
1. Tick the Enable checkbox of Remote Management.
2. Keep the HTTPS port as default settings (recommended) or enter a value between 1024 and 65535.
3. Select Specified Device for Remote Managers.
4. In the Only this IP Address field, enter the IP address of the remote device to manage the router.
5. Click SAVE.
Devices using this WAN IP can manage the router by logging in to https://Router’s WAN IP:port number (such as https://113.116.60.229:1024).
Tips: The router’s WAN IP is usually a dynamic IP. Please refer to Dynamic DNS if you want to log in to the router through a domain name.
6.12.7 System Log
When the router does not work normally, you can save the system log and send it to the technical support for troubleshooting.
• To save the system log locally:
1. Visit http://tplinkwifi.net, and log in your TP-Link ID or the password you set for the router.
2. Go to Advanced > System > System Log.
3. Choose the type and level of the system logs as needed.
4. In the Save Log section, click SAVE TO LOCAL to save the system logs to a local disk.
• To send the system log to a mailbox at a fixed time:
For example, I want to check my router’s working status at a fixed time every day, however, it’s too troublesome to log in to the web management page every time I want to go checking. It would be great if the system logs could be sent to my mailbox at 8 a.m. every day.
1. Visit http://tplinkwifi.net, and log in with your TP-Link ID or the password you set for the router.
2. Go to Advanced > System > System Log.
3. In the Save Log section, click MAIL LOG.
4. Enter the information required:
• Email From: Enter the email address used for sending the system log.
• Select Require Password.
Tips: Generally, Require Password should be selected if the login of the mailbox requires username and password.
• Username: Enter the email address used for sending the system log.
• Email Password: Enter the password to login the sender’s email address.
• SMTP Server: Enter the SMTP server address.
Tips: SMTP server is available for users in most webmail systems. For example, the SMTP server address of Hotmail is smtp-mail.outlook.com.
• Email To: Enter the recipient’s email address, which can be the same as or different from the sender’s email address.
• Select Mail Log Automatically.
Tips: The router will send the system log to the designated email address if this option is enabled.
• Frequency: This determines how often the recipient will receive the system log .
5. Click SAVE.
6.12.8 Test the Network Connectivity
Diagnostics is used to test the connectivity between the router and the host or other network devices.
1. Visit http://tplinkwifi.net, and log in with your TP-Link ID or the password you set for the router.
2. Go to Advanced > System > Diagnostics.
3. Enter the information:
1 ) Choose Ping or Traceroute as the diagnostic tool to test the connectivity;
• Ping is used to test the connectivity between the router and the tested host, and measure the round-trip time.
• Traceroute is used to display the route (path) your router has passed to reach the tested host, and measure transit delays of packets across an Internet Protocol network.
2 ) Enter the IP Address or Domain Name of the tested host.
3 ) Modify the Ping Count number and the Ping Packet Size. It’s recommended to keep the default value.
4 ) If you have chosen Traceroute, you can modify the Traceroute Max TTL. It’s recommended to keep the default value.
4. Click START to begin the diagnostics.
The figure below indicates the proper connection between the router and the Yahoo server (www.Yahoo.com) tested through Ping.
The figure below indicates the proper connection between the router and the Yahoo server (www.Yahoo.com) tested through Traceroute.
6.12.9 Set Up System Time
System time is the time displayed while the router is running. The system time you configure here will be used for other time-based functions like Parental Controls. You can choose the way to obtain the system time as needed.
1. Visit http://tplinkwifi.net, and log in with your TP-Link ID or the password you set for the router.
2. Go to Advanced > System > Time Settings.
• To get time from the internet:
1. Enable 24-Hour Time if you want the time to display in a 24-hour way.
2. In the Set Time field, select Get from Internet.
3. Select your local Time Zone from the drop-down list.
4. In the NTP Server I field, enter the IP address or domain name of your desired NTP Server.
5. (Optional) In the NTP Server II field, enter the IP address or domain name of the second NTP Server.
6. Click SAVE.
• To get time from your computer:
1. In the Set Time field, select Get from Managing Device.
2. The time of your computer will then be displayed and click SAVE.
• To manually set the date and time:
1. In the Set Time field, select Manually.
2. Set the current Date (In MM/DD/YYYY format).
3. Set the current Time (In HH/MM/SS format).
4. Click SAVE.
• To set up Daylight Saving Time:
1. Tick the Enable box of Daylight Saving Time.
2. Select the correct Start date and time when daylight saving time starts at your local time zone.
3. Select the correct End date and time when daylight saving time ends at your local time zone.
4. Click SAVE.
6.12.10 Set the Router to Reboot Regularly
The Scheduled Reboot feature cleans the cache to enhance the running performance of the router.
1. Visit http://tplinkwifi.net, and log in with your TP-Link ID or the password you set for the router.
2. Go to Advanced > System > Reboot.
3. Tick the Enable box of Reboot Schedule.
4. Specify the Reboot Time when the router reboots and Repeat to decide how often it reboots.
5. Click SAVE.
6.12.11 Control the LED
The LED of the router indicates its activities and status. You can enable the Night Mode feature to specify a time period during which the LED is off.
1. Visit http://tplinkwifi.net, and log in with your TP-Link ID or the password you set for the router.
2. Go to Advanced > System > LED Control.
3. Enable Night Mode.
4. Specify the LED Off time, and the LED will be off during this period every day.
5. Click SAVE.
6.12.12 Action Button
The customizable action button offers you a physical shortcut to control a variety of functions, including Wi-Fi, LED and VPN Merge.
1. Visit http://tplinkwifi.net, and log in with your TP-Link ID or the password you set for the router.
2. Go to Advanced > System > Action Button.
3. Select a quick control option, and click SAVE.
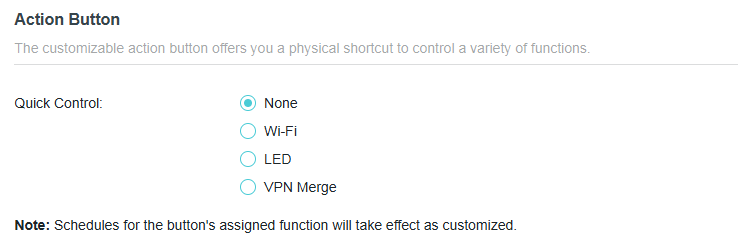
6.12.13 ECO Mode
An ECO Mode switch is used to change the power saving mode of the router. To change the ECO Mode, please toggle the Mode Switch on the device to your desired mode.
1. Visit http://tplinkwifi.net, and log in with your TP-Link ID or the password you set for the router.
2. Go to Advanced > System > ECO Mode.
3. Currently there are two versions. Follow the instructstion based on your actual models:
• For TL-WR5002BE, enable ECO Mode. We recommend enabling Smart ECO to automatically adjusts power consumption based on your traffic usage, minimizing the impact on your regular Internet traffic. It will also turn off the LEDs.
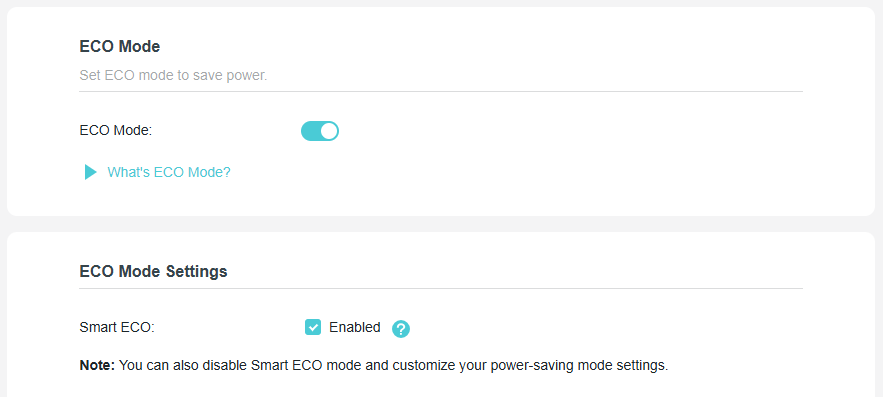
• For other models, select a preference mode and click SAVE.
• Boost Mode: Favors wireless range and transmission speed but may increase energy consumption and raise device temperature.
• Balance Mode: Automatically balances wireless range and transmission speed while considering energy consumption and device temperature.
• ECO Mode: Saves energy and lowers device temperature by reducing device’s wireless range and transmission speed.
6.12.14 Authorize Third-Party Services
Share your clients’ information to a third-party services to identify your clients better. We won’t save your private information.
1. Visit http://tplinkwifi.net, and log in with your TP-Link ID or the password you set for the router.
2. Go to Advanced > System > Authorize Third-Party Services.
3. Enable Client Identification.
章節 7. 訊號延伸模式
本章介紹如何設定便攜式路由器工作在訊號延伸器模式下的各項功能。
*網頁管理頁面上可用的功能可能因型號和軟體版本而異。
7.1 運作模式
如果便攜式路由器當前工作在路由器/USB 網路分享/USB 網卡/熱點模式,請按照以下步驟將運作模式切換為訊號延伸器模式。
1. 造訪 http://tplinkwifi.net,並使用您的 TP-Link ID 或您為便攜式路由器設定的密碼登入。
2. 前往 進階 > 系統 > 運作模式。
3. 選擇 AP/RE/用戶端模式 並按一下 儲存。
4. 選擇 訊號延伸器 並按一下 重新啟動。設定將在便攜式路由器重新啟動後生效。網際網路存取將暫時中斷。
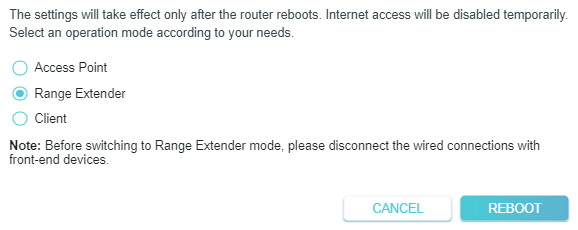
5. 等待重新啟動完成,並按照指示完成設定。
如果便攜式路由器當前工作在 AP/用戶端模式,請按照以下步驟將運作模式切換為訊號延伸器模式。
1. 造訪 http://tplinkwifi.net,並使用您為便攜式路由器設定的使用者名稱和密碼登入。
2. 前往 進階 > 網路設定 > 網路模式。
3. 選擇所需的網路模式,然後按一下 儲存。
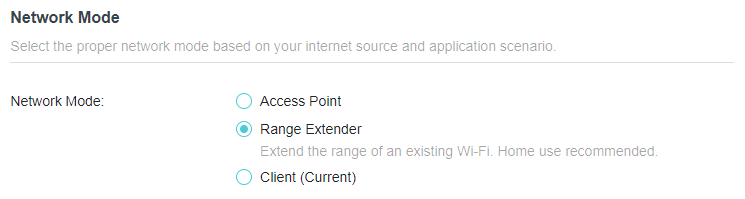
4. 前往 快速設定 並選擇 訊號延伸器,然後按照指示完成設定。
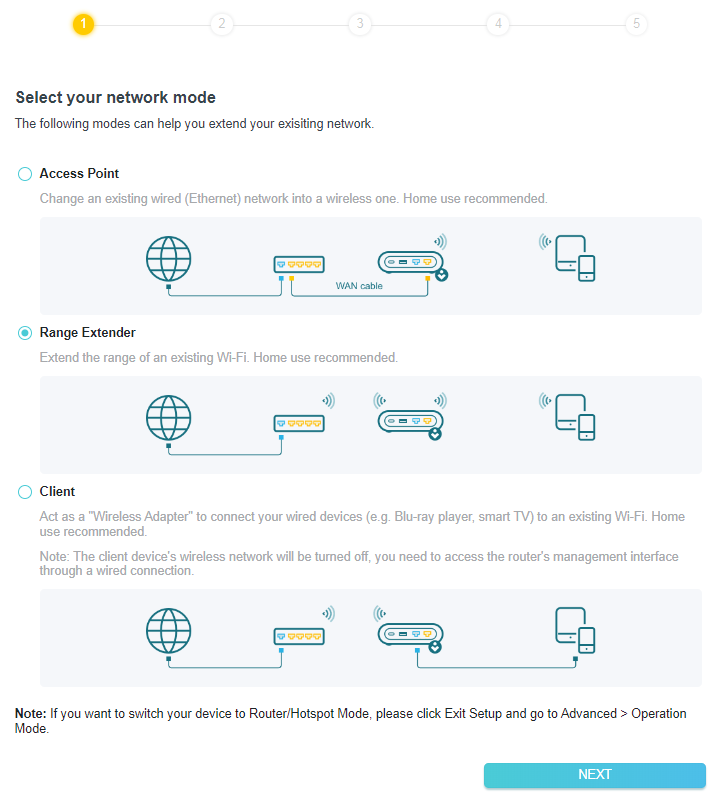
7.2 網路地圖
網路地圖直觀地概述了您網路的設備連線情況,並協助您管理網路的一般設定。
1. 造訪 http://tplinkwifi.net,並使用您的 TP-Link ID 或您為便攜式路由器設定的密碼登入。
2. 前往 網路地圖。
3. 按一下每個網路設備圖示以檢查和管理一般網路設定。
• 按一下 網際網路 以檢查網際網路狀態。
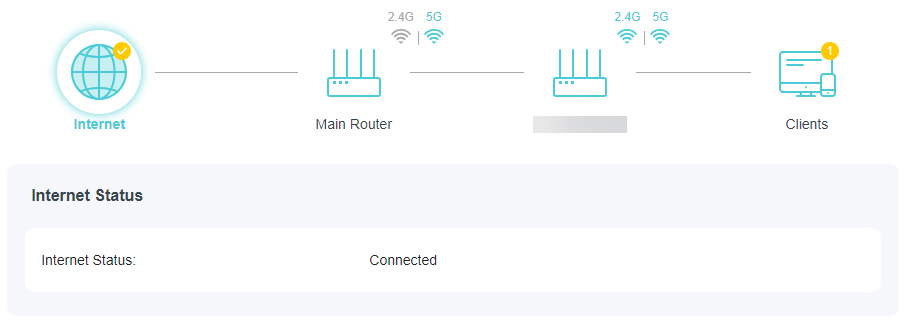
• 按一下 主路由器 以檢查已連接前端路由器的無線網路資訊。
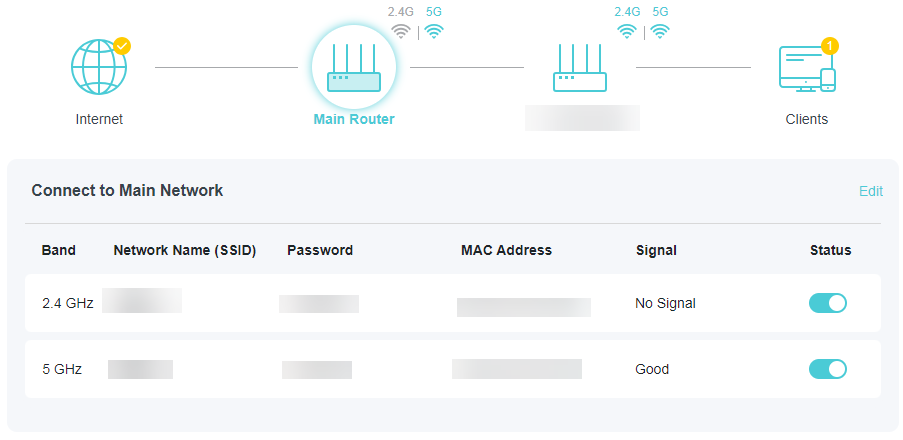
• 按一下便攜式路由器以檢查設備狀態和網路設定。您可以按一下編輯來變更相關設定。
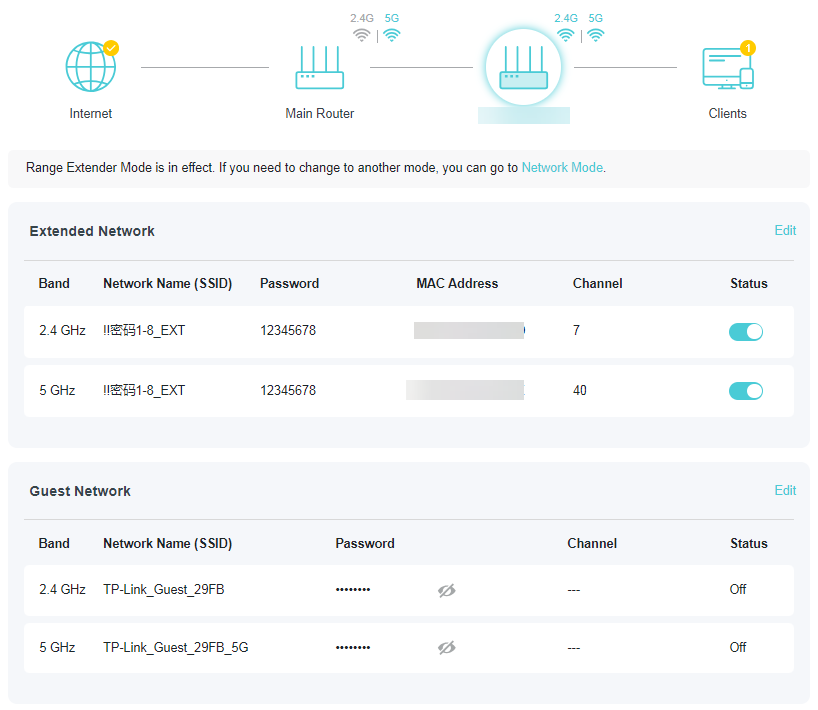
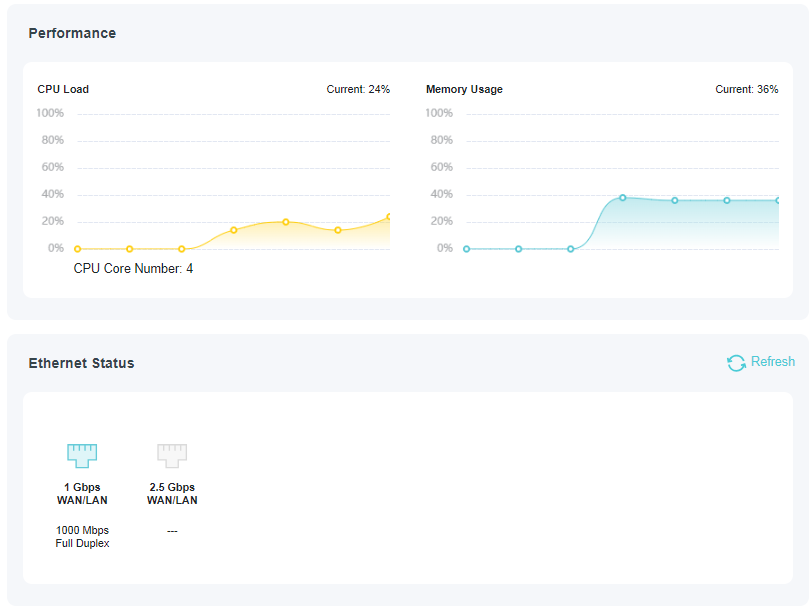
• 按一下 用戶端 以檢視您網路中的用戶端設備。
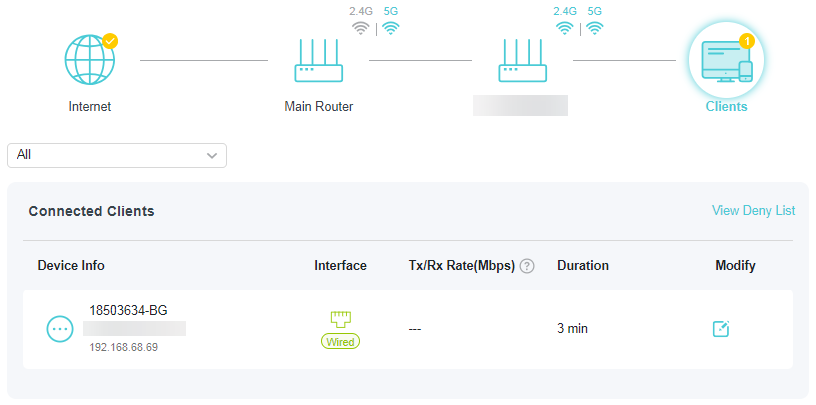
7.3 無線網路
7.3.1 設定無線網路
如果您想在快速設定後延伸另一個主要網路,可以參考本節。此外,您可以變更延伸網路的無線設定。
注意:這裡我們以 5GHz 網路的設定為例。
1. 造訪 http://tplinkwifi.net,並使用您的 TP-Link ID 或您為便攜式路由器設定的密碼登入。
• 延伸另一個前端網路:
2. 前往 無線網路 > 無線設定。
3. 啟用無線頻段,然後按一下 Wi-Fi 掃描 以尋找所有可用的網路。
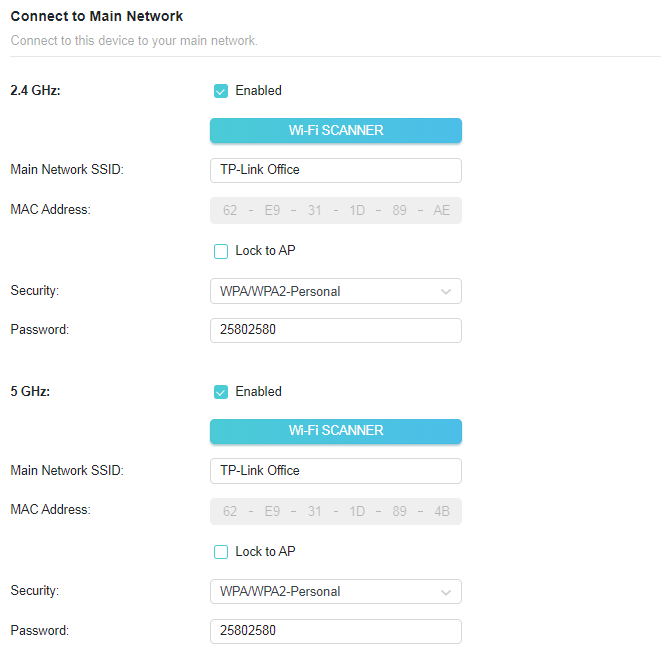
4. 選擇您要延伸的主要網路。
注意:如果您要延伸的網路已開啟但未列出,請嘗試以下步驟。
· 將便攜式路由器移近您的主路由器,然後重新掃描網路。
· 您可以手動輸入要延伸網路的網路名稱 (SSID) 和密碼,然後按一下儲存。
5. 選擇主要網路後,SSID 和安全性類型將自動填入。如果選定的網路已加密,請在 密碼 欄位中輸入密碼。
6. (選填)如果您啟用 鎖定 AP,便攜式路由器的連接將限制為具有此特定 MAC 地址的網路。
7. 按一下 儲存。
• 啟用或停用延伸網路:
1. 前往 無線網路 > 無線設定 > 延伸網路。
2. 延伸網路預設為啟用。如果您想停用某個頻段的無線功能,只需取消勾選 啟用 核取方塊即可。在這種情況下,該頻段的所有無線設定都將失效。
3. 按一下 儲存。
• 變更無線網路名稱 (SSID):
1. 前往 無線網路 > 無線設定 > 延伸網路。
2. 在 延伸 SSID 中建立一個新的 SSID,或按一下 複製主要網路 SSID。該值區分大小寫。
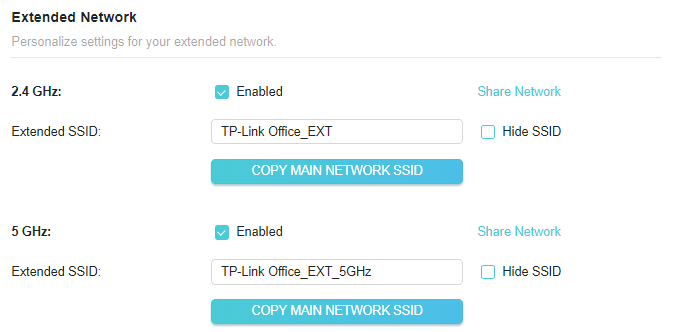
• 隱藏延伸網路的 SSID:
1. 前往 無線網路 > 無線設定 > 延伸網路。
2. 選擇 隱藏 SSID,當無線設備掃描本地無線網路時,將不會顯示相應的 SSID。您需要手動輸入 SSID 才能加入網路。
3. 按一下 儲存。
• 分享延伸網路:
1. 前往 無線網路 > 無線設定 > 延伸網路。
2. 按一下對應頻段的 分享網路,然後按一下 儲存圖片 將其分享給您的訪客。
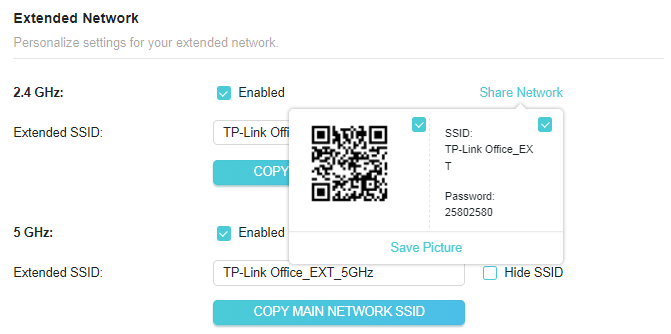
7.3.2 訪客網路
訪客網路允許您為訪客提供 Wi-Fi 存取權限,而無需透露您的主網路。當您的房屋、公寓或工作場所中有客人時,您可以為他們建立一個訪客網路。此外,您可以自訂訪客網路設定以確保網路安全和隱私。
• 建立訪客網路
1. 造訪 http://tplinkwifi.net,並使用您的 TP-Link ID 或您為便攜式路由器設定的密碼登入。
2. 前往 進階 > 無線網路 > 訪客網路。
3. 根據您的需要啟用 2.4GHz/5GHz 訪客網路。
4. 自訂 SSID。除非您希望訪客手動輸入 SSID 以存取訪客網路,否則請勿選擇隱藏 SSID。
5. 選擇 安全性 類型並自訂您自己的密碼。如果選擇了 無安全性,則存取您的訪客網路不需要密碼。
6. 按一下 儲存。現在您的訪客可以使用您設定的 SSID 和密碼存取您的訪客網路了!
• 自訂訪客網路選項
1. 造訪 http://tplinkwifi.net,並使用您的 TP-Link ID 或您為便攜式路由器設定的密碼登入。
2. 前往 進階 > 無線網路 > 訪客網路。找到 訪客權限 區塊。
3. 根據您的需求自訂訪客網路選項。
• 允許訪客相互查看
如果您希望允許訪客網路上的無線用戶端透過網路芳鄰和 Ping 等方式互相通訊,請勾選此核取方塊。
4. 按一下 儲存。現在您可以確保網路安全與隱私了!
7.3.3 無線排程
當您不需要無線功能時,無線功能可以在指定時間自動關閉。
1. 造訪 http://tplinkwifi.net,並使用您的 TP-Link ID 或您為便攜式路由器設定的密碼登入。
2. 前往 進階 > 無線網路 > 無線排程。
3. 啟用 無線排程 功能。
4. 按一下 新增 指定需要自動關閉無線網路的時間段,然後按一下 儲存。
注意:
• 生效的無線排程以便攜式路由器的時間為準。您可以前往 進階 > 系統 > 時間設定 來修改時間。
• 無線網路將在您設定的時間段結束後自動開啟。
7.3.4 其他設定
1. 造訪 http://tplinkwifi.net,並使用您的 TP-Link ID 或您為便攜式路由器設定的密碼登入。
2. 前往 進階 > 無線網路 > 其他設定。
3. 設定無線網路的進階設定,然後按一下 儲存。
注意:如果您不熟悉此頁面上的設定項目,強烈建議保持提供的預設值;否則可能會導致無線網路效能降低。
• WMM - WMM 功能可以保證帶有高優先順序訊息的封包被優先傳輸。
• Short GI - 此功能可縮短資料封包之間的時間,從而潛在提高無線網路的吞吐量。
• AP 隔離 - 此功能隔離所有連接的無線站點,使無線站點無法透過 WLAN 互相存取。
• 訊號輕重公平分配 - 此功能可以透過犧牲慢速設備的一點網路時間來提高整體網路效能。
• 信標間隔 - 此處輸入 40-1000 毫秒之間的信標間隔值。信標間隔值決定信標的時間間隔。信標是便攜式路由器發送的用於同步無線網路的封包。預設值為 100。
• RTS 門檻 - 此處您可以指定 RTS(請求發送)門檻。如果封包大於指定的 RTS 門檻大小,便攜式路由器將向特定接收站發送 RTS 訊框並協商發送資料訊框。預設值為 2346。
• DTIM 間隔 - 此值決定交付流量指示訊息 (DTIM) 的間隔。DTIM 欄位是一個倒數欄位,用於告知用戶端下一個收聽廣播和多播訊息的時間視窗。當便攜式路由器為相關用戶端快取了廣播或多播訊息時,它會發送帶有 DTIM 間隔值的下一個 DTIM。您可以指定 1-255 個信標間隔之間的值。預設值為 1,表示 DTIM 間隔與信標間隔相同。
• 群組金鑰更新週期 - 輸入秒數(最少 30 秒)以控制加密金鑰自動更新的時間間隔。預設值為 0,表示不更新金鑰。
7.4 網路設定
7.4.1 狀態
1. 造訪 http://tplinkwifi.net,並使用您為便攜式路由器設定的使用者名稱和密碼登入。
2. 前往 進階 > 網路設定 > 狀態。您可以檢視便攜式路由器當前的狀態資訊。
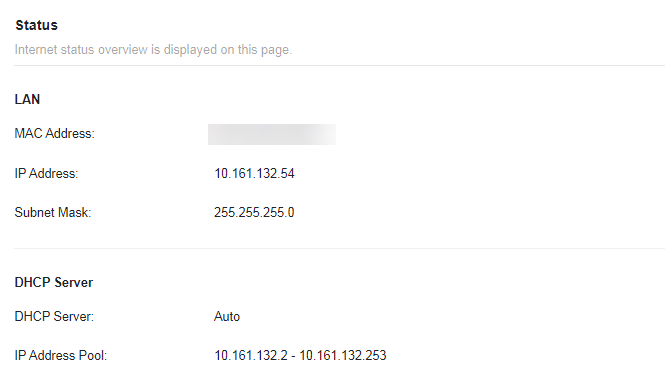
• LAN - 此欄位顯示 LAN 的當前設定,您可以在「網路設定 > LAN」頁面上對其進行設定。
• MAC 地址 - 便攜式路由器的實體地址。
• IP 地址 - 便攜式路由器的 LAN IP 地址。
• 子網路遮罩 - 與 LAN IP 地址關聯的子網路遮罩。
• DHCP 伺服器 - 此欄位顯示 DHCP(動態主機設定協定)伺服器的當前設定,您可以在 網路設定 > DHCP 伺服器 頁面上對其進行設定。
• DHCP 伺服器 - 指示 DHCP 伺服器已啟用還是已停用。預設情況下已啟用,便攜式路由器充當 DHCP 伺服器。
• IP 地址池 - DHCP 伺服器分配 IP 地址的 IP 地址範圍。
7.4.2 網路模式
在基地台模式下,您可以一鍵快速切換到訊號延伸器模式或用戶端模式。
1. 造訪 http://tplinkwifi.net,並使用您為便攜式路由器設定的使用者名稱和密碼登入。
2. 前往 進階 > 網路設定 > 網路模式。
3. 選擇所需的網路模式,然後按一下 儲存。
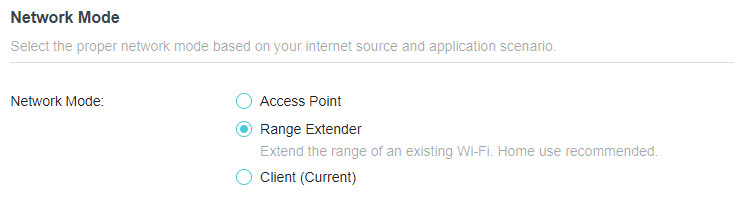
7.4.3 LAN
工作在訊號延伸器模式下的便攜式路由器預設預設了 LAN IP 192.168.0.254,您可以使用該 IP 登入網頁管理頁面。LAN IP 地址與子網路遮罩一起還定義了已連接設備所在的子網路。如果 IP 地址與您本地網路上的另一個設備發生衝突,或者您的網路需要特定的 IP 子網路,您可以變更它。
1. 造訪 http://tplinkwifi.net,並使用您為便攜式路由器設定的使用者名稱和密碼登入。
2. 前往 進階 > 網路設定 > LAN。
3. 在 IP 類型 中,選擇 固定 IP。
4. 根據需要輸入新的 IP 地址(例如 192.168.0.252),並保持 子網路遮罩 為預設設定。
5. 輸入與 IP 地址在同一子網路中的閘道。閘道通常是您路由器的 LAN IP 地址。
6. 按一下 儲存。
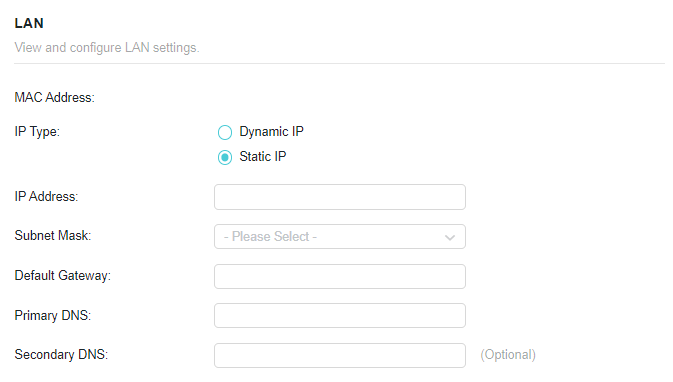
注意:
• 如果您變更了 IP 地址,則必須使用新 IP 地址登入。
• 如果您設定的新 IP 地址與舊 IP 地址不在同一子網路中,DHCP 伺服器中的 IP 地址池將自動設定,但虛擬伺服器和 DMZ 主機在重新設定之前不會生效。
7.4.4 DHCP 伺服器
預設情況下,DHCP(動態主機設定協定)伺服器已啟用,便攜式路由器充當 DHCP 伺服器;它從 IP 地址池動態向用戶端設備分配 TCP/IP 參數。如有必要,您可以變更 DHCP 伺服器的設定,並且可以為指定的用戶端設備保留 LAN IP 地址。
注意:如果您停用 DHCP 伺服器且 LAN 內沒有其他 DHCP 伺服器,則必須手動為每個用戶端設定 IP 地址。
• 指定便攜式路由器分配的 IP 地址:
1. 造訪 http://tplinkwifi.net,並使用您的 TP-Link ID 或您為便攜式路由器設定的密碼登入。
2. 前往 進階 > 網路設定 > DHCP 伺服器 並找到 DHCP 伺服器 區塊。
1. 開啟 DHCP 伺服器。
2. 在 IP 地址池 中輸入起始和結束 IP 地址。
3. 如果電信業者提供,請輸入其他參數。預設閘道 會自動填入,且與便攜式路由器的 LAN IP 地址相同。
4. 按一下 儲存。
注意:要使用便攜式路由器的 DHCP 伺服器功能,必須將 LAN 上的所有電腦設定為「自動獲取 IP 地址」。
• 為指定的用戶端設備保留 IP 地址:
便攜式路由器的 DHCP 伺服器在開啟時,或者在主路由器/AP 的 DHCP 伺服器停用的自動模式下運作。當它工作時,您可以檢視 DHCP 用戶端並為其保留 IP 地址。
1. 造訪 http://tplinkwifi.net,並使用您為便攜式路由器設定的使用者名稱和密碼登入。
2. 前往 進階 > 網路設定 > DHCP 伺服器 並找到 地址保留 區塊。
3. 按一下地址保留區塊中的 新增。
4. 按一下 檢視已連接的設備 並選擇要為其保留 IP 的設備。然後 MAC 和 IP 地址將自動填入。您也可以手動輸入用戶端設備的 MAC 和 IP 地址。
• 檢查 DHCP 用戶端清單:
1. 造訪 http://tplinkwifi.net,並使用您的 TP-Link ID 或您為便攜式路由器設定的密碼登入。
2. 前往 進階 > 網路設定 > DHCP 伺服器 並找到 DHCP 用戶端清單 區塊。您可以查看清單的設備資訊。
3. 按一下 重新整理 以查看當前連接的設備。
7.5 USB 儲存設備
將您的 USB 儲存設備插入便攜式路由器的 USB 連接埠,然後在本地或遠端存取儲存在其中的檔案。
提示:
• 如果您使用 USB 集線器,請確保連接到便攜式路由器的設備不超過 4 個。
• 如果 USB 儲存設備需要使用隨附的外接電源,請確保外接電源已連接。
• 如果您使用 USB 硬碟,請確保其檔案系統為 FAT32、exFat、NTFS 或 HFS+。
• 在從便攜式路由器實體斷開 USB 設備之前,請安全移除它以避免資料損壞:前往 進階 > USB > 儲存設備,然後按一下 移除。
7.5.1 在本地存取 USB 設備
將您的 USB 儲存設備插入便攜式路由器的 USB 連接埠,然後參考下表存取儲存在 USB 儲存設備上的檔案。
| Windows 電腦 |
• 方法 1:
• 方法 2:
|
|---|---|
| Mac |
1 ) 選擇 前往 > 連接伺服器。
4 ) 出現提示時,選擇 訪客 單選框。(如果您設定了使用者名稱和密碼以拒絕匿名存取 USB 磁碟,則應選擇 註冊使用者 單選框。要了解如何設定存取帳戶,請參閱 設定資料安全的驗證。) |
| 平板電腦 | 使用第三方應用程式進行網路檔案管理。 |
提示:
您也可以使用網路/媒體伺服器名稱作為伺服器地址來存取您的 USB 儲存設備。欲了解更多資訊,請參閱自訂 USB 儲存設備的地址。
7.5.2 自訂存取設定
預設情況下,所有網路用戶端都可以存取您 USB 磁碟上的所有資料夾。您可以在便攜式路由器的網頁管理頁面上透過設定共用帳戶、共用特定內容和設定新的共用地址來自訂共用設定。
1. 造訪 http://tplinkwifi.net,並使用您的 TP-Link ID 或您為便攜式路由器設定的密碼登入。
2. 前往 進階 > USB > 儲存設備。
• 自訂 USB 儲存設備的地址
您可以自訂伺服器名稱,並使用該名稱存取您的 USB 儲存設備。
1. 在 存取方式 區塊中,確保已啟用 Windows Samba / macOS/Linux Samba,並根據您的喜好輸入 網路/媒體伺服器名稱(例如 MyShare),然後按一下 儲存。
2. 現在您可以透過造訪 \\MyShare(適用於 Windows)或 smb://MyShare (適用於 Mac)來存取 USB 儲存設備。
• 僅共用特定內容
聚焦於 檔案共用 區塊。指定您想要共用的共用資料夾,然後按一下 儲存。
• 設定資料安全的驗證
您可以為 USB 儲存設備設定驗證,以便網路用戶端在存取 USB 儲存設備時需要輸入使用者名稱和密碼。
1. 在 檔案共用 區塊中,啟用 安全共用。
2. 按一下 修改存取帳戶,並注意預設的使用者名稱和密碼。作為管理員存取可以讀取和修改共用資料夾,而訪客只能讀取共用資料夾。
注意:
1. 對於 Windows 使用者,請勿將共用使用者名稱設定為與 Windows 使用者名稱相同。否則,Windows 憑證機制可能會導致以下問題:
• 如果共用密碼也與 Windows 密碼相同,則驗證將不起作用,因為 Windows 將自動使用其帳戶資訊進行 USB 存取。
• 如果共用密碼與 Windows 密碼不同,Windows 將無法記住您的憑證,您將始終需要輸入共用密碼進行 USB 存取。
2. 由於 Windows 憑證機制,變更驗證設定後您可能無法存取 USB 磁碟。請從 Windows 登出並嘗試重新存取。或者您可以參考 自訂 USB 儲存設備的地址 來變更 USB 磁碟的地址。
7.5.3 媒體共用
媒體共用功能允許您直接從支援 DLNA 的設備(例如電腦、平板電腦和 PS2/3/4)檢視儲存在 USB 儲存設備上的相片、播放音樂和觀看電影。
注意:某些型號可能不支援此功能。圖片可能與實際產品有所不同。
1. 造訪 http://tplinkwifi.net,並使用您的 TP-Link ID 或您為便攜式路由器設定的密碼登入。
2. 前往 進階 > USB > 儲存設備。
3. 啟用 媒體共用。
4. 當您的 USB 儲存設備插入便攜式路由器時,連接到便攜式路由器的支援 DLNA 的設備(如您的電腦和平板)可以檢測並播放 USB 儲存設備上的媒體檔案。
5. 詳細說明請參閱下表。
| Windows 電腦 |
前往 電腦 > 網路,然後按一下 媒體設備 區塊中的媒體伺服器名稱(預設為 型號-share)。
|
|---|---|
| 平板電腦 | • 使用第三方支援 DLNA 的播放器。 |
7.6 存取控制
存取控制用於根據已阻擋設備清單(黑名單)或已允許設備清單(白名單),阻擋或允許特定用戶端設備存取您的網路(透過有線或無線)。
我想:
阻擋或允許特定的用戶端設備存取我的網路(透過有線或無線)。
我該怎麼做?
1. 造訪 http://tplinkwifi.net,並使用您的 TP-Link ID 或您為便攜式路由器設定的密碼登入。
2. 前往 進階 > 安全性 > 存取控制。
3. 切換開關以啟用 存取控制。
4. 按一下 變更模式 以選擇存取模式,以阻擋(推薦)或允許清單中的設備。
阻擋特定設備:
1 ) 選擇 黑名單。
2 ) 按一下 並選擇要阻擋的設備,或手動輸入 MAC 地址,然後按一下 新增。
3 ) 畫面上將出現 操作成功 訊息,表示選定的設備已成功新增至黑名單。
允許特定設備:
1 ) 選擇 白名單 並按一下 變更。
2 ) 您自己的設備預設在白名單中,無法刪除。按一下 將其他設備新增至白名單。
• 新增已連接的設備
1 ) 按一下 從設備清單中選擇。
2 ) 選擇您要允許的設備,然後按一下 新增。
3 ) 畫面上將出現操作成功訊息,表示選定的設備已成功新增至白名單。
• 新增未連接的設備
1 ) 按一下 手動新增。
2 ) 輸入要允許的設備的 設備名稱 和 MAC 地址,然後按一下 新增。
3 ) 畫面上將出現 操作成功 訊息,表示該設備已成功新增至白名單。
完成!
現在您可以透過使用黑名單或白名單來阻擋或允許特定用戶端設備存取您的網路(透過有線或無線)。
7.7 韌體升級
TP-Link 旨在為使用者提供更好的網路體驗。如果有適用於您便攜式路由器的韌體更新可用,我們將透過網頁管理頁面通知您。此外,最新的韌體將在 TP-Link 官方網站 www.tp-link.com 發布,您可以從「支援」頁面免費下載。
注意:
• 韌體升級前請備份您的便攜式路由器設定。
• 韌體升級期間請勿關閉便攜式路由器。
自動更新
啟用 自動更新 並設定更新時間。當有新版本可用時,便攜式路由器將在指定時間自動更新韌體。
線上升級
1. 造訪 http://tplinkwifi.net,並使用您的 TP-Link ID 或您為便攜式路由器設定的密碼登入。
2. 當有適用於您便攜式路由器的最新韌體可用時,頁面右上角將顯示升級圖示。按一下圖示 前往 韌體升級 頁面。或者,您可以前往 進階 > 系統 > 韌體升級,然後按一下 檢查更新 以查看最新的韌體是否已發布。
3. 如果有新韌體,按一下 升級。
4. 等待幾分鐘讓升級和重新啟動完成。
提示:如果您的便攜式路由器有新的且重要的韌體更新,只要開啟網頁瀏覽器,您就會在電腦上看到提示通知。按一下 升級,然後使用您為便攜式路由器設定的使用者名稱和密碼登入網頁管理頁面。您將看到 韌體升級 頁面。
本地升級
1. 從 www.tp-link.com 下載適用於該便攜式路由器的最新韌體檔案。
2. 造訪 http://tplinkwifi.net,並使用您的 TP-Link ID 或您為便攜式路由器設定的密碼登入。
3. 前往 進階 > 系統 > 韌體升級。
4. 聚焦於 本地升級 區塊。按一下 瀏覽 尋找下載的新韌體檔案,然後按一下 升級。
5. 等待幾分鐘讓升級和重新啟動完成。
注意:如果您無法升級便攜式路由器的韌體,請聯繫我們的技術支援。
7.8 備份與還原設定
設定儲存為便攜式路由器中的設定檔。您可以將設定檔備份到電腦以備將來使用,並在需要時從備份檔案將便攜式路由器還原至之前的設定。此外,如有必要,您可以擦除當前設定並將便攜式路由器重設為原廠預設設定。
1. 造訪 http://tplinkwifi.net,並使用您的 TP-Link ID 或您為便攜式路由器設定的密碼登入。
2. 前往 進階 > 系統 > 備份與還原。
• 備份設定:
按一下 備份 將當前設定的副本儲存到本地電腦。當前設定的「.bin」檔案將儲存到您的電腦中。
• 還原設定:
1. 按一下 上傳 尋找儲存在您電腦上的備份設定檔,然後按一下 還原。
2. 等待幾分鐘進行還原和重新啟動。
注意:在還原過程中,請勿關閉或重設便攜式路由器。
• 重設便攜式路由器(登入密碼和 TP-Link ID 除外):
1. 在 恢復原廠預設值 區塊中,按一下 還原。
2. 等待幾分鐘進行重設和重新啟動。
注意:
• 在重設過程中,請勿關閉便攜式路由器。
• 重設後,您仍可以使用當前的登入密碼或 TP-Link ID 登入網頁管理頁面。
• 將便攜式路由器重設為原廠預設設定:
1. 按一下 恢復原廠設定 以重設便攜式路由器。
2. 等待幾分鐘進行重設和重新啟動。
注意:
• 在重設過程中,請勿關閉或重設便攜式路由器。
• 我們強烈建議您在重設便攜式路由器之前備份當前的設定。
7.9 TP-Link 雲端服務
TP-Link 雲端服務提供了一種更好的方式來管理您的雲端設備。使用 TP-Link ID 登入便攜式路由器,無論身在何處,都可以透過 Tether 應用程式輕鬆監控和管理您的家庭網路。為了確保您的便攜式路由器保持最新狀態並隨時間推移變得更好,TP-Link 雲端將在有重要的韌體升級可用時通知您。當然,您也可以使用單個 TP-Link ID 管理多個 TP-Link 雲端設備。
本節介紹如何註冊新的 TP-Link ID、綁定或解綁 TP-Link ID 以管理便攜式路由器,以及無論您身在何處都可以使用它管理家庭網路的 Tether 應用程式。
7.9.1 註冊 TP-Link ID
如果您在快速設定過程中跳過了註冊,您可以:
1. 造訪 http://tplinkwifi.net,並使用您為便攜式路由器設定的密碼登入。
2. 前往 進階 > TP-Link ID 或按一下頁面最頂部的 TP-Link ID。
3. 按一下 註冊 並按照說明註冊 TP-Link ID。
4. 啟用 TP-Link ID 後,返回 TP-Link ID 頁面進行登入。首次用於登入便攜式路由器的 TP-Link ID 將自動綁定為 管理員。
注意:
• 要了解有關 管理員 和 使用者 TP-Link ID 的更多資訊,請參閱 管理使用者 TP-Link ID。
• 在網頁管理頁面上註冊 TP-Link ID 後,只能透過 Tether 應用程式註冊另一個 TP-Link ID。請參閱 透過 Tether 登入 安裝應用程式。
• 如果您想從便攜式路由器解綁管理員 TP-Link ID,請前往 進階 > TP-Link ID,然後按一下設備資訊區塊中的解綁。
7.9.2 變更您的 TP-Link ID 資訊
按照以下步驟根據需要變更 TP-Link ID 的電子郵件地址和密碼。
1. 造訪 http://tplinkwifi.net,並使用您的 TP-Link ID 登入。
2. 前往 進階 > TP-Link ID,並聚焦於 TP-Link ID 區塊。
• 變更您的電子郵件地址:
1. 按一下電子郵件後面的 。
2. 輸入您 TP-Link ID 的密碼,然後輸入新的電子郵件地址。然後按一下 儲存。
• 變更您的密碼:
1. 按一下密碼後面的 。
2. 輸入當前密碼,然後輸入兩次新密碼。然後按一下 儲存。
7.9.3 管理使用者 TP-Link ID
首次用於登入便攜式路由器的 TP-Link ID 將自動綁定為 擁有者 帳戶。擁有者帳戶可以在同一台便攜式路由器中添加或刪除其他 TP-Link ID。所有帳戶都可以在本地或遠端監控和管理便攜式路由器,但只有擁有者帳戶可以:
• 在網頁管理頁面或 Tether 應用程式中將便攜式路由器重設為原廠預設設定。
• 向便攜式路由器添加/從中刪除其他 TP-Link ID。
添加 TP-Link ID 以管理便攜式路由器
1. 造訪 http://tplinkwifi.net,並使用您的 TP-Link ID 登入。
2. 前往 進階 > TP-Link ID,並聚焦於 已綁定的 TP-Link ID 區塊。
3. 按一下 ,根據需要輸入另一個 TP-Link ID,然後按一下 儲存。
注意:如果您需要另一個 TP-Link ID,請透過 Tether 應用程式註冊一個新 ID。請參閱 透過 TP-Link Tether 應用程式管理便攜式路由器 安裝應用程式並註冊新的 TP-Link ID。
4. 新的 TP-Link ID 將顯示在 已綁定的 TP-Link ID 表格中。
取消 TP-Link ID 對便攜式路由器的管理權限
1. 造訪 http://tplinkwifi.net,並使用您的 TP-Link ID 登入。
2. 前往 進階 > TP-Link ID,並聚焦於 已綁定的 TP-Link ID 區塊。
3. 勾選要刪除的 TP-Link ID 的 解綁。
7.9.4 透過 TP-Link Tether 應用程式管理便攜式路由器
Tether 應用程式在 iOS 和 Android 設備(例如智慧型手機和平板電腦)上執行。
1. 啟動 Apple App Store 或 Google Play 商店,搜尋「TP-Link Tether」或直接掃描二維碼下載並安裝應用程式。
2. 啟動 Tether 應用程式並使用您的 TP-Link ID 登入。如果您沒有 TP-Link ID,請先建立一個。
3. 將您的設備連接到便攜式路由器的無線網路。
4. 返回 Tether 應用程式,選擇您便攜式路由器的型號,然後使用您為便攜式路由器設定的密碼登入。
5. 根據需要管理您的便攜式路由器。
注意:如果您需要從智慧型設備遠端存取便攜式路由器,您需要:
• 使用您的 TP-Link ID 登入。如果您沒有,請參閱 註冊 TP-Link ID。
• 確保您的智慧型手機和平板電腦可以透過行動數據或 Wi-Fi 網路存取網際網路。
7.10 變更登入密碼
帳戶管理功能允許您變更網頁管理頁面的登入密碼。
注意:如果您使用 TP-Link ID 登入網頁管理頁面,帳戶管理功能將被停用。要管理 TP-Link ID,請前往「進階 > TP-Link ID」。
1. 造訪 http://tplinkwifi.net,並使用您的 TP-Link ID 或您為便攜式路由器設定的密碼登入。
2. 前往 進階 > 系統 > 權限管理 並聚焦於 變更密碼 區塊。
3. 輸入舊密碼,然後輸入兩次新密碼(均區分大小寫)。按一下 儲存。
4. 以後的登入請使用新密碼。
7.11 管理員密碼找回
此功能允許您在忘記密碼時找回為便攜式路由器設定的登入密碼。
注意:如果您使用 TP-Link ID 登入網頁管理頁面,密碼找回功能將被停用。要管理 TP-Link ID,請前往 進階 > TP-Link ID。
1. 造訪 http://tplinkwifi.net,並使用您為便攜式路由器設定的密碼登入。
2. 前往 進階 > 系統 > 權限管理 並聚焦於 管理員密碼找回 區塊。
3. 按一下 安全問題設定 來設定安全問題。
4. 勾選 密碼找回 的 啟用 方塊。
5. 指定用於發送找回郵件的 信箱(寄件者) 並輸入其 SMTP 伺服器 地址。指定用於接收找回郵件的 信箱(收件者)。如果發送找回郵件的信箱(寄件者)需要加密,請勾選 驗證 的 啟用 方塊並輸入其使用者名稱和密碼。
提示:
• 大多數 Web 郵件系統中的使用者都可以使用 SMTP 伺服器。例如,Gmail 的 SMTP 伺服器地址是 smtp.gmail.com。
• 通常,如果信箱登入需要使用者名稱和密碼,則應啟用驗證。
6. 按一下 儲存。
要找回登入密碼,請造訪 http://tplinkwifi.net,按一下登入頁面上的 忘記密碼? 並按照說明設定新密碼。
7.12 本地管理
此功能允許您透過使用基於 MAC 地址的驗證,限制 LAN 上存取便攜式路由器的用戶端設備數量。
1. 造訪 http://tplinkwifi.net,並使用您的 TP-Link ID 或您為便攜式路由器設定的密碼登入。
2. 前往 進階 > 系統 > 權限管理,並根據需要在 本地管理 區塊中完成設定。
• 透過 HTTPS 和 HTTP 存取便攜式路由器:
勾選 透過 HTTPS 進行本地管理 的 啟用 方塊以透過 HTTPS 和 HTTP 存取便攜式路由器,或保持其停用以僅透過 HTTP 存取便攜式路由器。
• 允許所有連接 LAN 的設備管理便攜式路由器:
為本地管理者選擇 所有設備 。
• 允許特定設備管理便攜式路由器:
1. 為本地管理者選擇 指定設備,然後按一下 儲存。
2. 按一下 新增設備。
3. 按一下 檢視已連接的設備 並從已連接的設備清單中選擇要管理便攜式路由器的設備,或手動輸入設備的 MAC 地址。
4. 為此條目指定一個 描述。
5. 按一下 儲存。
7.13 系統記錄
當便攜式路由器無法正常工作時,您可以儲存系統記錄並將其發送給技術支援以進行疑難排解。
• 在本地儲存系統記錄:
1. 造訪 http://tplinkwifi.net,並使用您的 TP-Link ID 或您為便攜式路由器設定的密碼登入。
2. 前往 進階 > 系統 > 系統記錄。
3. 根據需要選擇系統記錄的類型和等級。
4. 在 儲存記錄 區塊中,按一下 儲存到本地 將系統記錄儲存到本地磁碟。
• 定時將系統記錄發送到信箱:
例如,我想每天在固定時間檢查我便攜式路由器的工作狀態,但是每次想去檢查都要登入網頁管理頁面太麻煩了。如果每天早上 8 點能把系統記錄發送到我的信箱就太好了。
1. 造訪 http://tplinkwifi.net,並使用您的 TP-Link ID 或您為便攜式路由器設定的密碼登入。
2. 前往 進階 > 系統 > 系統記錄。
3. 在 儲存記錄 區塊中,按一下 郵寄記錄。
4. 輸入所需的資訊:
• 寄件者電子郵件: 輸入用於發送系統記錄的電子郵件地址。
• 選擇 需要密碼。
提示:通常,如果信箱登入需要使用者名稱和密碼,則應選擇「需要密碼」。
• 使用者名稱: 輸入用於發送系統記錄的電子郵件地址。
• 電子郵件密碼: 輸入登入發件人電子郵件地址的密碼。
• SMTP 伺服器: 輸入 SMTP 伺服器地址。
提示:大多數 Web 郵件系統中的使用者都可以使用 SMTP 伺服器。例如,Hotmail 的 SMTP 伺服器地址是 smtp-mail.outlook.com。
• 收件者電子郵件: 輸入收件者的電子郵件地址,可以與發件人的電子郵件地址相同或不同。
• 選擇 自動郵寄記錄。
提示:如果啟用此選項,便攜式路由器將把系統記錄發送到指定的電子郵件地址。
• 頻率: 這決定了收件者接收系統記錄的頻率。
5. 按一下 儲存。
7.14 測試網路連線
診斷用於測試便攜式路由器與主機或其他網路設備之間的連線。
1. 造訪 http://tplinkwifi.net,並使用您的 TP-Link ID 或您為便攜式路由器設定的密碼登入。
2. 前往 進階 > 系統 > 診斷工具。
3. 輸入資訊:
1 ) 選擇 Ping 或 Traceroute 作為診斷工具來測試連線;
• Ping 用於測試便攜式路由器與被測主機之間的連線,並測量往返時間。
• Traceroute 用於顯示您的便攜式路由器到達被測主機所經過的路由(路徑),並測量封包跨網際網路協定網路的傳輸延遲。
2 ) 輸入被測主機的 IP 地址 或 網域名稱 。
3 ) 修改 Ping 次數 數字和 Ping 封包大小。建議保持預設值。
4 ) 如果您選擇了 Traceroute,您可以修改 Traceroute 最大 TTL。建議保持預設值。
4. 按一下 開始 開始診斷。
下圖顯示透過 Ping 測試的便攜式路由器與 Yahoo 伺服器 (www.Yahoo.com) 之間的正常連接。
下圖顯示透過 Traceroute 測試的便攜式路由器與 Yahoo 伺服器 (www.Yahoo.com) 之間的正常連接。
7.15 設定系統時間
系統時間是便攜式路由器執行時顯示的時間。您在此處設定的系統時間將用於其他基於時間的功能(如家長監護)。您可以根據需要選擇獲取系統時間的方式。
1. 造訪 http://tplinkwifi.net,並使用您的 TP-Link ID 或您為便攜式路由器設定的密碼登入。
2. 前往 進階 > 系統 > 時間設定。
• 從網際網路獲取時間:
1. 如果您希望時間以 24 小時制顯示,請啟用 24 小時制時間 。
2. 在 設定時間 欄位中,選擇 從網際網路獲取。
3. 從下拉式清單中選擇您當地的 時區。
4. 在 NTP 伺服器 I 欄位中,輸入您想要的 NTP 伺服器的 IP 地址或網域名稱。
5. (選填)在 NTP 伺服器 II 欄位中,輸入第二個 NTP 伺服器的 IP 地址或網域名稱。
6. 按一下 儲存。
• 從您的電腦獲取時間:
1. 在設定時間欄位中,選擇從管理設備獲取。
2. 隨後將顯示您電腦的時間,按一下儲存。
• 手動設定日期和時間:
1. 在 設定時間 欄位中,選擇 手動。
2. 設定當前 日期 (格式為 月/日/年)。
3. 設定當前 時間 (格式為 時/分/秒)。
4. 按一下 儲存。
• 設定日光節約時間(夏令時間):
1. 勾選日光節約時間的 啟用 方塊。
2. 選擇您當地時區日光節約時間開始的正確 開始 日期和時間。
3. 選擇您當地時區日光節約時間結束的正確 結束 日期和時間。
4. 按一下 儲存。
7.16 設定便攜式路由器定期重新啟動
定期重新啟動功能可清除快取以提高便攜式路由器的執行效能。
1. 造訪 http://tplinkwifi.net,並使用您的 TP-Link ID 或您為便攜式路由器設定的密碼登入。
2. 前往 進階 > 系統 > 重新啟動。
3. 勾選重新啟動排程的 啟用 方塊。
4. 指定便攜式路由器重新啟動的 重新啟動時間,並指定 重複 以決定重新啟動的頻率。
5. 按一下 儲存。
7.17 控制 LED 燈
便攜式路由器的 LED 燈指示其活動和狀態。您可以啟用夜間模式功能來指定關閉 LED 燈的時間段。
1. 造訪 http://tplinkwifi.net,並使用您的 TP-Link ID 或您為便攜式路由器設定的密碼登入。
2. 前往 進階 > 系統 > LED 控制。
3. 啟用 夜間模式。
4. 指定 LED 關閉 時間,每天在此期間 LED 燈將關閉。
5. 按一下 儲存。
7.18 自訂按鍵 (Action Switch)
可自訂的實體切換按鍵為您提供控制各種功能(包括 Wi-Fi、LED 和 VPN 合併)的實體快捷方式。
1. 造訪 http://tplinkwifi.net,並使用您的 TP-Link ID 或您為便攜式路由器設定的密碼登入。
2. 前往 進階 > 系統 > 自訂按鍵。
3. 選擇一個快速控制選項,然後按一下 儲存。
7.19 ECO 節能模式
ECO 模式開關用於變更便攜式路由器的省電模式。要變更 ECO 模式,請將設備上的模式開關切換到您想要的模式。
1. 造訪 http://tplinkwifi.net,並使用您的 TP-Link ID 或您為便攜式路由器設定的密碼登入。
2. 前往 進階 > 系統 > ECO 模式。
3. 選擇偏好模式,然後按一下 儲存。
• 效能模式: 有利於無線涵蓋範圍和傳輸速度,但可能會增加能源消耗並提高設備溫度。
• 平衡模式: 在考量能源消耗和設備溫度的同時,自動平衡無線涵蓋範圍和傳輸速度。
• ECO 模式: 透過降低設備的無線涵蓋範圍和傳輸速度來節省能源並降低設備溫度。
章節 8. 客戶端模式
本章介紹如何設定便攜式路由器工作在用戶端模式下的各項功能。
*網頁管理頁面上可用的功能可能因型號和軟體版本而異。
8.1 運作模式
如果便攜式路由器當前工作在路由器/USB 網路分享/USB 網卡/熱點模式,請按照以下步驟將運作模式切換為用戶端模式。
1. 造訪 http://tplinkwifi.net,並使用您的 TP-Link ID 或您為便攜式路由器設定的密碼登入。
2. 前往 進階 > 系統 > 運作模式。
3. 選擇 AP/RE/用戶端模式 並按一下 儲存。
4. 選擇 用戶端 並按一下 重新啟動。設定將在便攜式路由器重新啟動後生效。網際網路存取將暫時中斷。
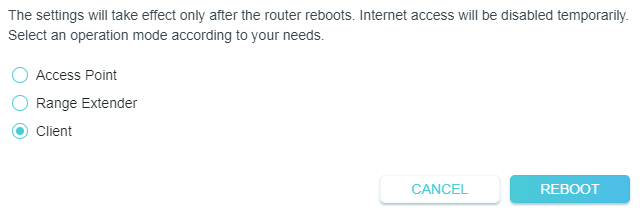
5. 等待重新啟動完成,並按照指示完成設定。
如果便攜式路由器當前工作在 AP/訊號延伸器模式,請按照以下步驟將運作模式切換為用戶端模式。
1. 造訪 http://tplinkwifi.net,並使用您為便攜式路由器設定的使用者名稱和密碼登入。
2. 前往 進階 > 網路設定 > 網路模式。
3. 選擇所需的網路模式,然後按一下 儲存。
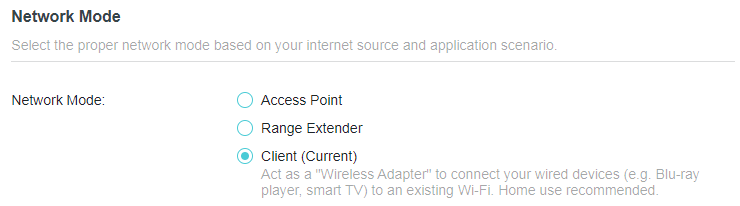
4. 前往 快速設定 並選擇 用戶端,然後按照指示完成設定。
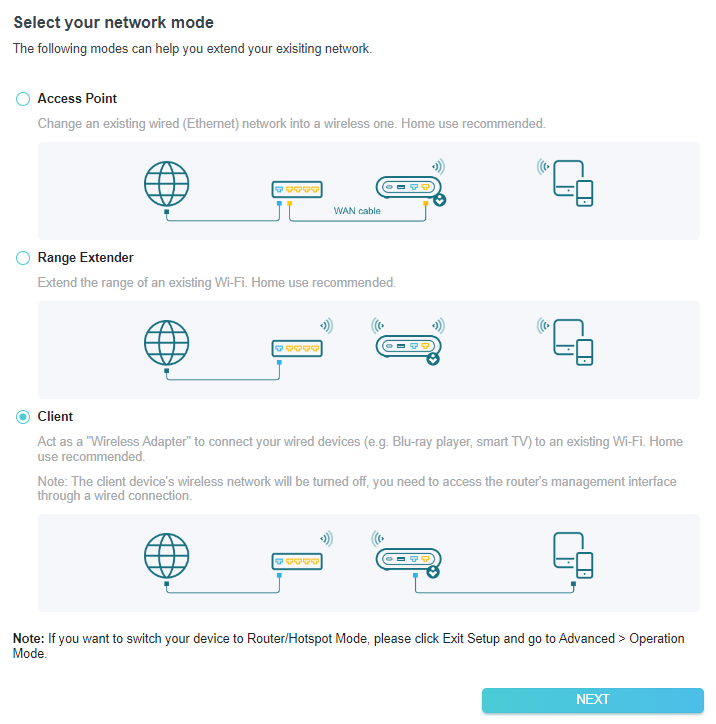
8.2 網路地圖
網路地圖直觀地概述了您網路的設備連線情況,並協助您管理網路的一般設定。
1. 造訪 http://tplinkwifi.net,並使用您的 TP-Link ID 或您為便攜式路由器設定的密碼登入。
2. 前往 網路地圖。
3. 按一下每個網路設備圖示以檢查和管理一般網路設定。
• 按一下 網際網路 以檢查網際網路狀態。
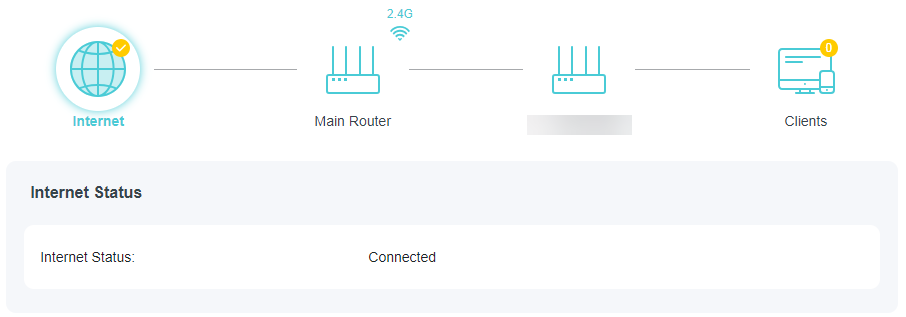
• 按一下 主路由器 以檢查已連接前端路由器的無線網路資訊。
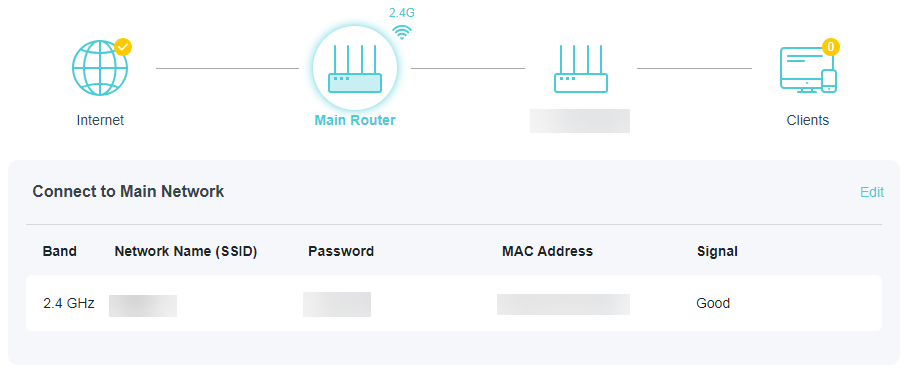
• 按一下便攜式路由器以檢查設備狀態和網路設定。您可以按一下編輯來變更相關設定。
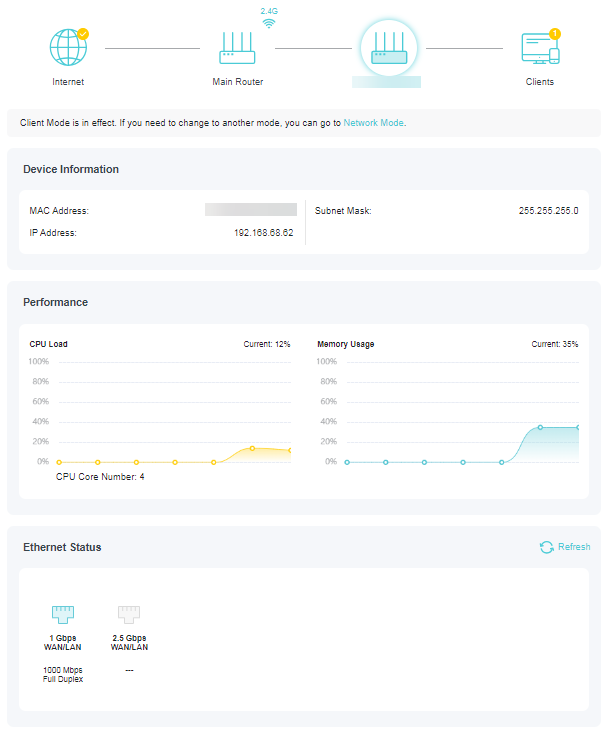
• 按一下 用戶端 以檢視您網路中的用戶端設備。
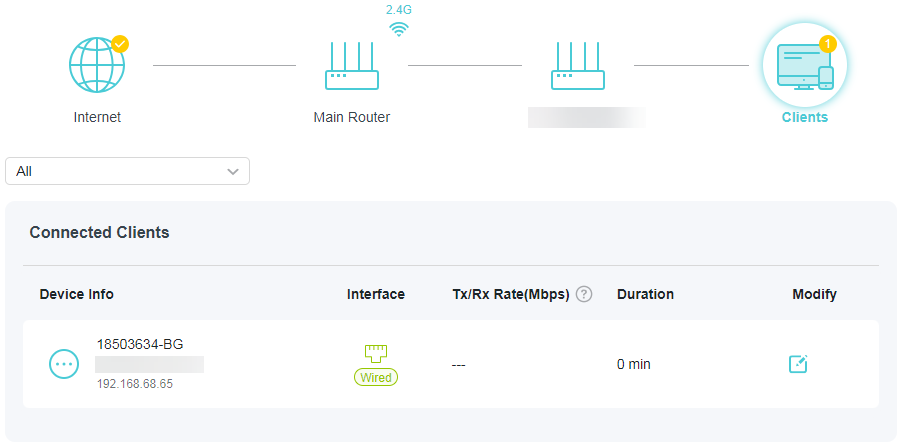
8.3 無線網路
8.3.1 設定無線網路
如果您想在快速設定後連接另一個主要網路,可以參考本節。
注意:這裡我們以 2.4GHz 網路的設定為例。
1. 造訪 http://tplinkwifi.net,並使用您的 TP-Link ID 或您為便攜式路由器設定的密碼登入。
• 變更主要網路:
2. 前往 無線網路。
3. 找到 無線頻段,選擇一個無線頻段,然後按一下 Wi-Fi 掃描 以尋找所有可用的網路。
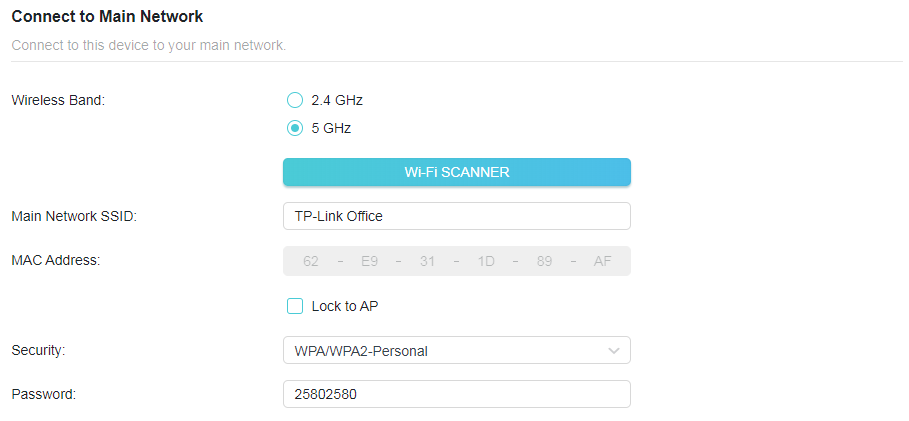
4. 選擇您要延伸的主要網路。
注意:如果您要延伸的網路已開啟但未列出,請嘗試以下步驟。
· 將便攜式路由器移近您的主路由器,然後重新掃描網路。
· 您可以手動輸入要延伸網路的網路名稱 (SSID) 和密碼,然後按一下儲存。
5. 選擇主要網路後,SSID 和安全性類型將自動填入。如果選定的網路已加密,請在 密碼 欄位中輸入密碼。
6. (選填)如果您啟用 鎖定 AP,便攜式路由器的連接將限制為具有此特定 MAC 地址的網路。
7. 按一下 儲存。
8.4 網路設定
8.4.1 狀態
1. 造訪 http://tplinkwifi.net,並使用您為便攜式路由器設定的使用者名稱和密碼登入。
2. 前往 進階 > 網路設定 > 狀態。您可以檢視便攜式路由器當前的狀態資訊。
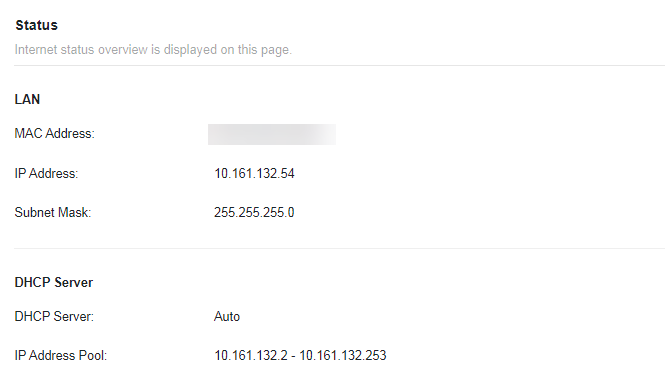
• LAN - 此欄位顯示 LAN 的當前設定,您可以在「網路設定 > LAN」頁面上對其進行設定。
• MAC 地址 - 便攜式路由器的實體地址。
• IP 地址 - 便攜式路由器的 LAN IP 地址。
• 子網路遮罩 - 與 LAN IP 地址關聯的子網路遮罩。
• DHCP 伺服器 - 此欄位顯示 DHCP(動態主機設定協定)伺服器的當前設定,您可以在 網路設定 > DHCP 伺服器 頁面上對其進行設定。
• DHCP 伺服器 - 指示 DHCP 伺服器已啟用還是已停用。預設情況下已啟用,便攜式路由器充當 DHCP 伺服器。
• IP 地址池 - DHCP 伺服器分配 IP 地址的 IP 地址範圍。
8.4.2 網路模式
在基地台模式下,您可以一鍵快速切換到訊號延伸器模式或用戶端模式。
1. 造訪 http://tplinkwifi.net,並使用您為便攜式路由器設定的使用者名稱和密碼登入。
2. 前往 進階 > 網路設定 > 網路模式。
3. 選擇所需的網路模式,然後按一下 儲存。
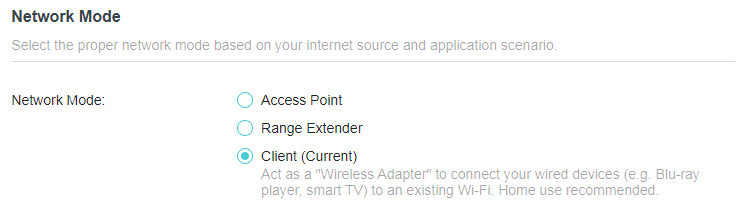
8.4.3 LAN
工作在訊號延伸器模式下的便攜式路由器預設預設了 LAN IP 192.168.0.254,您可以使用該 IP 登入網頁管理頁面。LAN IP 地址與子網路遮罩一起還定義了已連接設備所在的子網路。如果 IP 地址與您本地網路上的另一個設備發生衝突,或者您的網路需要特定的 IP 子網路,您可以變更它。
1. 造訪 http://tplinkwifi.net,並使用您為便攜式路由器設定的使用者名稱和密碼登入。
2. 前往 進階 > 網路設定 > LAN。
3. 在 IP 類型 中,選擇 固定 IP。
4. 根據需要輸入新的 IP 地址(例如 192.168.0.252),並保持 子網路遮罩 為預設設定。
5. 輸入與 IP 地址在同一子網路中的閘道。閘道通常是您路由器的 LAN IP 地址。
6. 按一下 儲存。
注意:
• 如果您變更了 IP 地址,則必須使用新 IP 地址登入。
• 如果您設定的新 IP 地址與舊 IP 地址不在同一子網路中,DHCP 伺服器中的 IP 地址池將自動設定,但虛擬伺服器和 DMZ 主機在重新設定之前不會生效。
8.4.4 流量控制器
啟用後,當設備過載時,它將發送 PAUSE 訊框以通知對等設備在指定時間內停止發送資料,從而避免由壅塞引起的封包遺失。
1. 造訪 http://tplinkwifi.net,並使用您的 TP-Link ID 或您為便攜式路由器設定的密碼登入。
2. 前往 進階 > 網路設定 > LAN。找到 流量控制器 區塊。
3. 選擇所需的選項,然後按一下 儲存。
8.4.5 DHCP 伺服器
預設情況下,DHCP(動態主機設定協定)伺服器已啟用,便攜式路由器充當 DHCP 伺服器;它從 IP 地址池動態向用戶端設備分配 TCP/IP 參數。如有必要,您可以變更 DHCP 伺服器的設定,並且可以為指定的用戶端設備保留 LAN IP 地址。
注意:如果您停用 DHCP 伺服器且 LAN 內沒有其他 DHCP 伺服器,則必須手動為每個用戶端設定 IP 地址。
• 指定便攜式路由器分配的 IP 地址:
1. 造訪 http://tplinkwifi.net,並使用您的 TP-Link ID 或您為便攜式路由器設定的密碼登入。
2. 前往 進階 > 網路設定 > DHCP 伺服器 並找到 DHCP 伺服器 區塊。
1. 開啟 DHCP 伺服器。
2. 在 IP 地址池 中輸入起始和結束 IP 地址。
3. 如果電信業者提供,請輸入其他參數。預設閘道 會自動填入,且與便攜式路由器的 LAN IP 地址相同。
4. 按一下 儲存。
注意:要使用便攜式路由器的 DHCP 伺服器功能,必須將 LAN 上的所有電腦設定為「自動獲取 IP 地址」。
• 為指定的用戶端設備保留 IP 地址:
便攜式路由器的 DHCP 伺服器在開啟時,或者在主路由器/AP 的 DHCP 伺服器停用的自動模式下運作。當它工作時,您可以檢視 DHCP 用戶端並為其保留 IP 地址。
1. 造訪 http://tplinkwifi.net,並使用您為便攜式路由器設定的使用者名稱和密碼登入。
2. 前往 進階 > 網路設定 > DHCP 伺服器 並找到 地址保留 區塊。
3. 按一下地址保留區塊中的 新增。
4. 按一下 檢視已連接的設備 並選擇要為其保留 IP 的設備。然後 MAC 和 IP 地址將自動填入。您也可以手動輸入用戶端設備的 MAC 和 IP 地址。
• 檢查 DHCP 用戶端清單:
1. 造訪 http://tplinkwifi.net,並使用您的 TP-Link ID 或您為便攜式路由器設定的密碼登入。
2. 前往 進階 > 網路設定 > DHCP 伺服器 並找到 DHCP 用戶端清單 區塊。您可以查看清單的設備資訊。
3. 按一下 重新整理 以查看當前連接的設備。
8.5 USB 儲存設備
將您的 USB 儲存設備插入便攜式路由器的 USB 連接埠,然後在本地或遠端存取儲存在其中的檔案。
提示:
• 如果您使用 USB 集線器,請確保連接到便攜式路由器的設備不超過 4 個。
• 如果 USB 儲存設備需要使用隨附的外接電源,請確保外接電源已連接。
• 如果您使用 USB 硬碟,請確保其檔案系統為 FAT32、exFat、NTFS 或 HFS+。
• 在從便攜式路由器實體斷開 USB 設備之前,請安全移除它以避免資料損壞:前往 進階 > USB > 儲存設備,然後按一下 移除。
8.5.1 在本地存取 USB 設備
將您的 USB 儲存設備插入便攜式路由器的 USB 連接埠,然後參考下表存取儲存在 USB 儲存設備上的檔案。
| Windows 電腦 |
• 方法 1:
• 方法 2:
|
|---|---|
| Mac |
1 ) 選擇 前往 > 連接伺服器。
4 ) 出現提示時,選擇 訪客 單選框。(如果您設定了使用者名稱和密碼以拒絕匿名存取 USB 磁碟,則應選擇 註冊使用者 單選框。要了解如何設定存取帳戶,請參閱 設定資料安全的驗證。) |
| 平板電腦 | 使用第三方應用程式進行網路檔案管理。 |
提示:
您也可以使用網路/媒體伺服器名稱作為伺服器地址來存取您的 USB 儲存設備。欲了解更多資訊,請參閱自訂 USB 儲存設備的地址。
5.5.2 自訂存取設定
預設情況下,所有網路用戶端都可以存取您 USB 磁碟上的所有資料夾。您可以在便攜式路由器的網頁管理頁面上透過設定共用帳戶、共用特定內容和設定新的共用地址來自訂共用設定。
1. 造訪 http://tplinkwifi.net,並使用您的 TP-Link ID 或您為便攜式路由器設定的密碼登入。
2. 前往 進階 > USB > 儲存設備。
• 自訂 USB 儲存設備的地址
您可以自訂伺服器名稱,並使用該名稱存取您的 USB 儲存設備。
1. 在 存取方式 區塊中,確保已啟用 Windows Samba / macOS/Linux Samba,並根據您的喜好輸入 網路/媒體伺服器名稱(例如 MyShare),然後按一下 儲存。
2. 現在您可以透過造訪 \\MyShare(適用於 Windows)或 smb://MyShare (適用於 Mac)來存取 USB 儲存設備。
• 僅共用特定內容
聚焦於 檔案共用 區塊。指定您想要共用的共用資料夾,然後按一下 儲存。
• 設定資料安全的驗證
您可以為 USB 儲存設備設定驗證,以便網路用戶端在存取 USB 儲存設備時需要輸入使用者名稱和密碼。
1. 在 檔案共用 區塊中,啟用 安全共用。
2. 按一下 修改存取帳戶,並注意預設的使用者名稱和密碼。作為管理員存取可以讀取和修改共用資料夾,而訪客只能讀取共用資料夾。
注意:
1. 對於 Windows 使用者,請勿將共用使用者名稱設定為與 Windows 使用者名稱相同。否則,Windows 憑證機制可能會導致以下問題:
• 如果共用密碼也與 Windows 密碼相同,則驗證將不起作用,因為 Windows 將自動使用其帳戶資訊進行 USB 存取。
• 如果共用密碼與 Windows 密碼不同,Windows 將無法記住您的憑證,您將始終需要輸入共用密碼進行 USB 存取。
2. 由於 Windows 憑證機制,變更驗證設定後您可能無法存取 USB 磁碟。請從 Windows 登出並嘗試重新存取。或者您可以參考 自訂 USB 儲存設備的地址 來變更 USB 磁碟的地址。
5.5.3 媒體共用
媒體共用功能允許您直接從支援 DLNA 的設備(例如電腦、平板電腦和 PS2/3/4)檢視儲存在 USB 儲存設備上的相片、播放音樂和觀看電影。
注意:某些型號可能不支援此功能。圖片可能與實際產品有所不同。
1. 造訪 http://tplinkwifi.net,並使用您的 TP-Link ID 或您為便攜式路由器設定的密碼登入。
2. 前往 進階 > USB > 儲存設備。
3. 啟用 媒體共用。
4. 當您的 USB 儲存設備插入便攜式路由器時,連接到便攜式路由器的支援 DLNA 的設備(如您的電腦和平板)可以檢測並播放 USB 儲存設備上的媒體檔案。
5. 詳細說明請參閱下表。
| Windows 電腦 |
前往 電腦 > 網路,然後按一下 媒體設備 區塊中的媒體伺服器名稱(預設為 型號-share)。
|
|---|---|
| 平板電腦 | • 使用第三方支援 DLNA 的播放器。 |
8.6 韌體升級
TP-Link 旨在為使用者提供更好的網路體驗。如果有適用於您便攜式路由器的韌體更新可用,我們將透過網頁管理頁面通知您。此外,最新的韌體將在 TP-Link 官方網站 www.tp-link.com 發布,您可以從「支援」頁面免費下載。
注意:
• 韌體升級前請備份您的便攜式路由器設定。
• 韌體升級期間請勿關閉便攜式路由器。
自動更新
啟用 自動更新 並設定更新時間。當有新版本可用時,便攜式路由器將在指定時間自動更新韌體。
線上升級
1. 造訪 http://tplinkwifi.net,並使用您的 TP-Link ID 或您為便攜式路由器設定的密碼登入。
2. 當有適用於您便攜式路由器的最新韌體可用時,頁面右上角將顯示升級圖示。按一下圖示 前往 韌體升級 頁面。或者,您可以前往 進階 > 系統 > 韌體升級,然後按一下 檢查更新 以查看最新的韌體是否已發布。
3. 如果有新韌體,按一下 升級。
4. 等待幾分鐘讓升級和重新啟動完成。
提示:如果您的便攜式路由器有新的且重要的韌體更新,只要開啟網頁瀏覽器,您就會在電腦上看到提示通知。按一下 升級,然後使用您為便攜式路由器設定的使用者名稱和密碼登入網頁管理頁面。您將看到 韌體升級 頁面。
本地升級
1. 從 www.tp-link.com 下載適用於該便攜式路由器的最新韌體檔案。
2. 造訪 http://tplinkwifi.net,並使用您的 TP-Link ID 或您為便攜式路由器設定的密碼登入。
3. 前往 進階 > 系統 > 韌體升級。
4. 聚焦於 本地升級 區塊。按一下 瀏覽 尋找下載的新韌體檔案,然後按一下 升級。
5. 等待幾分鐘讓升級和重新啟動完成。
注意:如果您無法升級便攜式路由器的韌體,請聯繫我們的技術支援。
8.7 備份與還原設定
設定儲存為便攜式路由器中的設定檔。您可以將設定檔備份到電腦以備將來使用,並在需要時從備份檔案將便攜式路由器還原至之前的設定。此外,如有必要,您可以擦除當前設定並將便攜式路由器重設為原廠預設設定。
1. 造訪 http://tplinkwifi.net,並使用您的 TP-Link ID 或您為便攜式路由器設定的密碼登入。
2. 前往 進階 > 系統 > 備份與還原。
• 備份設定:
按一下 備份 將當前設定的副本儲存到本地電腦。當前設定的「.bin」檔案將儲存到您的電腦中。
• 還原設定:
1. 按一下 上傳 尋找儲存在您電腦上的備份設定檔,然後按一下 還原。
2. 等待幾分鐘進行還原和重新啟動。
注意:在還原過程中,請勿關閉或重設便攜式路由器。
• 重設便攜式路由器(登入密碼和 TP-Link ID 除外):
1. 在 恢復原廠預設值 區塊中,按一下 還原。
2. 等待幾分鐘進行重設和重新啟動。
注意:
• 在重設過程中,請勿關閉便攜式路由器。
• 重設後,您仍可以使用當前的登入密碼或 TP-Link ID 登入網頁管理頁面。
• 將便攜式路由器重設為原廠預設設定:
1. 按一下 恢復原廠設定 以重設便攜式路由器。
2. 等待幾分鐘進行重設和重新啟動。
注意:
• 在重設過程中,請勿關閉或重設便攜式路由器。
• 我們強烈建議您在重設便攜式路由器之前備份當前的設定。
8.8 TP-Link 雲端服務
TP-Link 雲端服務提供了一種更好的方式來管理您的雲端設備。使用 TP-Link ID 登入便攜式路由器,無論身在何處,都可以透過 Tether 應用程式輕鬆監控和管理您的家庭網路。為了確保您的便攜式路由器保持最新狀態並隨時間推移變得更好,TP-Link 雲端將在有重要的韌體升級可用時通知您。當然,您也可以使用單個 TP-Link ID 管理多個 TP-Link 雲端設備。
本節介紹如何註冊新的 TP-Link ID、綁定或解綁 TP-Link ID 以管理便攜式路由器,以及無論您身在何處都可以使用它管理家庭網路的 Tether 應用程式。
8.8.1 註冊 TP-Link ID
如果您在快速設定過程中跳過了註冊,您可以:
1. 造訪 http://tplinkwifi.net,並使用您為便攜式路由器設定的密碼登入。
2. 前往 進階 > TP-Link ID 或按一下頁面最頂部的 TP-Link ID。
3. 按一下 註冊 並按照說明註冊 TP-Link ID。
4. 啟用 TP-Link ID 後,返回 TP-Link ID 頁面進行登入。首次用於登入便攜式路由器的 TP-Link ID 將自動綁定為 管理員。
注意:
• 要了解有關 管理員 和 使用者 TP-Link ID 的更多資訊,請參閱 管理使用者 TP-Link ID。
• 在網頁管理頁面上註冊 TP-Link ID 後,只能透過 Tether 應用程式註冊另一個 TP-Link ID。請參閱 透過 Tether 登入 安裝應用程式。
• 如果您想從便攜式路由器解綁管理員 TP-Link ID,請前往 進階 > TP-Link ID,然後按一下設備資訊區塊中的解綁。
8.8.2 變更您的 TP-Link ID 資訊
按照以下步驟根據需要變更 TP-Link ID 的電子郵件地址和密碼。
1. 造訪 http://tplinkwifi.net,並使用您的 TP-Link ID 登入。
2. 前往 進階 > TP-Link ID,並聚焦於 TP-Link ID 區塊。
• 變更您的電子郵件地址:
1. 按一下電子郵件後面的 。
2. 輸入您 TP-Link ID 的密碼,然後輸入新的電子郵件地址。然後按一下 儲存。
• 變更您的密碼:
1. 按一下密碼後面的 。
2. 輸入當前密碼,然後輸入兩次新密碼。然後按一下 儲存。
8.8.3 管理使用者 TP-Link ID
首次用於登入便攜式路由器的 TP-Link ID 將自動綁定為 擁有者 帳戶。擁有者帳戶可以在同一台便攜式路由器中添加或刪除其他 TP-Link ID。所有帳戶都可以在本地或遠端監控和管理便攜式路由器,但只有擁有者帳戶可以:
• 在網頁管理頁面或 Tether 應用程式中將便攜式路由器重設為原廠預設設定。
• 向便攜式路由器添加/從中刪除其他 TP-Link ID。
添加 TP-Link ID 以管理便攜式路由器
1. 造訪 http://tplinkwifi.net,並使用您的 TP-Link ID 登入。
2. 前往 進階 > TP-Link ID,並聚焦於 已綁定的 TP-Link ID 區塊。
3. 按一下 ,根據需要輸入另一個 TP-Link ID,然後按一下 儲存。
注意:如果您需要另一個 TP-Link ID,請透過 Tether 應用程式註冊一個新 ID。請參閱 透過 TP-Link Tether 應用程式管理便攜式路由器 安裝應用程式並註冊新的 TP-Link ID。
4. 新的 TP-Link ID 將顯示在 已綁定的 TP-Link ID 表格中。
取消 TP-Link ID 對便攜式路由器的管理權限
1. 造訪 http://tplinkwifi.net,並使用您的 TP-Link ID 登入。
2. 前往 進階 > TP-Link ID,並聚焦於 已綁定的 TP-Link ID 區塊。
3. 勾選要刪除的 TP-Link ID 的 解綁。
8.9 變更登入密碼
帳戶管理功能允許您變更網頁管理頁面的登入密碼。
注意:如果您使用 TP-Link ID 登入網頁管理頁面,帳戶管理功能將被停用。要管理 TP-Link ID,請前往「進階 > TP-Link ID」。
1. 造訪 http://tplinkwifi.net,並使用您的 TP-Link ID 或您為便攜式路由器設定的密碼登入。
2. 前往 進階 > 系統 > 權限管理 並聚焦於 變更密碼 區塊。
3. 輸入舊密碼,然後輸入兩次新密碼(均區分大小寫)。按一下 儲存。
4. 以後的登入請使用新密碼。
8.10 密碼找回
此功能允許您在忘記密碼時找回為便攜式路由器設定的登入密碼。
注意:如果您使用 TP-Link ID 登入網頁管理頁面,密碼找回功能將被停用。要管理 TP-Link ID,請前往 進階 > TP-Link ID。
1. 造訪 http://tplinkwifi.net,並使用您為便攜式路由器設定的密碼登入。
2. 前往 進階 > 系統 > 權限管理 並聚焦於 管理員密碼找回 區塊。
3. 按一下 安全問題設定 來設定安全問題。
4. 勾選 密碼找回 的 啟用 方塊。
5. 指定用於發送找回郵件的 信箱(寄件者) 並輸入其 SMTP 伺服器 地址。指定用於接收找回郵件的 信箱(收件者)。如果發送找回郵件的信箱(寄件者)需要加密,請勾選 驗證 的 啟用 方塊並輸入其使用者名稱和密碼。
提示:
• 大多數 Web 郵件系統中的使用者都可以使用 SMTP 伺服器。例如,Gmail 的 SMTP 伺服器地址是 smtp.gmail.com。
• 通常,如果信箱登入需要使用者名稱和密碼,則應啟用驗證。
6. 按一下 儲存。
要找回登入密碼,請造訪 http://tplinkwifi.net,按一下登入頁面上的 忘記密碼? 並按照說明設定新密碼。
8.11 本地管理
此功能允許您透過使用基於 MAC 地址的驗證,限制 LAN 上存取便攜式路由器的用戶端設備數量。
1. 造訪 http://tplinkwifi.net,並使用您的 TP-Link ID 或您為便攜式路由器設定的密碼登入。
2. 前往 進階 > 系統 > 權限管理,並根據需要在 本地管理 區塊中完成設定。
• 透過 HTTPS 和 HTTP 存取便攜式路由器:
勾選 透過 HTTPS 進行本地管理 的 啟用 方塊以透過 HTTPS 和 HTTP 存取便攜式路由器,或保持其停用以僅透過 HTTP 存取便攜式路由器。
• 允許所有連接 LAN 的設備管理便攜式路由器:
為本地管理者選擇 所有設備 。
• 允許特定設備管理便攜式路由器:
1. 為本地管理者選擇 指定設備,然後按一下 儲存。
2. 按一下 新增設備。
3. 按一下 檢視已連接的設備 並從已連接的設備清單中選擇要管理便攜式路由器的設備,或手動輸入設備的 MAC 地址。
4. 為此條目指定一個 描述。
5. 按一下 儲存。
8.12 系統記錄
當便攜式路由器無法正常工作時,您可以儲存系統記錄並將其發送給技術支援以進行疑難排解。
• 在本地儲存系統記錄:
1. 造訪 http://tplinkwifi.net,並使用您的 TP-Link ID 或您為便攜式路由器設定的密碼登入。
2. 前往 進階 > 系統 > 系統記錄。
3. 根據需要選擇系統記錄的類型和等級。
4. 在 儲存記錄 區塊中,按一下 儲存到本地 將系統記錄儲存到本地磁碟。
• 定時將系統記錄發送到信箱:
例如,我想每天在固定時間檢查我便攜式路由器的工作狀態,但是每次想去檢查都要登入網頁管理頁面太麻煩了。如果每天早上 8 點能把系統記錄發送到我的信箱就太好了。
1. 造訪 http://tplinkwifi.net,並使用您的 TP-Link ID 或您為便攜式路由器設定的密碼登入。
2. 前往 進階 > 系統 > 系統記錄。
3. 在 儲存記錄 區塊中,按一下 郵寄記錄。
4. 輸入所需的資訊:
• 寄件者電子郵件: 輸入用於發送系統記錄的電子郵件地址。
• 選擇 需要密碼。
提示:通常,如果信箱登入需要使用者名稱和密碼,則應選擇「需要密碼」。
• 使用者名稱: 輸入用於發送系統記錄的電子郵件地址。
• 電子郵件密碼: 輸入登入發件人電子郵件地址的密碼。
• SMTP 伺服器: 輸入 SMTP 伺服器地址。
提示:大多數 Web 郵件系統中的使用者都可以使用 SMTP 伺服器。例如,Hotmail 的 SMTP 伺服器地址是 smtp-mail.outlook.com。
• 收件者電子郵件: 輸入收件者的電子郵件地址,可以與發件人的電子郵件地址相同或不同。
• 選擇 自動郵寄記錄。
提示:如果啟用此選項,便攜式路由器將把系統記錄發送到指定的電子郵件地址。
• 頻率: 這決定了收件者接收系統記錄的頻率。
5. 按一下 儲存。
8.13 測試網路連線
診斷用於測試便攜式路由器與主機或其他網路設備之間的連線。
1. 造訪 http://tplinkwifi.net,並使用您的 TP-Link ID 或您為便攜式路由器設定的密碼登入。
2. 前往 進階 > 系統 > 診斷工具。
3. 輸入資訊:
1 ) 選擇 Ping 或 Traceroute 作為診斷工具來測試連線;
• Ping 用於測試便攜式路由器與被測主機之間的連線,並測量往返時間。
• Traceroute 用於顯示您的便攜式路由器到達被測主機所經過的路由(路徑),並測量封包跨網際網路協定網路的傳輸延遲。
2 ) 輸入被測主機的 IP 地址 或 網域名稱 。
3 ) 修改 Ping 次數 數字和 Ping 封包大小。建議保持預設值。
4 ) 如果您選擇了 Traceroute,您可以修改 Traceroute 最大 TTL。建議保持預設值。
4. 按一下 開始 開始診斷。
下圖顯示透過 Ping 測試的便攜式路由器與 Yahoo 伺服器 (www.Yahoo.com) 之間的正常連接。
下圖顯示透過 Traceroute 測試的便攜式路由器與 Yahoo 伺服器 (www.Yahoo.com) 之間的正常連接。
8.14 設定系統時間
系統時間是便攜式路由器執行時顯示的時間。您在此處設定的系統時間將用於其他基於時間的功能(如家長監護)。您可以根據需要選擇獲取系統時間的方式。
1. 造訪 http://tplinkwifi.net,並使用您的 TP-Link ID 或您為便攜式路由器設定的密碼登入。
2. 前往 進階 > 系統 > 時間設定。
• 從網際網路獲取時間:
1. 如果您希望時間以 24 小時制顯示,請啟用 24 小時制時間 。
2. 在 設定時間 欄位中,選擇 從網際網路獲取。
3. 從下拉式清單中選擇您當地的 時區。
4. 在 NTP 伺服器 I 欄位中,輸入您想要的 NTP 伺服器的 IP 地址或網域名稱。
5. (選填)在 NTP 伺服器 II 欄位中,輸入第二個 NTP 伺服器的 IP 地址或網域名稱。
6. 按一下 儲存。
• 從您的電腦獲取時間:
1. 在設定時間欄位中,選擇從管理設備獲取。
2. 隨後將顯示您電腦的時間,按一下儲存。
• 手動設定日期和時間:
1. 在 設定時間 欄位中,選擇 手動。
2. 設定當前 日期 (格式為 月/日/年)。
3. 設定當前 時間 (格式為 時/分/秒)。
4. 按一下 儲存。
• 設定日光節約時間(夏令時間):
1. 勾選日光節約時間的 啟用 方塊。
2. 選擇您當地時區日光節約時間開始的正確 開始 日期和時間。
3. 選擇您當地時區日光節約時間結束的正確 結束 日期和時間。
4. 按一下 儲存。
8.15 設定便攜式路由器定期重新啟動
定期重新啟動功能可清除快取以提高便攜式路由器的執行效能。
1. 造訪 http://tplinkwifi.net,並使用您的 TP-Link ID 或您為便攜式路由器設定的密碼登入。
2. 前往 進階 > 系統 > 重新啟動。
3. 勾選重新啟動排程的 啟用 方塊。
4. 指定便攜式路由器重新啟動的 重新啟動時間,並指定 重複 以決定重新啟動的頻率。
5. 按一下 儲存。
8.16 控制 LED 燈
便攜式路由器的 LED 燈指示其活動和狀態。您可以啟用夜間模式功能來指定關閉 LED 燈的時間段。
1. 造訪 http://tplinkwifi.net,並使用您的 TP-Link ID 或您為便攜式路由器設定的密碼登入。
2. 前往 進階 > 系統 > LED 控制。
3. 啟用 夜間模式。
4. 指定 LED 關閉 時間,每天在此期間 LED 燈將關閉。
5. 按一下 儲存。
8.17 自訂按鍵 (Action Switch)
可自訂的實體切換按鍵為您 provide 控制各種功能(包括 Wi-Fi、LED 和 VPN 合併)的實體快捷方式。
1. 造訪 http://tplinkwifi.net,並使用您的 TP-Link ID 或您為便攜式路由器設定的密碼登入。
2. 前往 進階 > 系統 > 自訂按鍵。
3. 選擇一個快速控制選項,然後按一下 儲存。
8.18 ECO 節能模式
ECO 模式開關用於變更便攜式路由器的省電模式。要變更 ECO 模式,請將設備上的模式開關切換到您想要的模式。
1. 造訪 http://tplinkwifi.net,並使用您的 TP-Link ID 或您為便攜式路由器設定的密碼登入。
2. 前往 進階 > 系統 > ECO 模式。
3. 選擇偏好模式,然後按一下 儲存。
• 效能模式: 有利於無線涵蓋範圍和傳輸速度,但可能會增加能源消耗並提高設備溫度。
• 平衡模式: 在考量能源消耗和設備溫度的同時,自動平衡無線涵蓋範圍和傳輸速度。
• ECO 模式: 透過降低設備的無線涵蓋範圍和傳輸速度來節省能源並降低設備溫度。
章節 9. HomeShield
使用 TP-Link HomeShield 內建的一系列功能,自訂具備增強安全性的家庭網路。無論是保護您的敏感資料,還是限制兒童和訪客的存取權限,TP-Link HomeShield 都為您提供全面管理網路所需的工具。
*某些型號可能不支援此功能。圖片可能與實際產品有所不同。
*為了更輕鬆地檢查您的家庭網路保護系統,您可以下載 Tether 應用程式以享受完整的 HomeShield Pro 功能。
9.1 網路檢測
掃描您的整個網路,以協助分析和最佳化您的網路。
注意:某些型號可能不支援此功能。圖片可能與實際產品有所不同。
1. 造訪 http://tplinkwifi.net,並使用您的 TP-Link ID 或您為便攜式路由器設定的密碼登入。
2. 前往 進階 > HomeShield > 網路檢測。
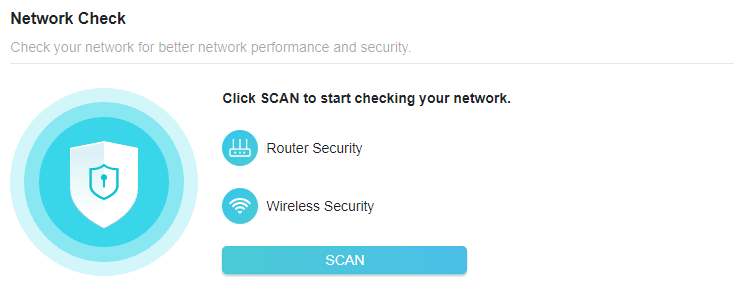
3. 按一下 掃描。
4. 根據提示最佳化您的網路。
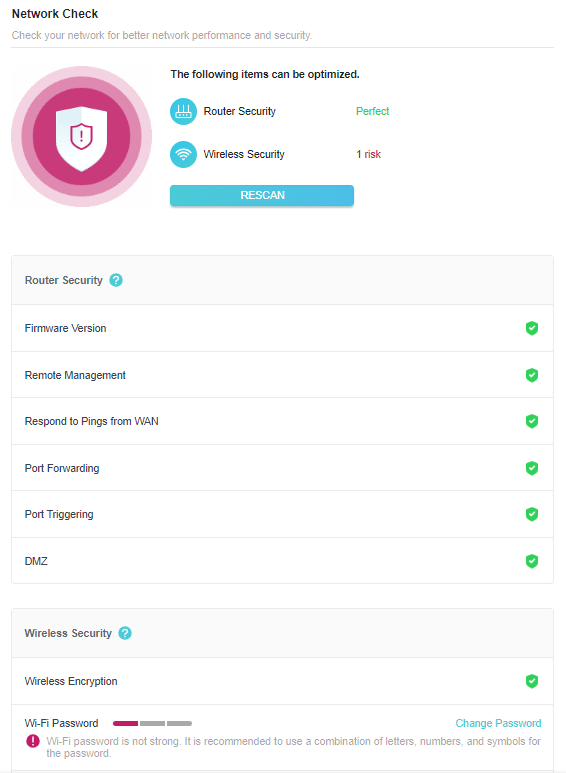
9.2 家長監護
家長監護允許您為家庭的每位成員設定獨特的網際網路存取限制。您可以阻擋不適當的內容,設定每天上網總時間的限制,並將網際網路存取限制在一天中的特定時間。
1. 造訪 http://tplinkwifi.net,並使用您的 TP-Link ID 或您為便攜式路由器設定的密碼登入。
2. 前往 進階 > HomeShield > 家長監護。
注意:對於某些不支援 HomeShield 的型號,請前往 進階 > 家長監護。圖片可能與實際產品有所不同。
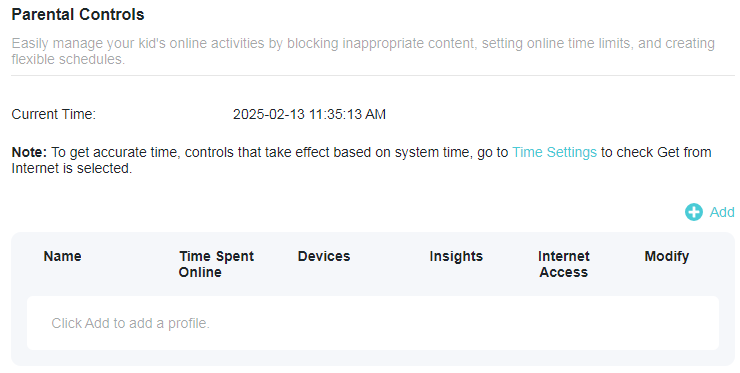
3. 按一下  為家庭成員建立設定檔。
4. 新增基本設定檔資訊。
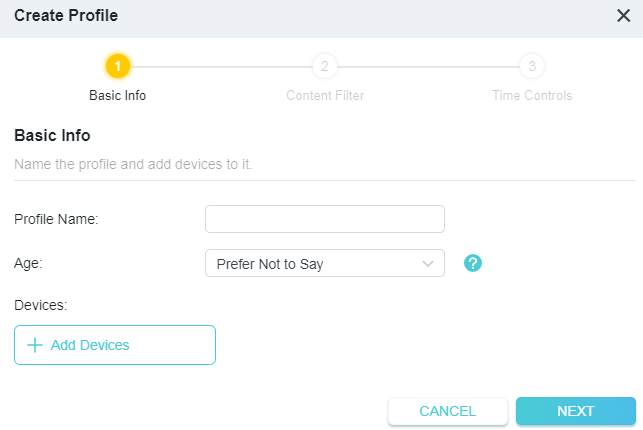
1 ) 為設定檔輸入名稱以便於識別。設定年齡以獲取相應的過濾等級。
2 ) 按一下 + 新增設備。
3 ) 選擇屬於該家庭成員的設備。存取限制將套用到這些設備。完成後按一下 新增。
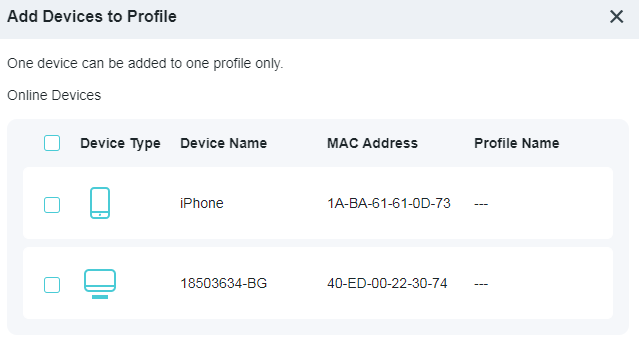
注意:此處僅列出先前曾連接到您便攜式路由器網路的設備。如果您找不到想要新增的設備,請將其連接到您的網路,然後重試。
4 ) 按一下 下一步
5. 封鎖此設定檔的內容。
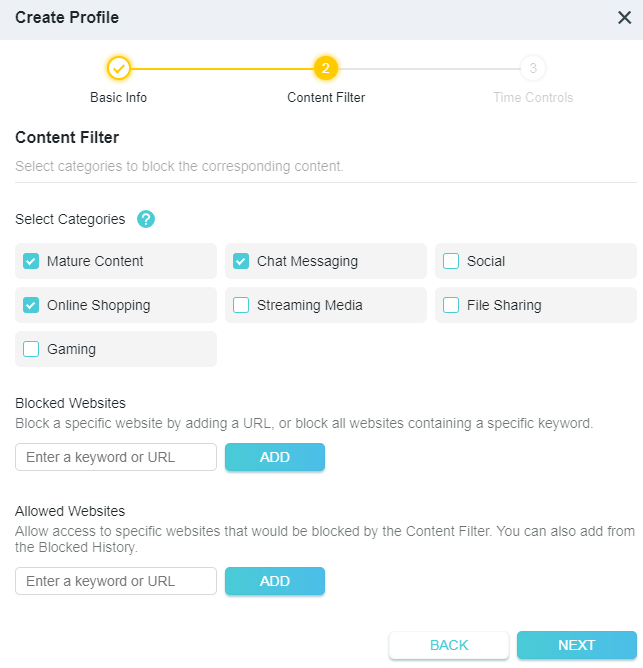
1 ) 在 內容過濾 清單中選擇要封鎖的內容類別。
2 ) 您還可以封鎖特定網站或新增已允許的網站。輸入關鍵字(例如「Facebook」)或 URL(例如「www.facebook.com」),然後按一下新增。
3 ) 按一下 下一步。
6. 設定網際網路存取的時間限制。
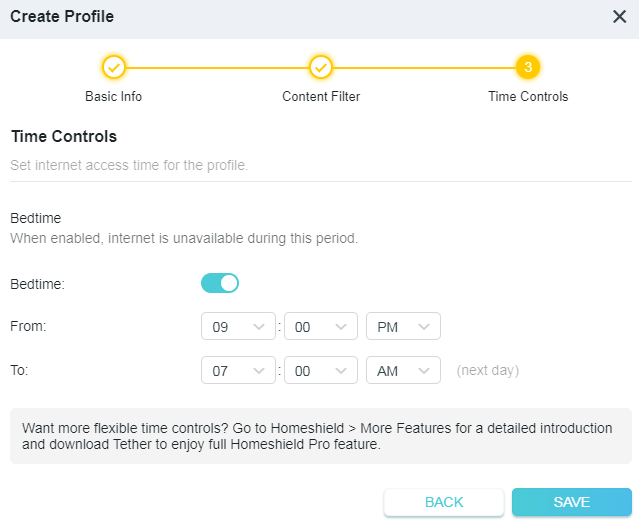
1 ) 啟用 就寢時間 並使用上/下箭頭或在欄位中輸入時間。此設定檔下的設備在此時間段內將無法存取網際網路。
2 ) 按一下 儲存。
3 ) 新增設定檔後,您可以按一下洞察圖示來檢查詳細的造訪歷史記錄,並隨時暫停此設定檔的網路。
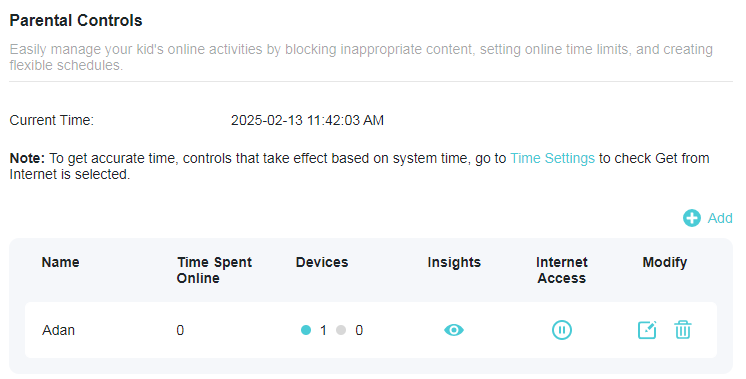
注意:您可以前往 進階 > HomeShield > 更多功能 查看詳細介紹,並下載 Tether 享受完整的 HomeShield Pro 功能。
9.3 QoS
QoS(服務品質)允許您在設定的時間內優先考慮特定設備的連接。設定為高優先順序的設備將被分配更多頻寬,因此即使在網路流量繁忙時也能繼續順暢執行。
1. 造訪 http://tplinkwifi.net,並使用您的 TP-Link ID 或您為便攜式路由器設定的密碼登入。
2. 前往 進階 > HomeShield > QoS。
注意:對於某些不支援 HomeShield 的型號,請前往 進階 > QoS。圖片可能與實際產品有所不同。
3. 啟用 QoS 以設定總頻寬。然後按一下 儲存。
4. 為所需的設備啟用 高優先順序 並設定其生效時間。
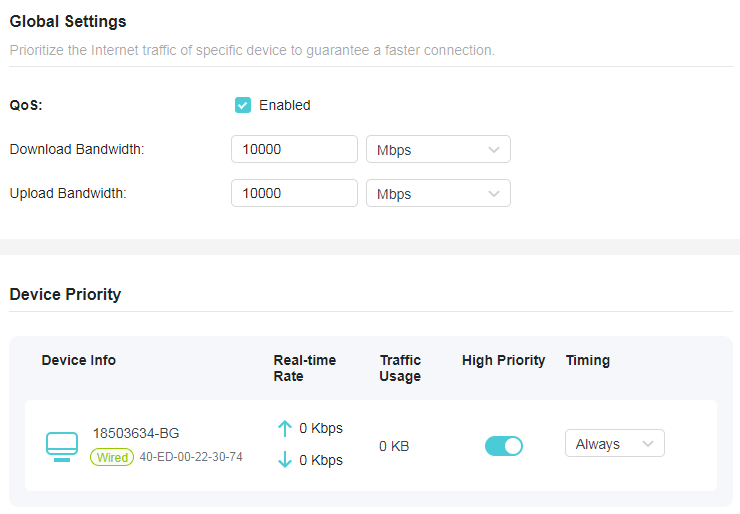
9.4 更多功能
下載 Tether 應用程式並訂閱即可享受 HomeShield 的完整功能。
注意:某些型號可能不支援此功能。圖片可能與實際產品有所不同。
1. 造訪 http://tplinkwifi.net,並使用您的 TP-Link ID 或您為便攜式路由器設定的密碼登入。
2. 前往 進階 > HomeShield > 更多功能。
3. 按照網頁指示獲取 HomeShield 的完整功能。
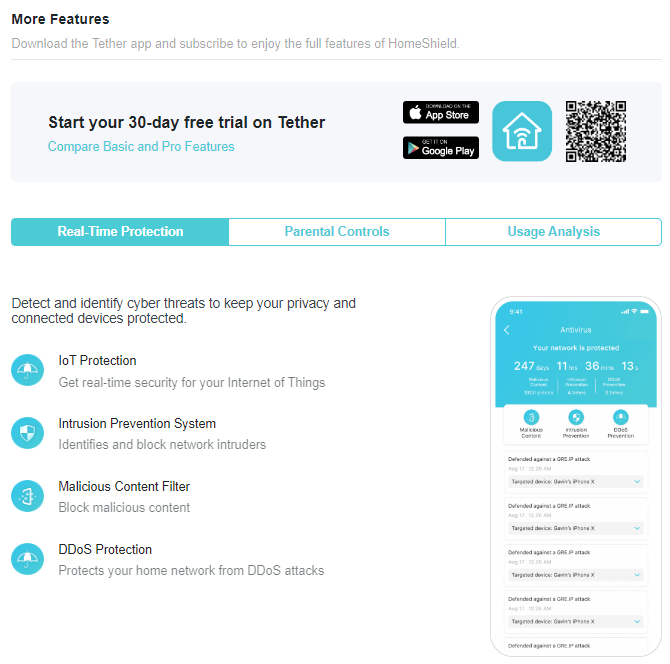
FAQ
Q1. 如果無法存取網際網路,我該怎麼辦?
• 透過將電腦/手機直接連接到當前網路,檢查網際網路是否正常工作。如果無法正常工作,請聯繫您的網際網路服務提供者。如果您在飯店房間或展覽會上,網際網路可能會受到限制,需要您進行服務驗證或購買網際網路存取權限。
• 如果您使用的是 Cable Modem(纜線數據機),請將 Modem 關機約 5 分鐘,然後開機並檢查網際網路。如果您的 Modem 有多個乙太網路連接埠,請保持其他連接埠未連接。
• 登入網頁管理頁面,前往「網路地圖」頁面檢查網際網路 IP 地址是否有效。如果有效,請前往「進階 > 網路設定 > 網際網路 > 網路連線優先順序」。按一下您網際網路連線類型的設定圖示  ,然後前往「進階設定 > DNS 地址」並選擇「使用以下 DNS 地址」,將主要 DNS 設定為 8.8.8.8,次要 DNS 設定為 8.8.4.4。如果無效,請檢查硬體連接或聯繫您的網際網路服務提供者。對於某些型號,您可以前往「進階 > 網路設定 > 網際網路」,按一下「進階設定」,選擇「使用以下 DNS 地址」,將主要 DNS 設定為 8.8.8.8,次要 DNS 設定為 8.8.4.4。如果無效,請檢查硬體連接或聯繫您的網際網路服務提供者。
Q2. 如果忘記 Wi-Fi 密碼,我該怎麼辦?
• 如果您未變更預設的無線密碼,可以在便攜式路由器的標籤上找到。
• 使用乙太網路線將電腦直接連接到便攜式路由器的 LAN 連接埠。登入便攜式路由器的網頁管理頁面 http://tplinkwifi.net,然後前往 無線網路 頁面以找回或重設您的無線密碼。
Q3. 如果忘記網頁管理頁面的登入密碼,我該怎麼辦?
• 如果您使用 TP-Link ID 登入,請按一下登入頁面上的「忘記密碼?」,然後按照說明進行重設。
• 或者,按住 RESET 按鈕約 6 秒鐘以重設便攜式路由器。然後造訪 http://tplinkwifi.net 建立新的登入密碼。
Q4. 如果我的無線訊號不穩定或微弱,我該怎麼辦?
這可能是由於干擾過大引起的。
• 將您的無線頻道設定為其他頻道。
• 選擇一個較少可能阻擋便攜式路由器與主 AP 之間訊號障礙物的位置。開放的走廊或寬敞的位置是理想的選擇。
• 將便攜式路由器移動到遠離藍牙設備和其他家用電子產品(如無線電話、微波爐和嬰兒監視器)的新位置,以盡可能減少訊號干擾。
• 在訊號延伸器模式下,放置便攜式路由器的理想位置是主 AP 和 Wi-Fi 死角之間的中點。如果無法實現,請將便攜式路由器放置在靠近主 AP 的位置,以確保穩定的效能。
Q5. 當便攜式路由器設定為熱點模式時,如果無法進入驗證入口頁面(Captive Portal),我該怎麼辦?
• 如果入口登入頁面在快速設定過程中未開啟,請將您的智慧型手機或電腦連接到便攜式路由器,然後開啟任何網站,您將被重新導向到入口登入頁面。
• 如果某些公共熱點透過 MAC 地址限制每個客戶端可以存取的設備數量,請執行以下操作:
1. 將智慧型手機連接到公共熱點的 Wi-Fi。在其 Wi-Fi 清單中找到智慧型手機的 MAC 地址,並記錄該 MAC 地址。
2. 登入便攜式路由器的網頁管理頁面,前往「進階 > 網路設定 > 網際網路 > 網路連線優先順序 > 熱點設定 > 路由器 MAC 地址」。選擇「使用自訂 MAC 地址」,輸入您的智慧型手機用於連接公共熱點 Wi-Fi 的 MAC 地址,然後按一下「儲存」。對於某些型號,您可以前往「進階 > 網路設定 > 網際網路 > 路由器 MAC 地址」。選擇「使用自訂 MAC 地址」,輸入您的智慧型手機用於連接公共熱點 Wi-Fi 的 MAC 地址,然後按一下「儲存」。
Q6. 如果想變更便攜式路由器的網路模式,我該怎麼辦?
方法 1. 登入便攜式路由器的網頁管理頁面,前往「進階 > 系統 > 運作模式」,然後按照說明完成設定。
方法 2. 登入便攜式路由器的網頁管理頁面,按一下「變更模式」,然後按照說明完成設定。