


Troubleshoot TP-Link Wired Adapter Stability and Performance
If you encounter any stability issues or speed problems (where the speed cannot reach 10G) after installing your TP-Link wired adapter, this article will provide you with several troubleshooting suggestions using TX401 as an example.
Key Takeaways
- Fix Frequent Disconnects: Upgrade to the latest driver, use a Cat6A shielded cable, and manually set the PCIe speed to Gen3 in the BIOS instead of Auto negotiation.
- Resolve Sleep, Reboot, or Disappearance Issues: Disable PCI Express Link State Power Management in Windows, turn off power-saving mode in Device Manager, and disable Fast Boot in the BIOS.
- Prevent Lag & Game Crashes Under Heavy Load: Enable Jumbo Frames (9014 Bytes), then disable Recv Segment Coalescence (RSC IPv4 & IPv6) in the adapter's Advanced properties.
- Fix Bandwidth Bottlenecks & Low Speeds: Ensure your motherboard's PCIe slot provides enough bandwidth (at least PCIe 3.0 x1) and avoid slots affected by M.2/SATA PCIe lane sharing.
Troubleshoot for Stability
Due to potential variations in network card stability, we will provide troubleshooting suggestions based on different abnormal manifestations below.
Scenario 1: Frequent Disconnection and Reconnection
Regarding unstable network card performance, here are four suggestions for optimization. You can try upgrading the driver, checking the network cable, modifying the PCI-E Speed on the computer motherboard, and adjusting the Link Speed Negotiation of the network card.
Upgrade to the Latest Driver
Please go to your driver’s Support page to download the latest driver, such as TX401.
Check the Ethernet Cable
- Check the Ethernet Cable Category
To achieve stable 10G speeds, always use a Cat6A (or higher) shielded Ethernet cable. Standard Cat5e or non-shielded Cat6 cables are prone to signal degradation, leading to frequent disconnects or speed drops.
- Check the Length of the Ethernet Cable
Cat6A / Cat7: Supports 10G up to 100 meters (328 ft).
Cat5e / Cat6: Supports 10G up to a maximum of 55 meters (180 ft) under ideal, interference-free conditions. Exceeding this distance will cause negotiation failures or performance degradation.
- Check the Cable Quality
Sub-optimal cable quality (e.g., non-copper wires, poorly crimped connectors) or routing near heavy power cables (EMI) will drastically reduce effective distance.
If using existing long/legacy cabling, try replacing it with the included Cat6A cable and test it.
Change the NIC (Network Adapter) Link Speed Negotiation
In the network adapter's Advanced settings, the speed negotiation is set to 'Auto' by default. You can try manually setting it to 10G. If the connection fails, it may be due to poor environmental conditions preventing 10G operation; in this case, try lowering the speed to 5G or 2.5G.
Change the Motherboard’s PCI-E settings
The motherboard BIOS is set to 'Auto' negotiation by default, which may fail and result in repeated renegotiation, leading to disconnections and reconnects. Consider manually setting the PCIe speed to PCIe Gen3 to verify connection stability.
Scenario 2: Network Card Sleep-related, Restart, Disappearance
The computer's power management can affect sleep mode, the restart process, and even the Wi-Fi disappearance of the network card device. We suggest that you try modifying the power management settings to optimize.
Disable the Power Management of the Network Card
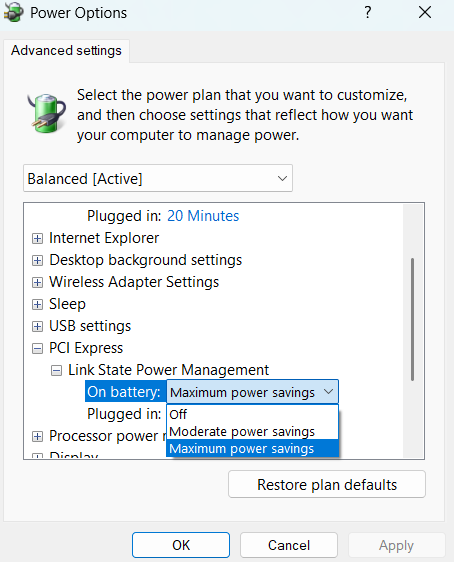
Go to control panel > Power Options > Change plan settings > Change advanced power settings, find the PCI Express, find the Link State Power management, then turn it off.
Turn off the Power-saving Mode of the Computer
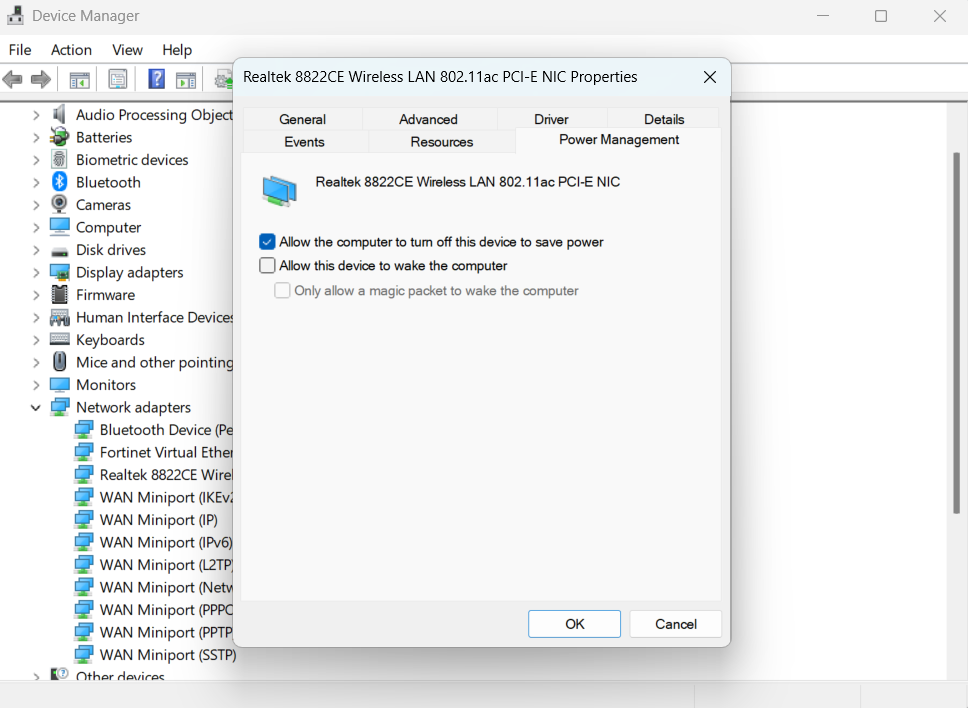
Go to the device management > Network card, then please find the TX401 adapter. Double-click it and go to Power Management, then untick Allow the computer to turn off this device to save power.
Disable Fast Boot in BIOS
Disabling Fast Boot involves motherboard BIOS settings, so we recommend consulting your motherboard manufacturer for specific instructions.
Generally, you can enter the BIOS setup page and check under Boot > Fast Boot.
Scenario 3: Poor Performance During Heavy Data Transfers & Game Crashes
Sometimes, when there is a high data transmission volume or when using a relatively high bandwidth, the device may encounter stability issues such as lag. In such cases, you can try adjusting some parameters of the computer network card.
Enabling Jumbo Frames Setting
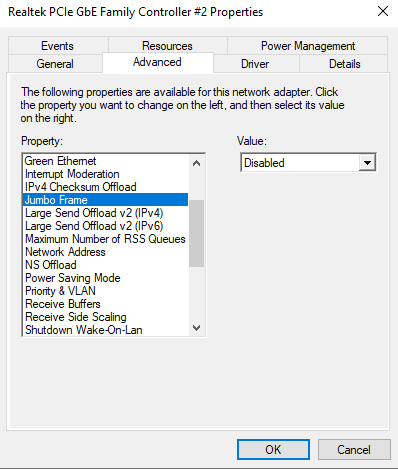
Go to the device management > Network card, then find the TX401 adapter. Right-click the network adapter and select Properties > Switch to the Advanced tab.
In the Property list, locate the following setting:
Jumbo Packet or Jumbo Frame
In the Value drop-down menu on the right, change the default setting from Disabled (or 1500) to 9014 Bytes or 9K Bytes (typically select the maximum value available). Click OK to save the settings.
Disabling the Recv Segment Coalescence IPv4/IPV6
Go to the device management > Network card, then please find the TX401 adapter. Right-click the network adapter and select Properties > Switch to the Advanced tab.
In the Property list, locate the following two settings:
Recv Segment Coalescence (IPv4)
Recv Segment Coalescence (IPv6)
Change the Value for both settings to Disabled, and click OK to apply the changes.
Troubleshoot for Performance
We purchased new network cards hoping to experience the device's extremely high performance. However, regarding the speed issue, it requires checking motherboard compatibility, as well as parameter settings, etc.
Check Compatibility Between Network Adapter and Motherboard
Some older or budget motherboards don't provide enough slot bandwidth, which can cap your TX401 below its full 10Gbps speed.
To run at 10Gbps, the TX401 needs enough motherboard bandwidth (at least PCIe 3.0 x1 or PCIe 2.0 x2). If you plug the card into an older PCIe 2.0 x1 or 1.0 slot, the hardware limit is only 4 to 8 Gbps, so it physically cannot reach 10Gbps.
Some motherboards have long slots that look like full-speed x16 slots (usually near the bottom), but internal wiring only connects 1 lane (PCIe 2.0 x1). This creates a bottleneck that slows down the network card.
We recommend contacting your motherboard manufacturer or checking its user manual to confirm whether your specific PCIe slot provides sufficient bandwidth (PCIe 3.0 x1 or higher) to support full 10Gbps performance.
Check PCIe Lane Sharing & Slot Switching of the Motherboard
Some motherboards share bandwidth across SATA, M.2, and PCIe slots using a priority hierarchy. When higher-priority slots are populated, lower-priority slots may be disabled or forced to run at reduced lane counts/PCIe generations. As a result, the network adapter may fail to be detected, or suffer performance drops due to bandwidth bottlenecks.
We suggest that if you experience recognition issues or speed drops, try moving the network adapter to a different PCIe slot (preferably one directly connected to the CPU) or consult your motherboard manual for slot sharing configurations.
Enable Jumbo Frames
Jumbo Frames can enhance the speed and performance of network transmission. Go to the device management > Network card, then find the TX401 adapter. Right-click the network adapter and select Properties > Switch to the Advanced tab.
In the Property list, locate the following setting:
Jumbo Packet or Jumbo Frame
In the Value drop-down menu on the right, change the default setting from Disabled (or 1500) to 9014 Bytes or 9K Bytes (typically select the maximum value available). Click OK to save the settings.
To get to know more details of each function and configuration, please go to the Download Center to download the manual for your product.
Looking For More
¿Es útil este artículo?
Tus comentarios nos ayudan a mejorar esta web.



TP-Link Community
Still need help? Search for answers, ask questions, and get help from TP-Link experts and other users around the world.