


How to Connect Your TP-Link Deco Mesh System to Starlink
This page covers how to connect Starlink with the Deco mesh for Starlink satellite dishes. There are two generations of Starlink Satellite Dish: The Gen-1 Terminal (Circular Dish) and the Gen-2 Terminal (Rectangular Dish). Each requires a different setup approach. The main difference between the two versions is the removal of the Ethernet Jack. Gen-2 Terminal does not include a built-in Ethernet port, so you must first purchase an Ethernet Adapter from Starlink to connect a third-party router.
Key Takeaways
- The Gen-2 Starlink terminal (rectangular dish) does not include a built-in Ethernet port. You must purchase a Starlink Ethernet Adapter separately before connecting Deco.
- With a Gen-2 terminal, there are two recommended setups: enable Bypass mode in the Starlink app under Settings > Advanced and run Deco in wireless router mode, or leave Bypass mode disabled and run Deco in Access Point mode.
- Enabling Bypass mode completely disables the built-in Starlink Wi-Fi router functionality. A factory reset is required to switch back, so consider this carefully before making the change.
- With a Gen-1 terminal (circular dish), you can connect Deco directly to the Starlink terminal without the Starlink router, or connect via the AUX port on the Gen-1 Starlink router.
- When connecting Deco alongside the Gen-1 Starlink router, changing Deco to Access Point mode is recommended to avoid a double NAT (Network Address Translation) issue.
Head below to learn how to connect Deco to the Starlink Terminal.
For the updated Gen-2 Starlink User Terminal
Unlike the Original Starlink Terminal, the Gen-2 Dish is Rectangular, and no PoE adapter is included. The Rectangular Dish will be directly powered by the Gen-2 Starlink router.
To connect Deco to Starlink using the Gen-2 terminal, please follow the steps below:
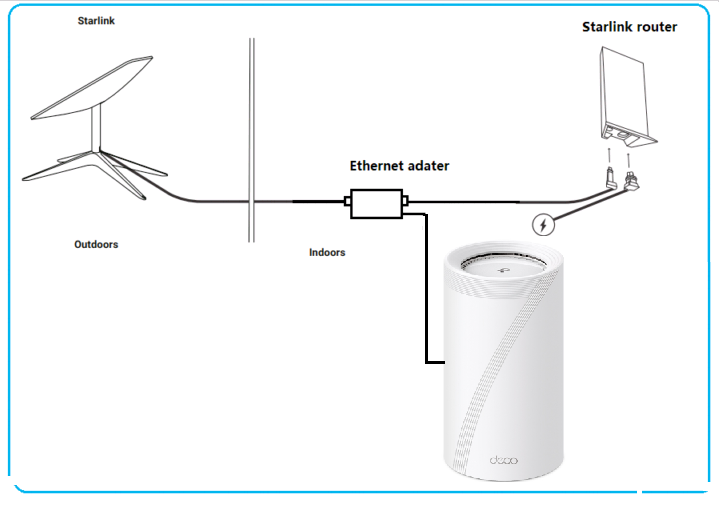
Step 1: Connect the main Deco to the Starlink router via an Ethernet adapter.
Note: This terminal doesn’t have an Ethernet port, so you’ll need to purchase the Ethernet adapter from Starlink.
Step 2: Choose the working mode on the Starlink router and the Deco system.
Gen-2 Starlink router supports Bypass mode, which will completely disable the built-in Starlink WiFi router functionality. You may choose one of the setups below based on whether you want to use the Starlink router’s Wi-Fi:
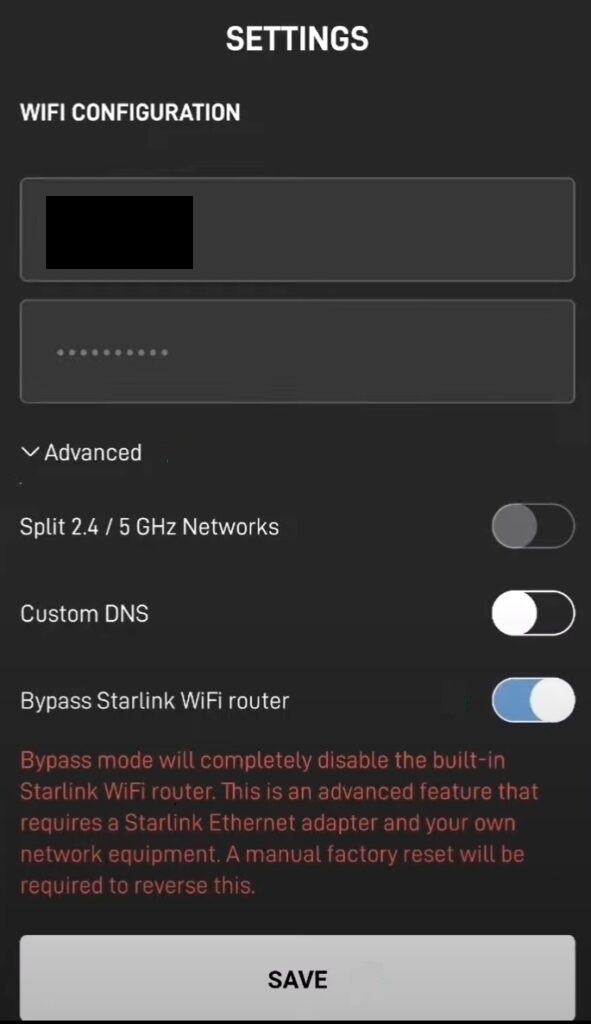
Option 1: Enable Bypass Mode (Deco in default Router Mode)
- Open the Starlink APP, go to Settings > Advanced, and toggle on Bypass Starlink WiFi router.
Note: A factory reset is required if you want to switch back to router mode.
Option 2: Leave Bypass Mode Disabled (Deco in Access Point Mode)
In this setup, no changes are required on the Starlink router. You only need to set up the Deco network and change its Operation Mode to Access Point.
For the original Gen-1 Starlink User Terminal
Option 1: Connect Deco Directly to the Starlink Terminal (Without Starlink Router)
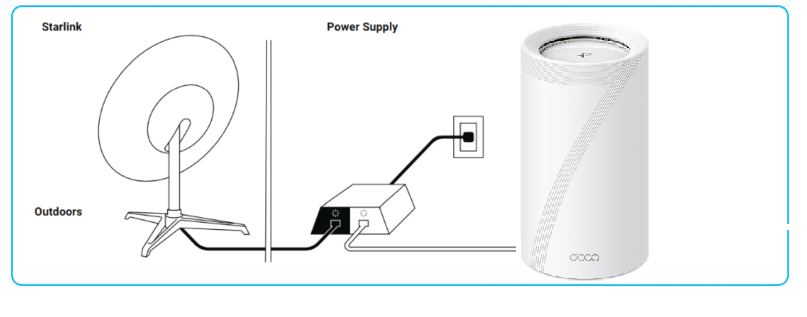
Follow this guide to set up Deco.
Option 2: Connect Deco via the Gen-1 Starlink Router
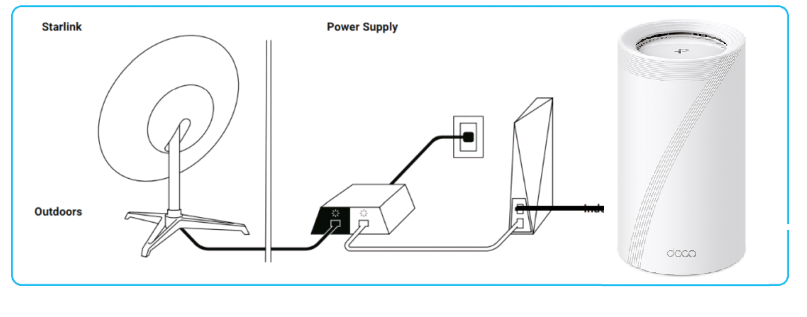
On this network topology, please connect Deco to the AUX port of the Gen-1 Starlink Router. Since the default operation mode on Deco is also a wireless router, to avoid the double-NAT issue, it is recommended to set Deco to Access Point mode.
Follow the guide to change Deco into Access Point mode.
For any further inquiries about Deco setup or configuration with Starlink, please contact our technical support.
ค้นหาเพิ่มเติม
คำถามที่พบบ่อยนี้มีประโยชน์หรือไม่?
ความคิดเห็นของคุณช่วยปรับปรุงเว็บไซต์นี้
_Overview_normal_20211225093343a.png)


TP-Link Community
Still need help? Search for answers, ask questions, and get help from TP-Link experts and other users around the world.