


How to install the VIGI Solar Panel system
Contents
Configuration for Dual-panel Model
Configuration for Single Panel Model
Introduction
VIGI Solar System provides flexible surveillance solution for multiple scenarios, with this article you can see how to install it properly to avoid low performance.
Requirements
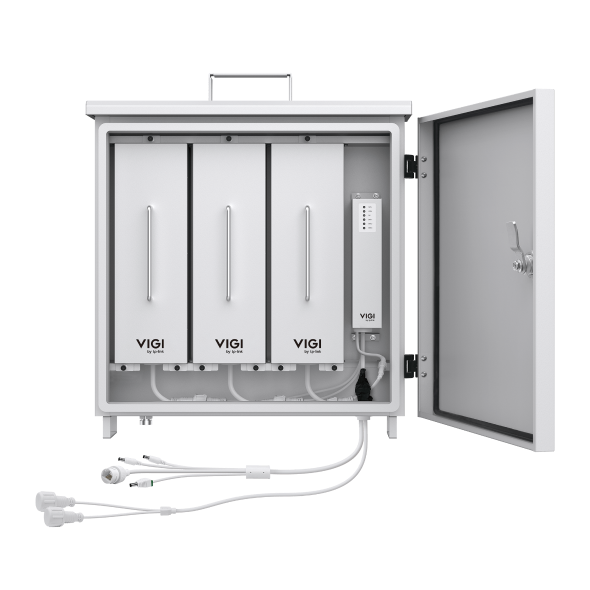
- A complete dual-panel solar power system includes the following parts: Solar component (photovoltaic panel), Main bracket, IPC(IP Camera) bracket, a waterproof box containing three batteries.
- A complete single panel solar power system includes the following parts: Solar component (photovoltaic panel), Main bracket, IPC(IP Camera) bracket.
Configuration
Configuration for Dual-panel Model
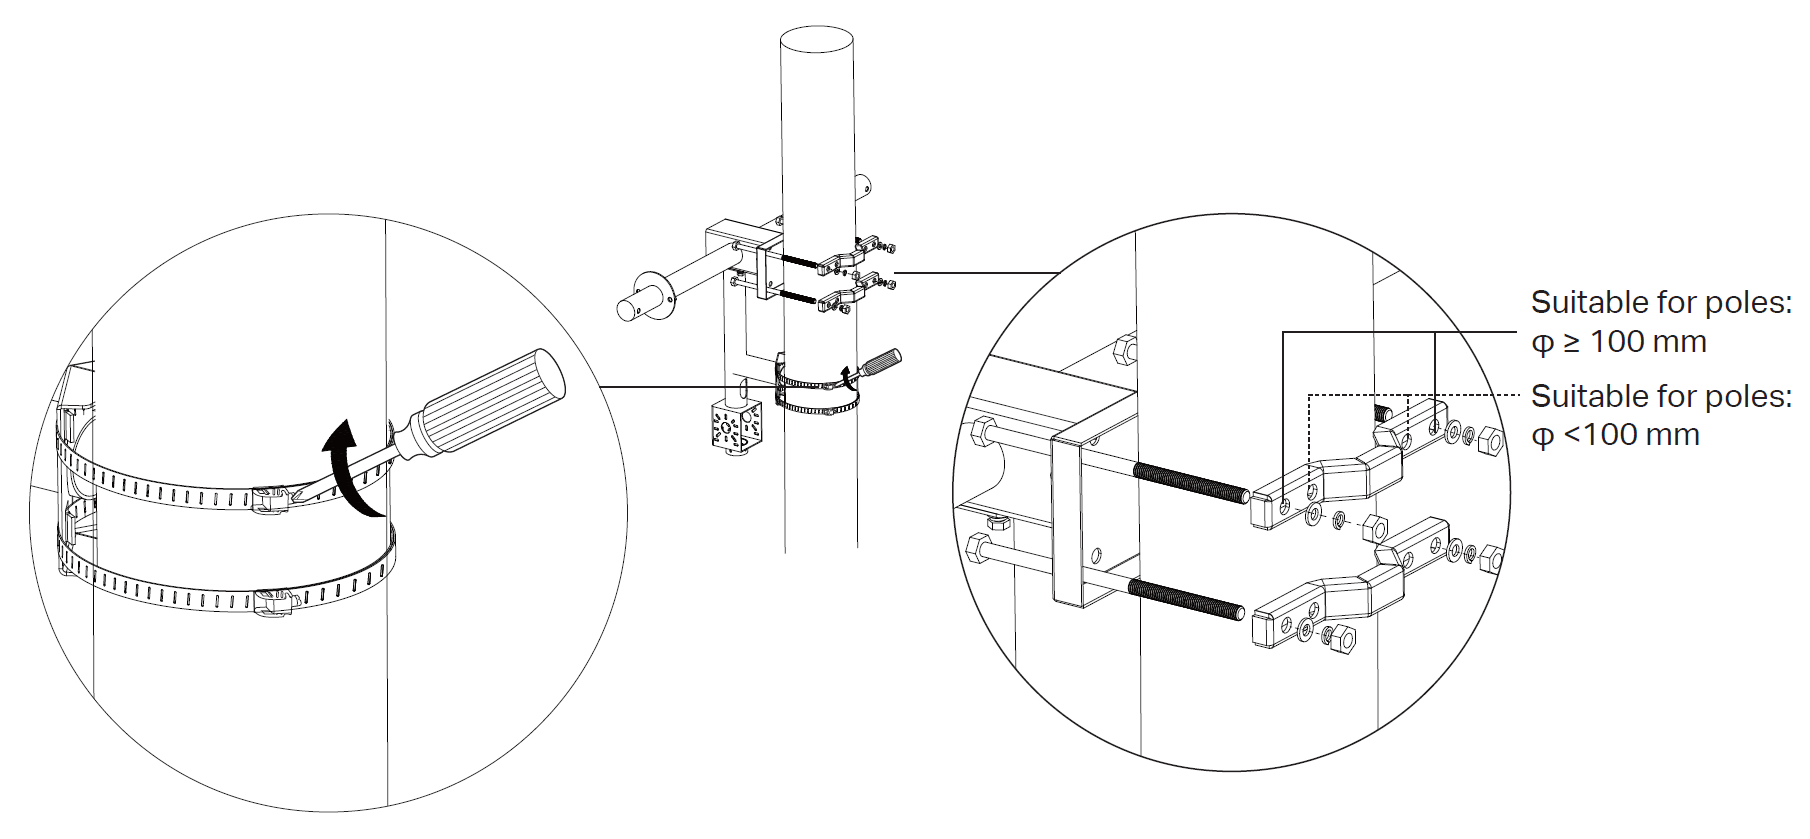
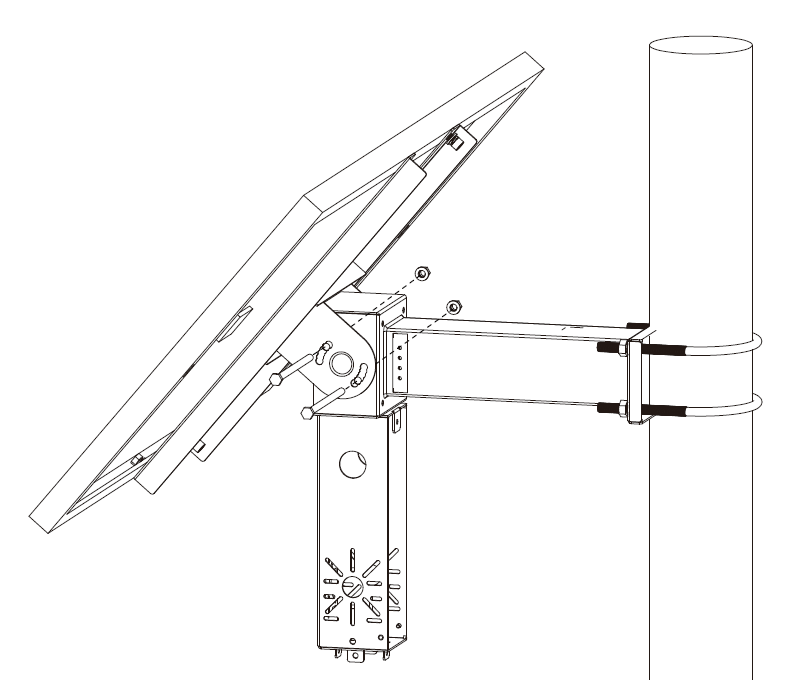
Step 1. First assemble the main bracket, then install it onto the pole using long screws and metal straps.
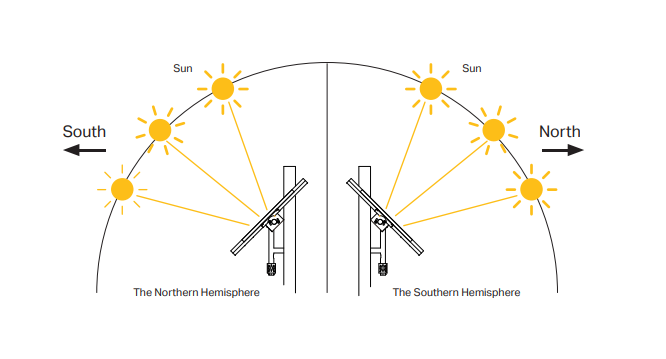
An orientation tip. When installing in the Northern Hemisphere, the solar panel should preferably face south. When installing in the Southern Hemisphere, the solar panel should preferably face north.
Note: The opposite direction of the recommendation will reduce the energy collection efficiency.
Please use an Inclinometer or Inclinometer app to confirm the installation orientation is correct.
Step 2. Install the solar panel onto the main bracket using long screws and adjust the tilt angle.
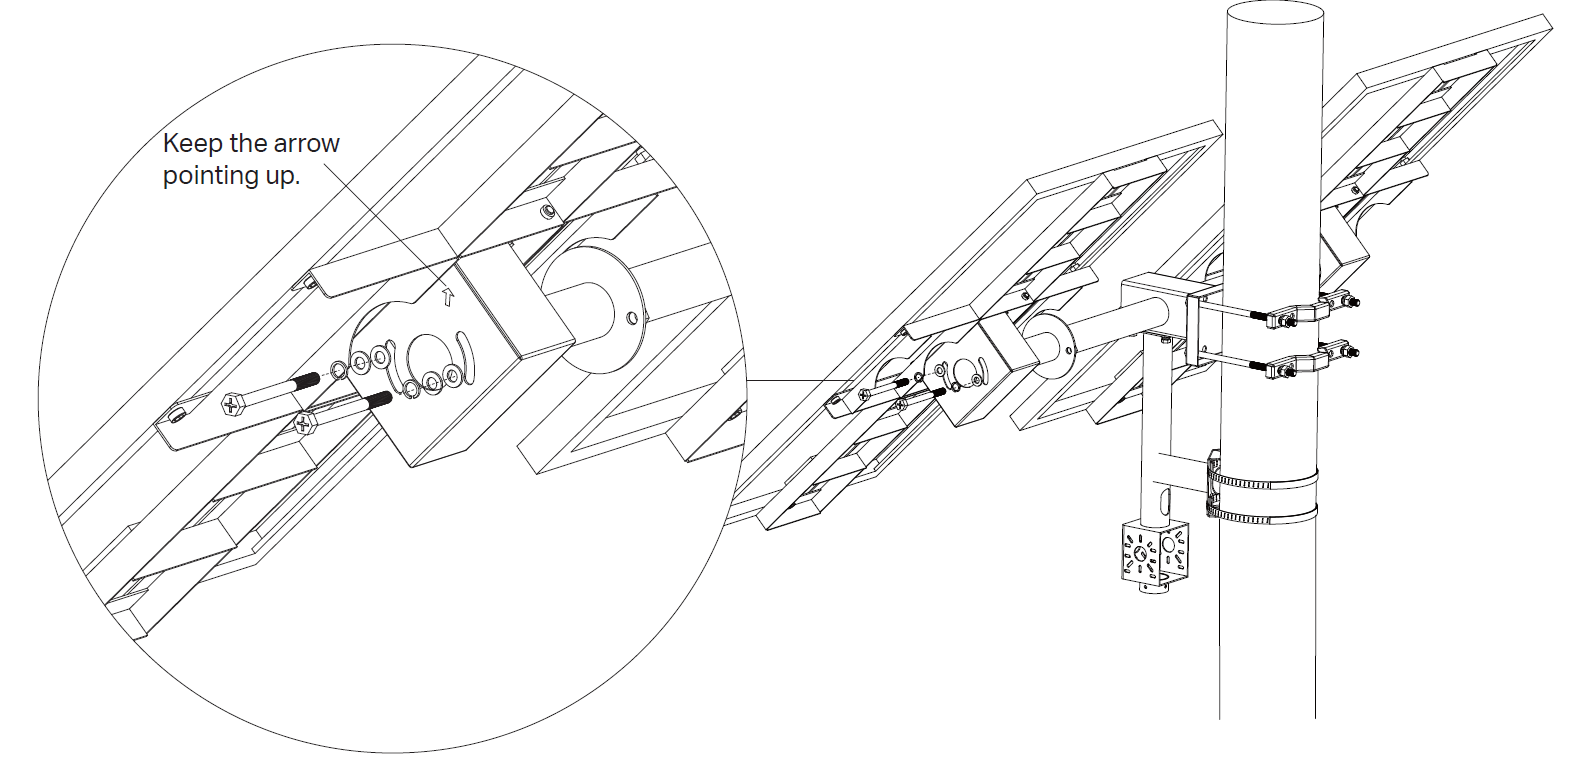
The tilt angle of a photovoltaic module refers to the angle between the module and the horizontal ground. Different countries and regions require different tilt angles based on local conditions. We recommend that the modules should not be installed flat. This helps rain wash away dust from the module surface, reducing cleaning frequency. It also helps drain accumulated water and prevents marks left by long-term accumulation of water. Use a Inclinometer or an Inclinometer app to confirm the correct installation angle.
Recommended installation tilt angles for various latitudes are as follows:
|
Latitude Range |
Recommended Inclination |
|
0-5° |
5° |
|
5-15° |
15° |
|
15-25° |
25° |
|
25-35° |
35° |
|
35-45° |
45° |
|
>45° |
55° |
Here is a Cheat Sheet for main cities over the world:
|
City |
Latitude |
Recommended angle |
|
Singapore |
1°N |
5° |
|
Seoul |
37°N |
45° |
|
Bangkok |
13°N |
15° |
|
Mexico City |
19°N |
25° |
|
Mumbai |
19°N |
25° |
|
Cairo |
30°N |
35° |
|
Tokyo |
35°N |
35° |
|
Beijing |
40°N |
45° |
|
Rome |
42°N |
45° |
|
Paris |
49°N |
55° |
|
London |
51°N |
55° |
|
Toronto |
44°N |
45° |
|
Moscow |
55°N |
55° |
|
Dubai |
25°N |
35° |
|
Helsinki |
60°N |
55° |
|
New York |
40°N |
45° |
|
Houston |
30°N |
35° |
|
Denver |
40°N |
45° |
|
Boston |
42°N |
45° |
|
Los Angeles |
34°N |
35° |
|
Sydney |
34°S |
35° |
|
Melbourne |
38°S |
45° |
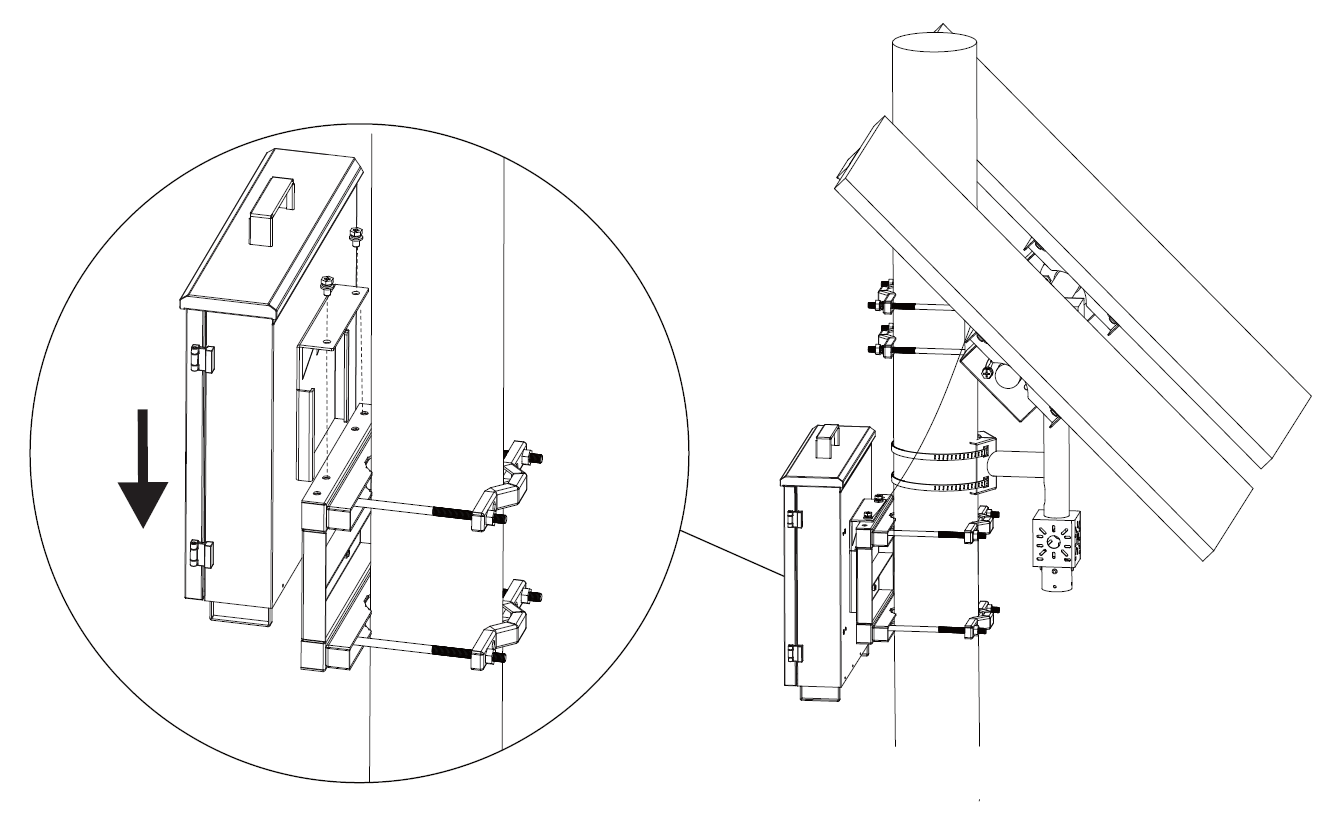
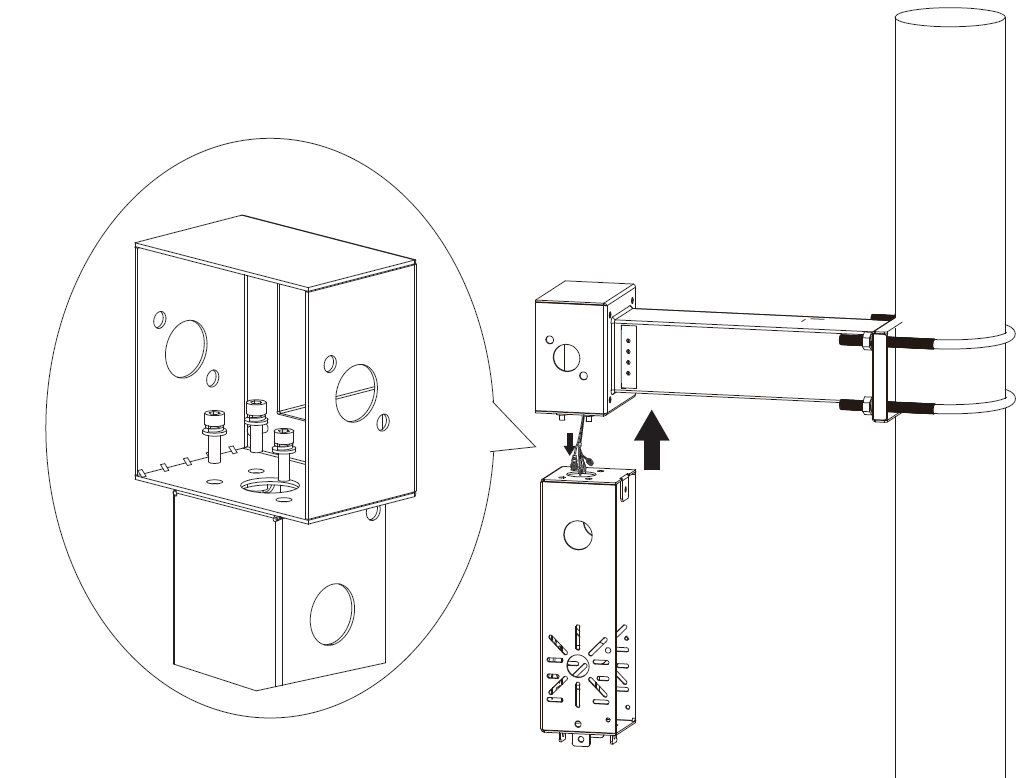
Step 3. First install the waterproof box bracket onto the pole using long screws, then mount the waterproof box onto the bracket.
Step 4. Install the load device(s). Mount the camera to the IPC bracket. Install devices like wireless bridges onto the pole or other suitable locations.
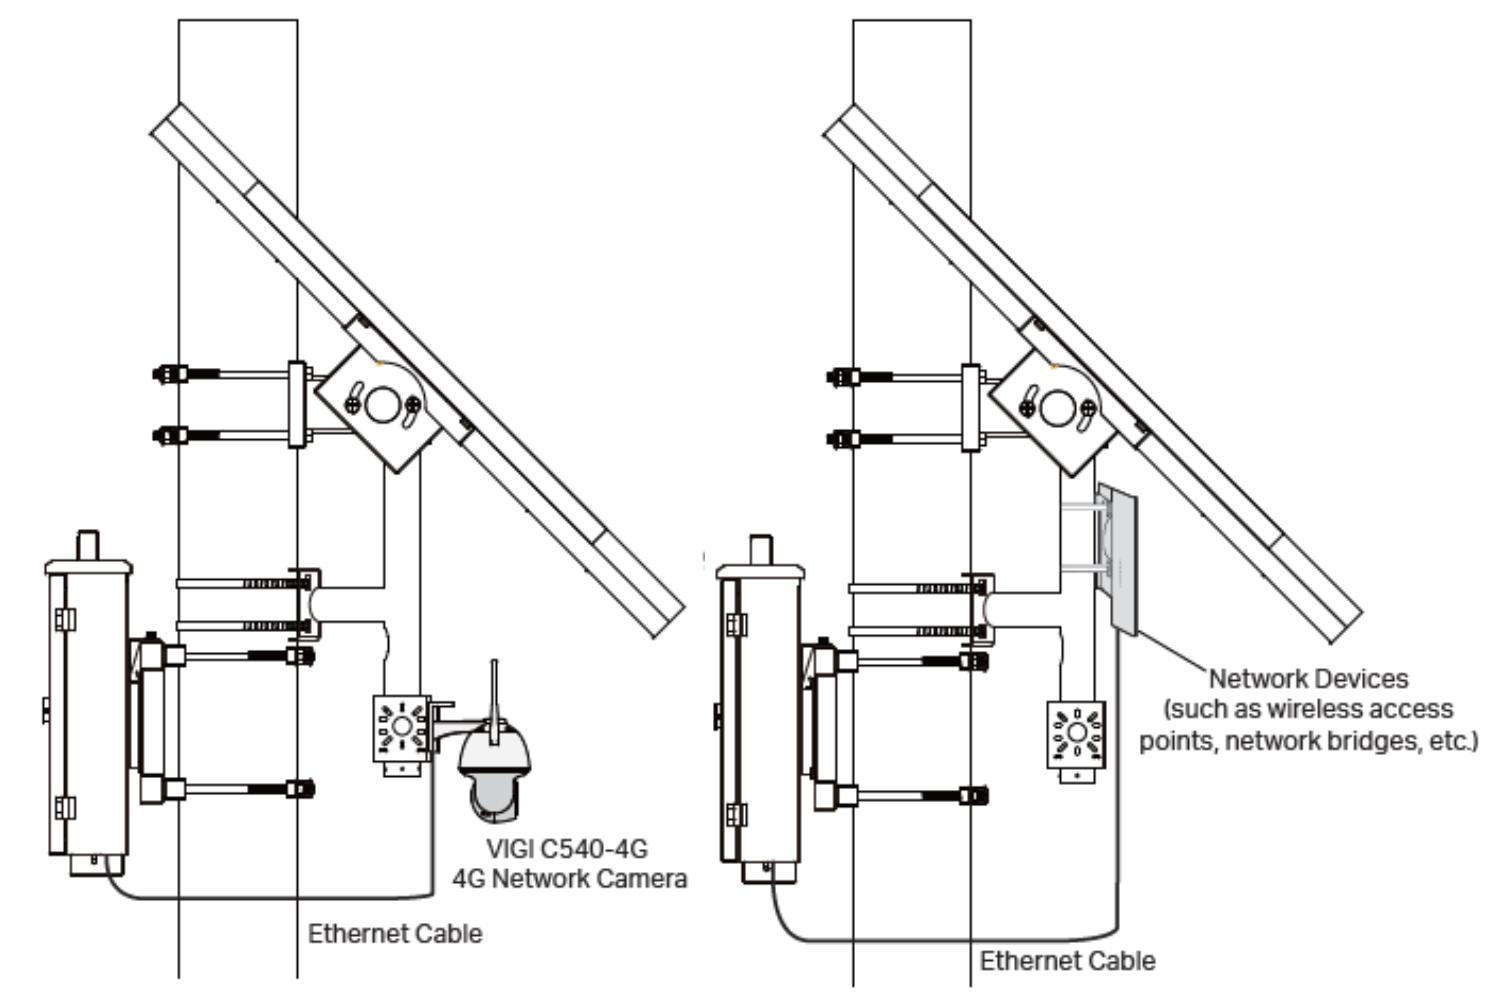
Step 5. Connect all interfaces and confirm the system is working normally. After installation is complete, promptly confirm the device operation status via VIGI APP, VIGI VMS or other VIGI software, and verify the correspondence between the load interface and the load device(s).
Note:
- Keep all interfaces dry and clean to ensure they are in good working condition.
- Strict waterproofing measures must be applied to all interfaces, e.g., using the provided waterproof silicone sleeves or waterproof tape, to avoid short circuits and leakage.
Configuration for Single Panel Model
Step 1. Install the main bracket onto the pole using U-bolts, then install the IPC mounting bracket.
An orientation tip. When installing in the Northern Hemisphere, the solar panel should preferably face south. When installing in the Southern Hemisphere, the solar panel should preferably face north.
Note:
The opposite direction of the recommendation will reduce the energy collection efficiency.
Please use an Inclinometer or Inclinometer app to confirm the installation orientation is correct.

Step 2. Install the solar panel component onto the main bracket using long screws and adjust the tilt angle.
The tilt angle of a photovoltaic module refers to the angle between the module and the horizontal ground. Different countries and regions require different tilt angles based on local conditions. We recommend that the modules should not be installed flat. This helps rain wash away dust from the module surface, reducing cleaning frequency. It also helps drain accumulated water and prevents marks left by long-term accumulation of water. Use a Inclinometer or an Inclinometer app to confirm the correct installation angle.
Recommended installation tilt angles for various latitudes are as follows:
|
Latitude Range |
Recommended Inclination |
|
0-5° |
5° |
|
5-15° |
15° |
|
15-25° |
25° |
|
25-35° |
35° |
|
35-45° |
45° |
|
>45° |
55° |
Step 3. Install the load device(s). Mount the camera to the IPC bracket. Install devices like wireless bridges onto the pole or other suitable locations.
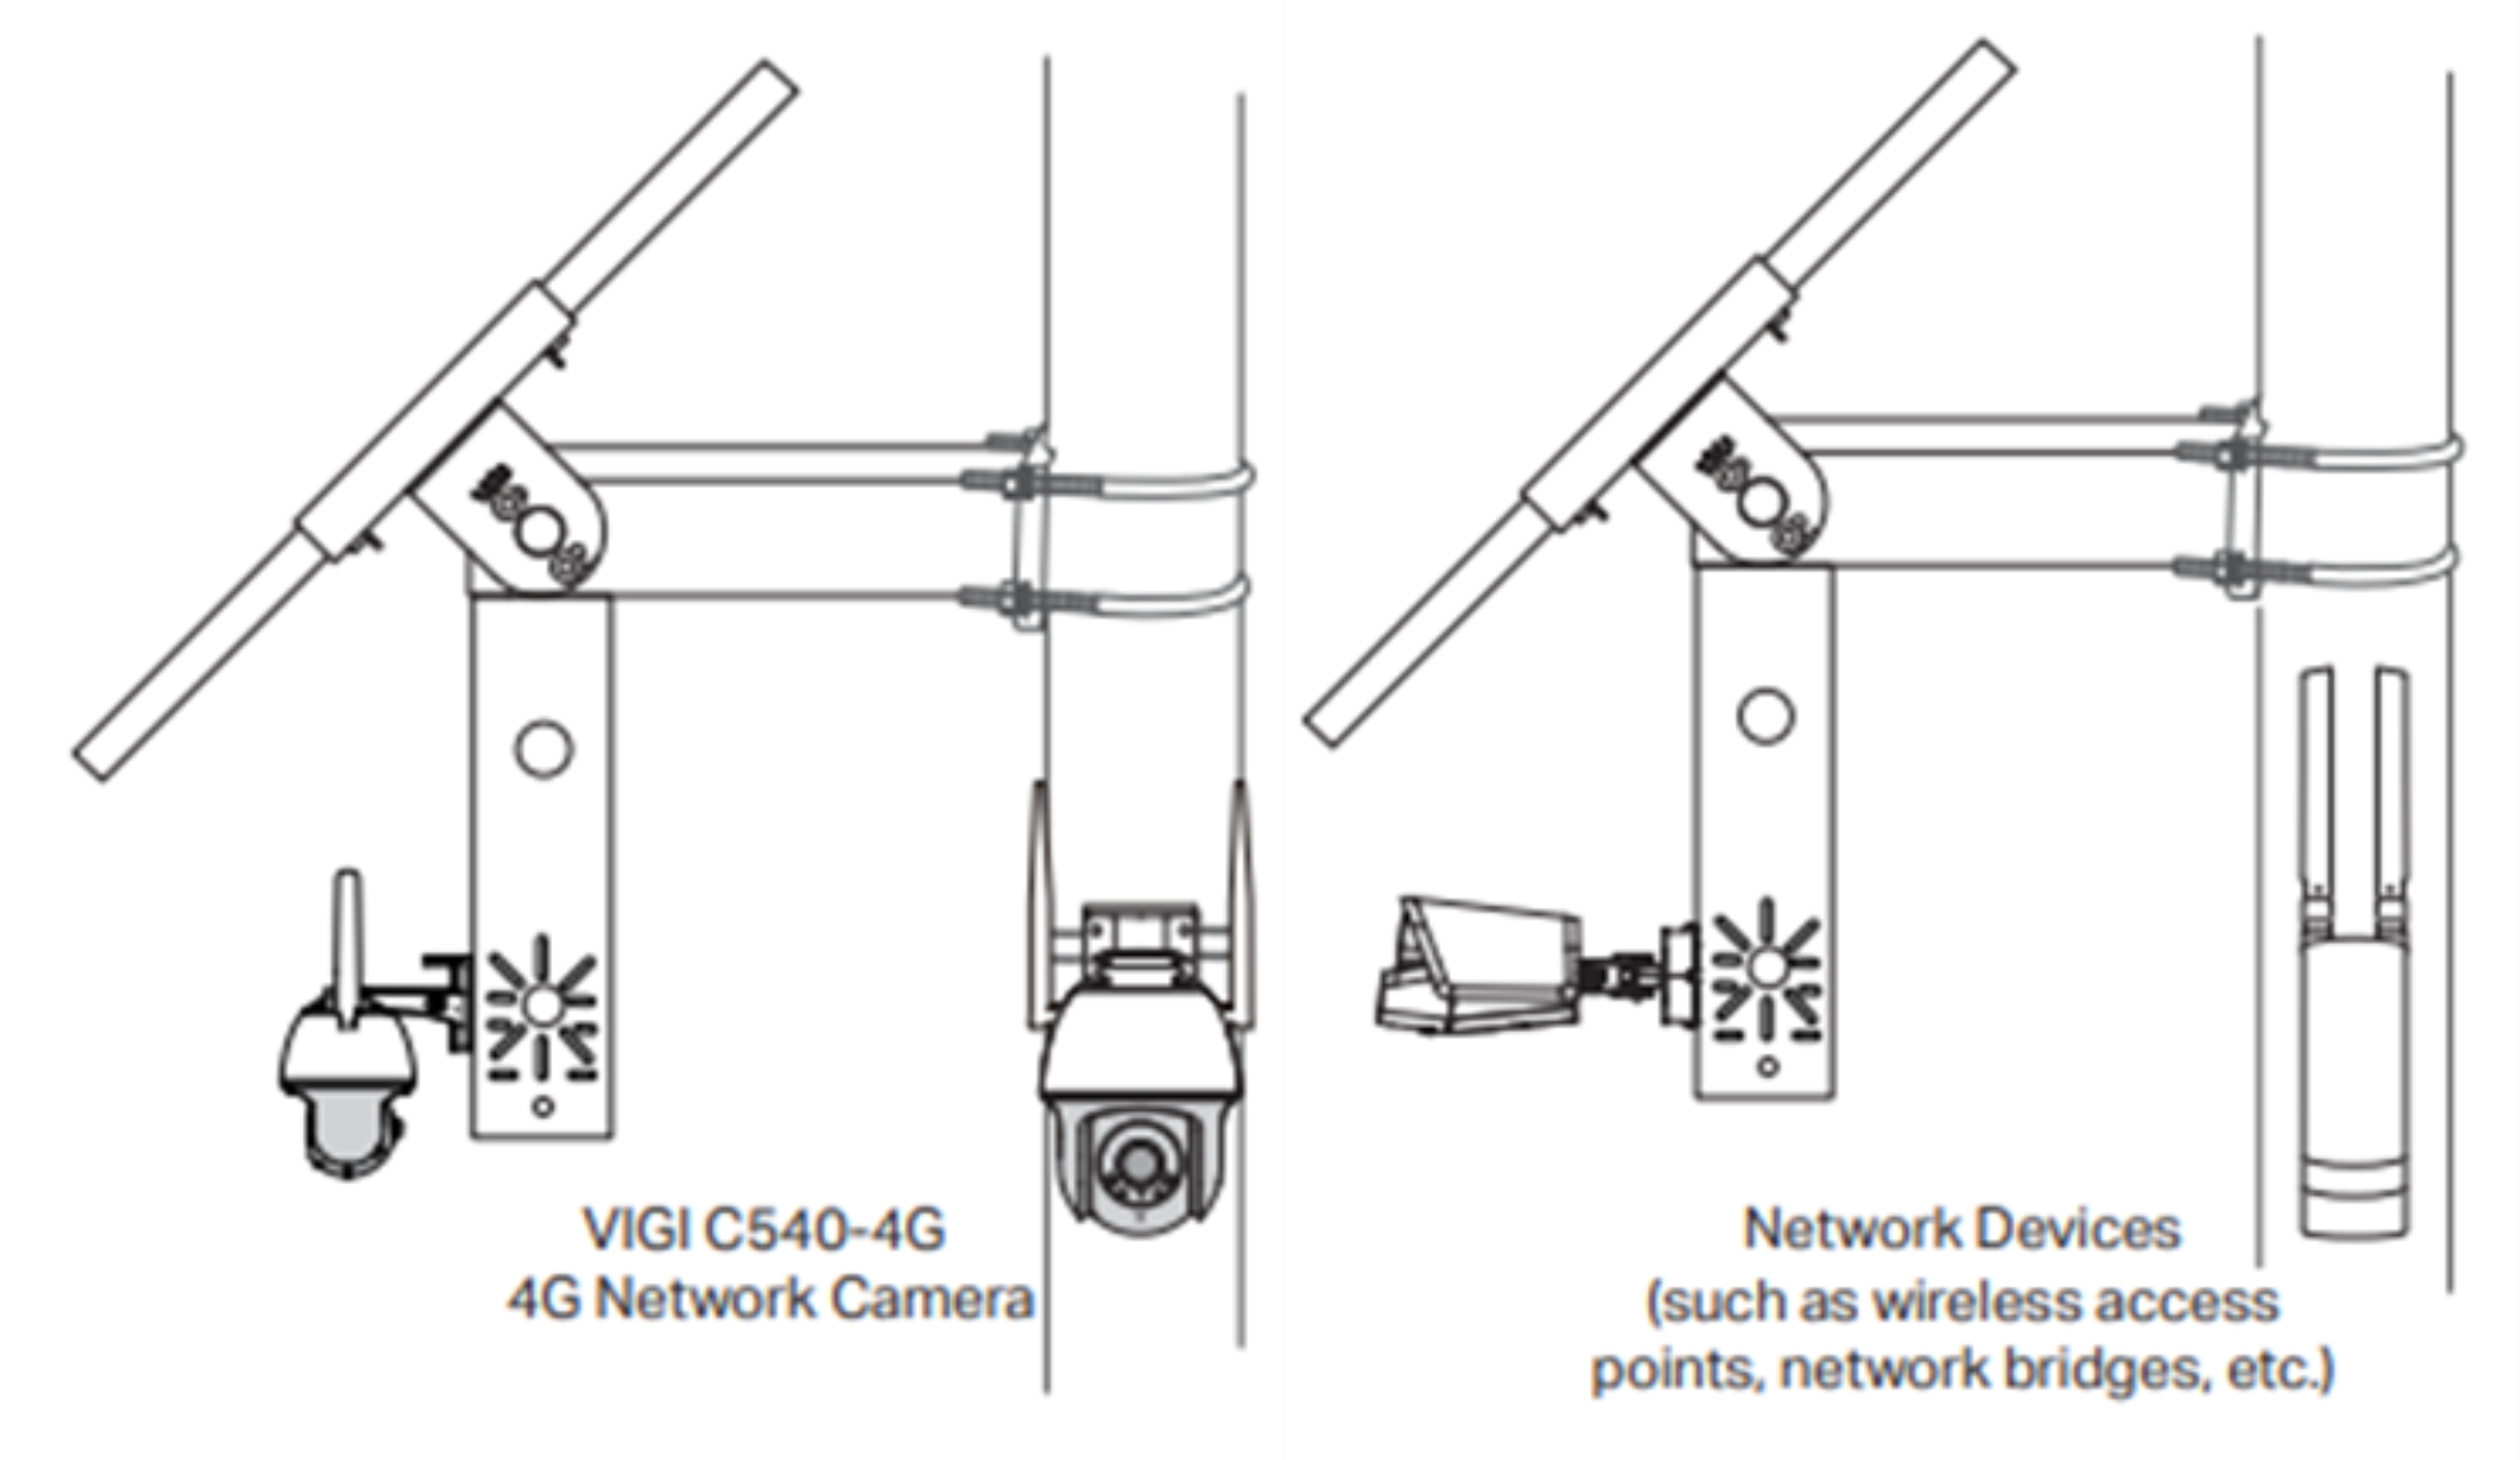
Step 4. Connect all interfaces and confirm the system is working normally. After installation is complete, promptly confirm the device operation status via VIGI APP, VIGI VMS or other VIGI software, and verify the correspondence between the load interface and the load device(s).
Note:
- Keep all interfaces dry and clean to ensure they are in good working condition.
- Strict waterproofing measures must be applied to all interfaces, e.g., using the provided waterproof silicone sleeves or waterproof tape, to avoid short circuits and leakage.
Conclusion
With the steps above, you can install your VIGI Solar Panel system and make it work properly.
Get to know more details of each function and configuration please go to Download Center to download the manual of your product.
QA
Q1: How can I improve solar charging efficiency?
A1:
-
Install the panel at the correct angle facing the sun.
-
Keep the panel unobstructed by buildings, trees, or shadows.
-
Regularly clean off dust, dirt, and debris to avoid efficiency loss.
-
Ensure the panel lies flat on a stable surface to prevent scratches or cracks.
Q2: Why is full sunlight exposure so important?
A2: Even a small shaded area drastically reduces energy harvesting efficiency, leading to lower charging power and shorter battery life.
Q3: How can I prevent water-related or connection issues with the solar panel?
A3: Apply strict waterproofing measures to all interfaces and connectors to avoid short circuits, leakage, or power loss caused by rain or moisture.
Q4: What precautions should I take when installing the main bracket or waterproof box?
A4: Both components are heavy (some brackets even contain batteries). Handle with care during transportation and installation. Dropping or striking them is strictly prohibited.
Q5: Why is waterproofing important for the box and bracket?
A5: Proper waterproofing prevents moisture from entering, which could cause wiring failures, battery malfunctions, or system breakdowns.
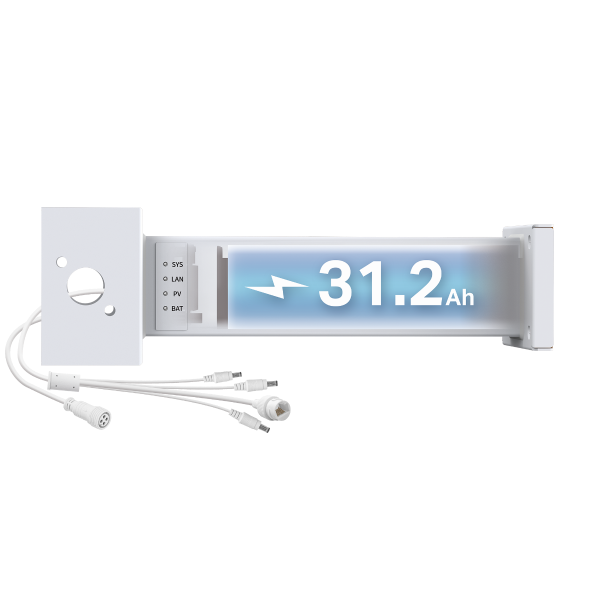
Q6: What do different indicator lights on the controller mean when they are off?
A6:
-
SYS light off: Solar component or battery abnormal/not connected, or no power input.
-
LAN light off: No network connection.
-
PV light off: PV panel not connected or abnormal, unable to generate power.
-
BAT light off: Battery not connected or abnormal.
Q7: Why is the system runtime short or the camera monitoring time insufficient?
A7: Possible causes and solutions:
-
Insufficient battery power – Check all battery connections and confirm batteries are functional.
-
Solar panel disconnected – Ensure the panel is properly connected to the device.
-
Solar panel obstructed or dirty – Remove shadows, dust, or debris from the panel.
-
Improper system selection – Confirm total device power consumption; disable high-power functions or upgrade to a higher-spec solar system.
Q8: Why is the camera offline, or why can’t the bridge/AP access the internet?
A8: Possible causes and solutions:
-
Insufficient power supply – Check all battery, solar panel, and network connections. Confirm battery level.
-
SIM card issue – Ensure the SIM card is correctly inserted (not reversed), check 4G signal strength, and confirm the card has sufficient credit/balance.
-
Bridge/AP obstruction – Check bridge transmission quality and remove any obstacles affecting the signal.
Is this faq useful?
Your feedback helps improve this site.
TP-Link Community
Still need help? Search for answers, ask questions, and get help from TP-Link experts and other users around the world.