How to Implement Network Segmentation: 7 Steps
Learning how to implement network segmentation means working through seven steps in order: inventory every device on the network, group devices by risk and function, assign each group a VLAN ID and subnet, create the VLANs, map switch ports and SSIDs to them, write the rules that control traffic between segments, and test every boundary before relying on it.
Creating VLANs is the simple half. Most segmentation projects fall short because they never define the rules governing traffic between segments, leaving a network that is organized but no more secure. This guide covers the full procedure, with the decisions that make the boundaries hold. If you need the fundamentals first, start with what network segmentation is and how it works.
Key Takeaways
- Network segmentation follows seven steps: inventory devices, group them by risk and function, plan VLAN IDs and subnets, create the VLANs, assign ports and SSIDs, write inter-segment traffic rules, and test every boundary.
- Group devices by what they need to reach and the impact if they were compromised, and create a segment only when its devices share both a trust level and a traffic pattern.
- VLANs separate broadcast domains but do not block traffic between them, so devices in different VLANs can still communicate until explicit access rules are in place.
- A default-deny policy between segments, with only the required flows permitted, closes gaps that a permit-first approach leaves open.
- Testing each boundary from a device inside the segment confirms that blocked traffic fails and permitted traffic still works before the network relies on it.
What You Need Before You Start
Segmentation depends on four capabilities across your switches, gateway, controller, and access points. Confirm each is in place before you start planning segments.
- Managed switches with 802.1Q support. Managed switches assign VLANs, handle tagged and untagged traffic, and control port membership using the IEEE 802.1Q standard. Unmanaged switches cannot do this, though one can carry a single untagged VLAN from an access port.
- A gateway that filters traffic between local networks. Look for LAN-to-LAN ACL (access control list) capability. Without inter-VLAN rules, segmentation is just tidier addressing.
- A controller, if more than one site is involved. A controller lets you write the plan once and apply it everywhere instead of configuring each site by hand.
- Access points that map SSIDs to VLANs. Without this, the wireless half of the network, which is most of the devices in many businesses, cannot be segmented.
The three common types of network segmentation are VLAN-based, subnet-based, and firewall-based. This guide covers VLAN network segmentation, because managed switches and a gateway support it natively. The full taxonomy is in the overview linked above.
Step 1: Inventory What Is Actually on the Network
Start with a complete device inventory. A network cannot be segmented accurately until every connected device is accounted for, and most inventories reveal more devices than expected. Any guide to how to segment a network starts here.
For each device, record:
- What it is and who or what uses it
- What it needs to reach, internally and on the Internet
- Whether it stores or handles sensitive data
- Whether it can be updated
That last field is important. A device that cannot be patched should be isolated behind a segment boundary.
The controller's client list is a starting point, not a complete record. It shows only devices connected at that moment, so intermittent and rarely used equipment is easy to miss. Supplement it with a physical walkthrough, a week of switch port activity, and input from department leads.
This step produces a device list with a proposed segment for each entry, which every later step depends on.
Step 2: Group Devices by Risk and Function
Group devices by what they need to reach and the impact if they were compromised, not by department. This is the foundation of any network segmentation strategy.
For each device, determine what it legitimately needs to communicate with and what an attacker could do with it. Create a segment only when its devices share both a trust level and a traffic pattern, since additional divisions add rules without reducing risk.
These network segmentation examples fit a typical small multi-site business:
| Segment | Typical devices | Why it is separate |
|---|---|---|
| Staff | Laptops, desktops, file access | Needs broad internal access, so other segments are defended against it |
| Guest Wi-Fi | Visitor and personal devices | Unmanaged and untrusted, Internet only |
| VoIP | Desk phones | Latency-sensitive, benefits from isolation and Quality of Service (QoS) |
| Payments / POS | Terminals, payment controllers | Compliance scope, kept as small as possible |
| Cameras and IoT | IP cameras, sensors, smart devices | Often unpatchable, should never initiate connections |
| Management | Switch, gateway, AP, and controller interfaces | Compromise here compromises everything |
The management segment is one of the most frequently overlooked yet the most critical. When switch and access point admin interfaces share the staff VLAN, a single compromised laptop can reach the infrastructure responsible for enforcing every other boundary.
At the same time, avoid over-segmentation. Each additional segment introduces rules that require ongoing maintenance, and overly complex designs are often flattened during troubleshooting when the cause of a problem can't be traced quickly.
Personal devices sit between staff and guests and need their own decision. Some businesses treat them as guests, while others create a restricted segment with limited internal access.
Step 3: Assign VLAN IDs and Plan Your Addressing
Assign each segment a VLAN ID, a dedicated subnet, and a separate DHCP scope, and document all three before making any configuration changes. This addressing plan is what turns a list of segments into working VLAN network segmentation.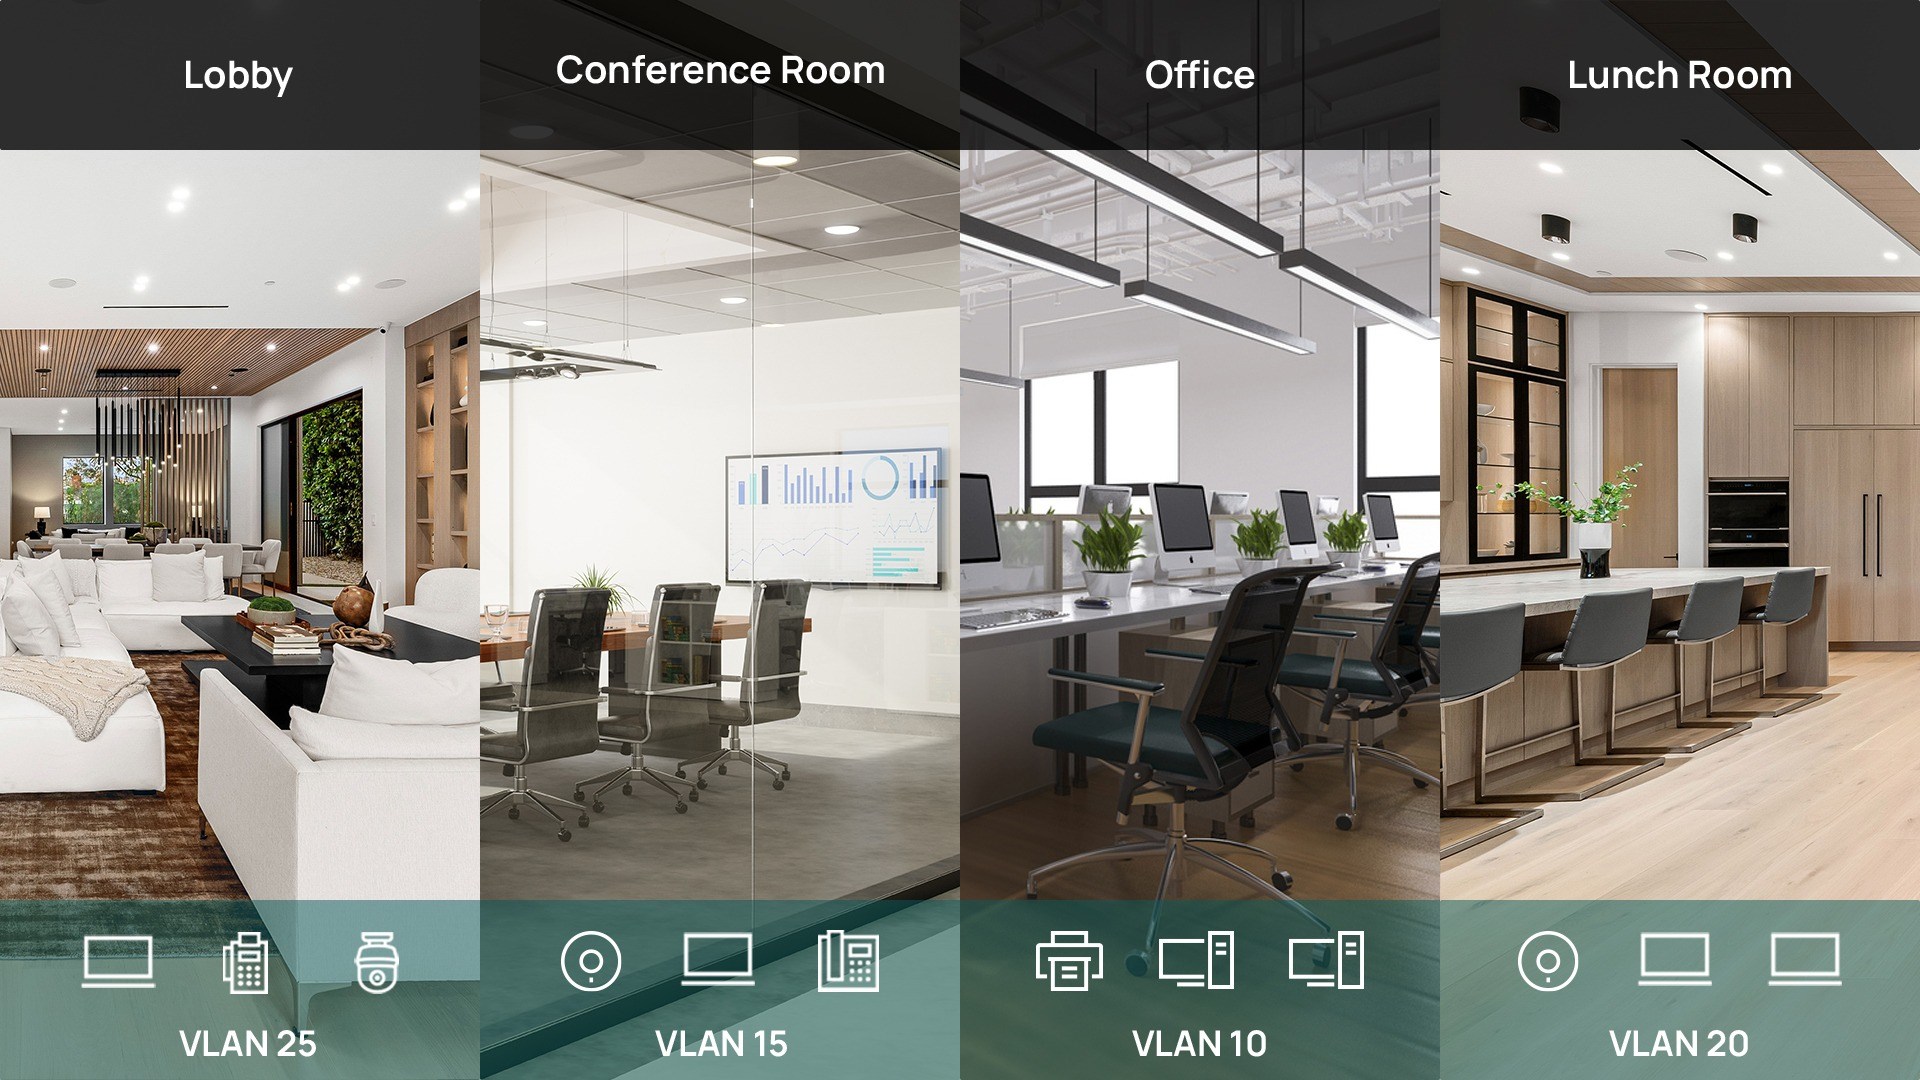
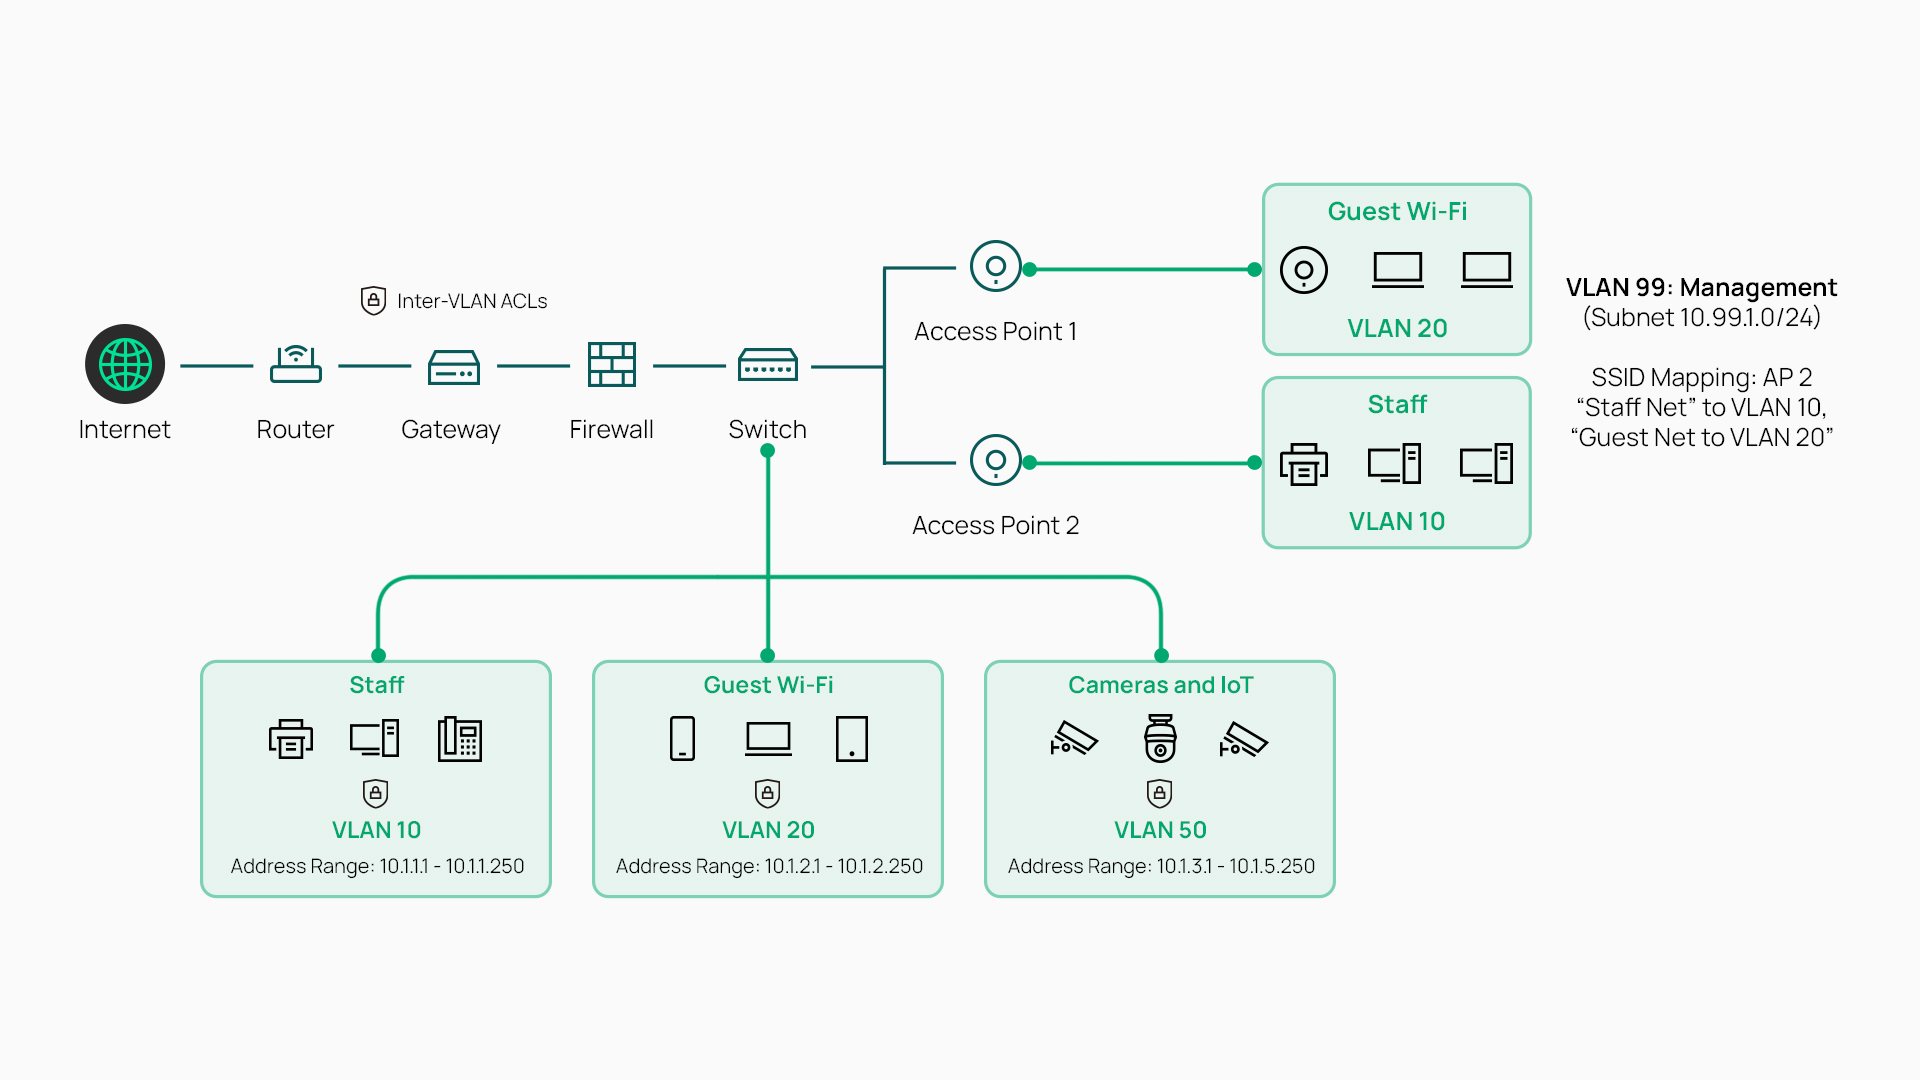
- VLAN numbering: Use a readable scheme with gaps, because renumbering a live VLAN is disruptive. Keep user traffic off VLAN 1. It is the default VLAN on most switches, so unconfigured ports and newly connected devices land there, and anything sharing it shares their exposure.
- Subnet sizing: Size for growth without waste. Align the third octet with the VLAN ID where possible, such as VLAN 20 on 192.168.20.0/24, because it makes every future troubleshooting session faster.
- One DHCP scope per VLAN: Without a DHCP scope, devices joining a VLAN cannot obtain an IP address. It is the most common reason a new segment looks broken right after creation.
| VLAN ID | Name | Subnet | Gateway | DHCP range | Wireless SSID |
|---|---|---|---|---|---|
| 10 | Staff | 192.168.10.0/24 | .1 | .100 to .200 | Staff SSID |
| 20 | Guest | 192.168.20.0/24 | .1 | .100 to .240 | Guest SSID |
| 30 | VoIP | 192.168.30.0/24 | .1 | .50 to .150 | None |
| 40 | Payments | 192.168.40.0/24 | .1 | Reservations only | None |
| 50 | Cameras / IoT | 192.168.50.0/24 | .1 | Reservations only | IoT SSID |
| 99 | Management | 192.168.99.0/24 | .1 | Reservations only | None |
The bottom three rows use DHCP reservations instead of a pool. Infrastructure and fixed-function devices should have predictable addresses, and reservations deliver that without configuring each device by hand.
Step 4: Create the VLANs
Turn each row of the plan into a VLAN interface with a name, ID, subnet, and DHCP server. In the Omada controller, go to Network Config > Network Settings > LAN, click Add, and enter the Name, VLAN ID, Subnet, and DHCP Server Device from your plan. Omada's guide to configuring VLANs shows each screen.
The DHCP Server Device setting determines which device assigns addresses for the VLAN. In most single-site deployments, the gateway fills this role. When inter-VLAN routing takes place on a switch, a switch with DHCP server support can handle addressing instead, although traffic routed at the switch is not filtered by gateway rules (see Step 6). Select External Devices when an existing DHCP server already manages addressing, or None for networks that use only static IP addresses.
Next, select the ports that belong to the VLAN. Ports serving end devices become access ports carrying one untagged VLAN. Any switch port you leave unselected becomes a trunk port carrying every VLAN. That is convenient for uplinks to switches and access points but risky for ports where end devices plug in, so assign every client-facing port deliberately.
Repeat this for each segment. With a controller, multi-site deployments do not require re-entering the plan at every location.
Step 5: Put Devices Into Their Segments
Assign each device to its planned segment, since a VLAN provides no protection until devices are placed in it. Wired devices join a segment through their switch port, and wireless devices join through their SSID.
Wired: Access Ports and Trunk Ports
Assign each access port the VLAN of whatever is plugged into it. On Omada switches, you can adjust port settings such as PVID and tagged or untagged membership from each switch's device details page.
Two failures cause most wired problems. An access port left on the default network drops its device into the wrong segment without warning. The symptom is a device with an address from the default subnet instead of its planned one.
The second failure is a trunk link between switches that is missing a VLAN, so a segment works in one part of the building and fails in another. The symptom is devices on the far switch getting no address at all.
Wireless: Mapping SSIDs to VLANs
Map each SSID to one VLAN. This mapping places guest traffic in its own broadcast domain. Without it, a guest SSID is only a separate password on the same network. In the Omada controller, create or edit SSIDs under Site > Network Config > WLAN, then assign each one to its VLAN in the wireless network settings.
Wireless mapping is frequently overlooked. A network can have every VLAN configured correctly on the wired side while every wireless device still shares a single flat segment. Create separate SSIDs for staff, guest, and IoT devices, and verify that each access point's uplink port carries every VLAN mapped to it.
Step 6: Write the Rules for Traffic Between Segments
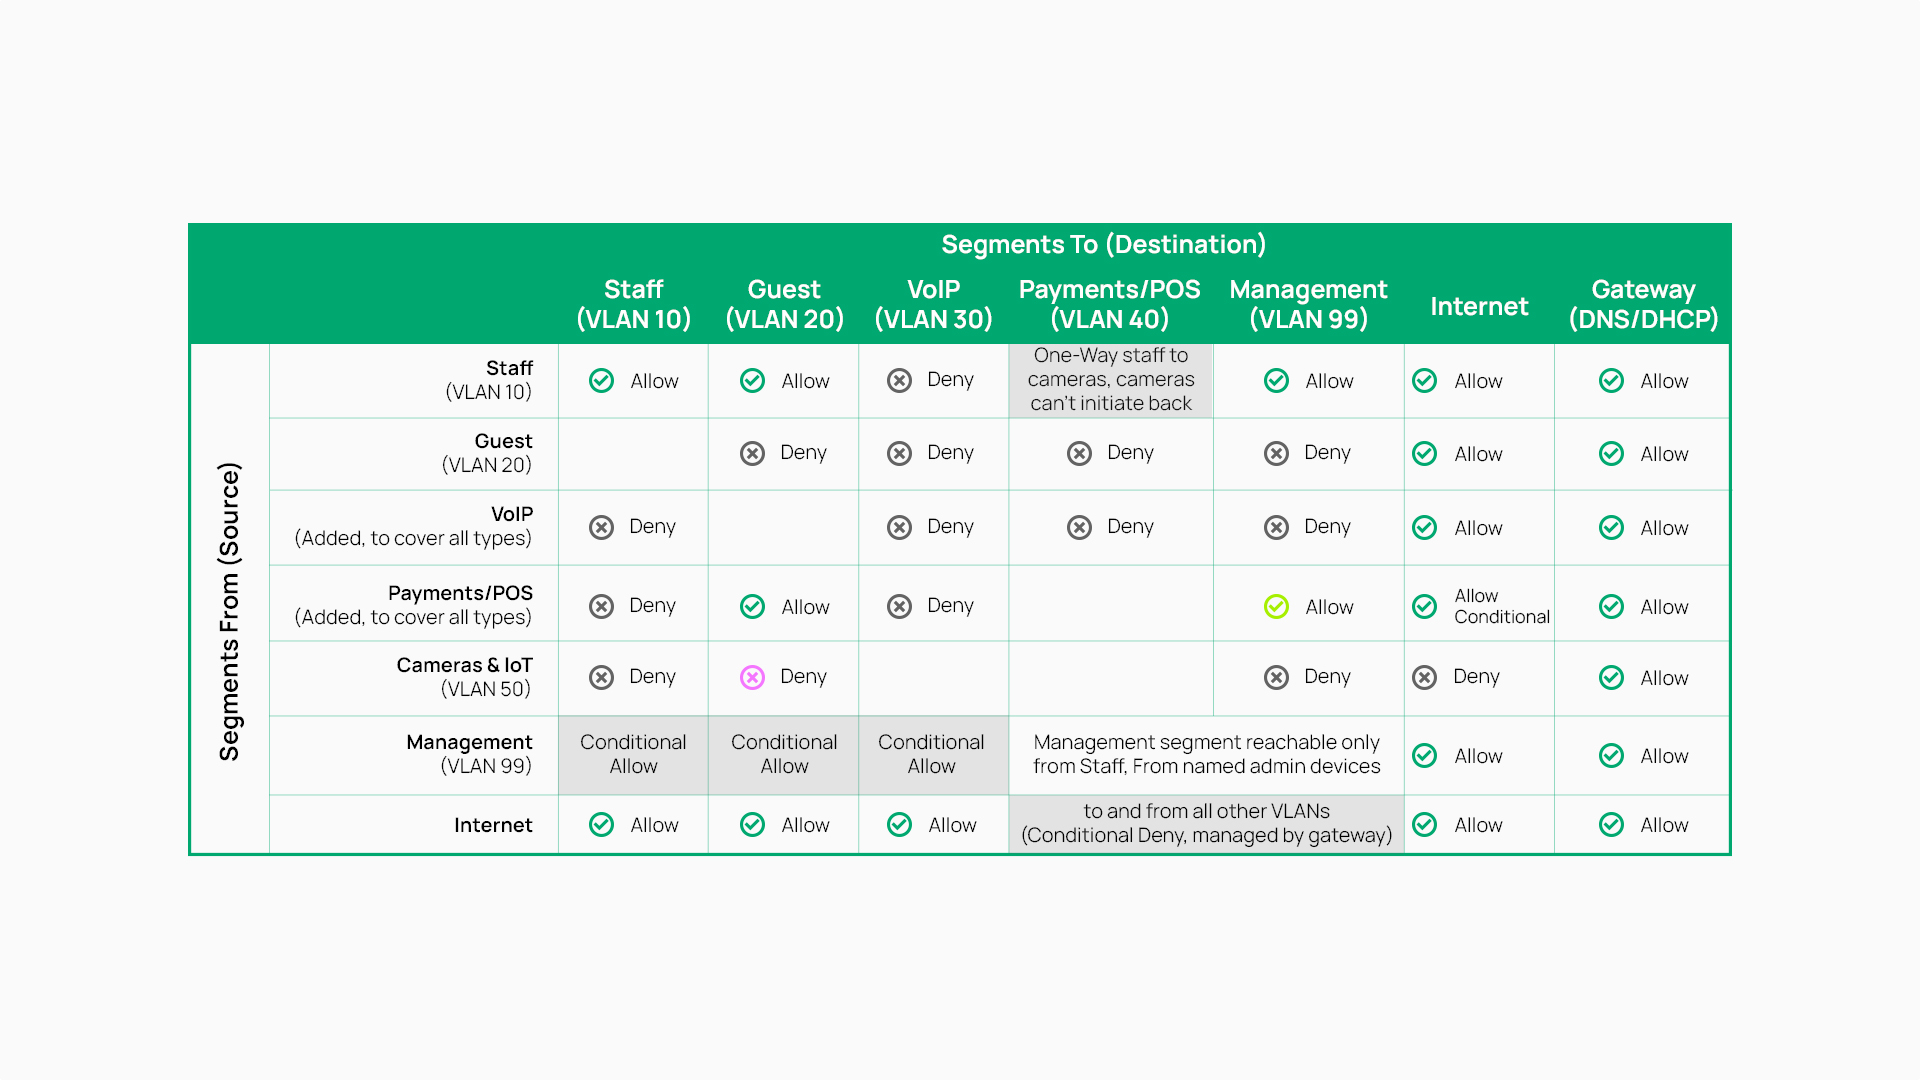
Write explicit rules for every flow between segments, because VLANs separate broadcast domains but do not stop traffic between them. Devices in different VLANs can still reach each other through the gateway unless a rule says otherwise. Until the rules exist, the network is organized, not segmented.
| From / To | Staff | Guest | VoIP | Payments | Cameras / IoT | Management | Internet |
|---|---|---|---|---|---|---|---|
| Staff | Same segment | Deny | Deny | Deny | One-way | Admin devices only | Allow |
| Guest | Deny | Same segment | Deny | Deny | Deny | Deny | Allow |
| VoIP | Deny | Deny | Same segment | Deny | Deny | Deny | Allow |
| Payments | Deny | Deny | Deny | Same segment | Deny | Deny | Allow |
| Cameras / IoT | Deny | Deny | Deny | Deny | Same segment | Deny | Deny |
| Management | Deny | Deny | Deny | Deny | Deny | Same segment | Allow |
Every segment is allowed to reach the gateway for DNS and DHCP. "One-way" means the row segment can open connections to the column segment, but not the reverse.
Start From Deny, Then Open What Is Needed
Block traffic between segments by default, then permit only the flows identified in Step 1. A permit-first policy leaves every unanticipated path open, and those gaps may be discovered only after they have been exploited.
Inter-VLAN Rules at the Gateway
Omada gateways are the primary enforcement point for internal network segmentation. In the controller, go to Network Config > Security > ACL, open Gateway ACL, and click Create New Rule. Each rule sets a Direction, Policy (Permit or Deny), Protocols, and a Source and Destination network or IP Group.
For example, to block the Cameras and IoT segment from initiating connections to Staff, set Direction to LAN-to-LAN, Policy to Deny, Protocols to All, Source to the IoT network, and Destination to the staff network.
One-Way Access, and Why It Matters
Staff need to reach the cameras, but the cameras never need to reach staff. An Omada LAN-to-LAN rule applies in one direction unless you enable Bi-Directional, which creates a mirrored reverse rule. Stateful matching keeps the permitted direction working by tracking each connection's state:
- New: the first packet of a connection, such as a TCP SYN.
- Established: a connection the gateway has seen traffic on in both directions.
- Related: a secondary connection spawned by an existing one, such as an FTP data channel.
The States Type field sets which states a rule matches, and Auto matches all three. To stop cameras from opening connections while letting replies to staff sessions return, the deny rule should match new connections only.
Port-Level Rules at the Switch
Gateway rules only see traffic that passes through the gateway. Traffic within a VLAN, or routed between VLANs by a Layer 3 switch, never reaches it, so use Switch ACLs or port isolation there. The gateway controls traffic between segments, and the switch controls traffic that should never leave the access layer.
Essential Rules for Network Services and Administrative Access
- DNS and DHCP. Every segment relies on the gateway for DNS and DHCP, so a broad deny rule that blocks these services will disrupt name resolution before any other symptom appears.
- Management access. Permit the management segment only from named admin devices, defined as an IP Group under Network Config > Profile > Groups.
- Discovery traffic. Printers and casting devices use discovery protocols that do not cross VLANs. Permit a specific flow or deliberately answer no.
Step 7: Test the Boundaries Before You Rely on Them
Confirm that what should be blocked is blocked, and that what should work still works. A segmentation plan is finished when it passes network segmentation testing, not when the rules are applied.
- From a device in each segment, confirm it gets an address in the right subnet. A wrong subnet points to a port or SSID mapping error, not a rule.
- Confirm Internet access and name resolution from each segment.
- Test every deny in the matrix from the source side and confirm it fails.
- Test every permit from the source side and confirm it succeeds.
- Test one-way rules in both directions. That is the only way to confirm stateful behavior is doing what you expect.
- Confirm management interfaces are reachable from admin devices and from nowhere else.
Run each test from a device inside the segment being tested, since an admin laptop with broader access will produce misleading results.
Keep the plan table, traffic matrix, and test results together. This record makes future changes safer and simplifies compliance audits.
Maintaining Network Segmentation as Your Business Grows
With segments built, rules enforced, and boundaries tested, the remaining work is maintaining that structure as the network changes. Applying network segmentation best practices as new devices arrive, staff change roles, and sites come online prevents devices from landing in the wrong segment and keeps temporary rules from becoming permanent.
Frequently Asked Questions
Do I need a managed switch to segment a network?
Yes, for VLAN-based segmentation. Managed switches assign VLANs, handle tagged and untagged traffic, and control which devices belong to each segment. An unmanaged switch may carry traffic from a single untagged VLAN, but it cannot configure or enforce VLAN membership.
How many VLANs should a small business have?
Usually four to six: staff, guest, voice, IoT or cameras, and a management VLAN, plus payments if you process cards. Each extra segment means more rules to maintain, so add one only when a group of devices has both a distinct trust level and a distinct traffic pattern.
Is a guest Wi-Fi network the same as network segmentation?
No. A guest network is one segment, not a segmentation strategy. It isolates guest traffic only when the SSID sits in its own VLAN with rules blocking internal segments, or when the controller's guest network isolation is turned on. Everything else on the network still needs its own boundaries.
What is the difference between network segmentation and network segregation?
Most vendor material uses the terms interchangeably. Where a distinction is drawn, segmentation means dividing a network into zones with controlled paths between them. Segregation means keeping two environments entirely separate, with no permitted path at all.
Making Segmentation Work Across Every Site
Creating VLANs is only the first part of segmentation. The planning behind them and the rules that govern traffic between them are what turn a divided network into a secure one. For businesses operating across multiple locations, the remaining question is operational: whether each site is configured individually or the policy is defined once and applied consistently everywhere. Centralized management supports the second approach, keeping segment boundaries aligned across every site as the network grows.